Process multiple journal entries
Related information
Journal entries are core transactions in a financial system. Working with these entries one-by-one makes sense in many circumstances, but you can also post, duplicate, or reverse a group of entries. You can process multiple journal entries within the same journal, or across journals, or even across books.
Bulk updates can be used to process multiple transactions, including:
- Post
- Duplicate (same or different book)
- Reverse
- Delete
- Attach
Mass updates
Mass update is simply processing multiple selected transactions at once. Select as many journal entries as needed and process them in a single step.
These updates work for transactions in the same journal. The processes for duplicating and reversing entries adhere to the posting approval rules associated with the journal into which the entries are recorded.
| Subscription |
General Ledger Projects (for revenue recognition of projects) |
|---|---|
| Regional availability |
All regions |
| User type | Business user with admin privileges |
| Permissions |
Journal entries: List, View, Edit, Add, Delete, Reverse |
Top level and entity restrictions
You can perform a bulk update only at the same entity level where the entries were created.
-
If you're working at the top level, you cannot perform bulk updates on journal entries created at the entity level.
-
If you're working at the entity level, you cannot perform bulk updates on journal entries created at the top level.
Post multiple journal entries
When you post journal transactions, the entire transaction must be balanced and all required information must be entered. Posting multiple transactions simultaneously is used primarily for transactions that have been left in the Draft state.
Because you're selecting transactions within the same journal, the selections will be posted to that journal.
To post or submit multiple entries:
- Go to General Ledger > All > Journal entries.
- Find the applicable journal in the list and select View transactions.
-
Select the checkbox for each draft transaction to post or submit for approval.
To select all, select the checkbox at the top of the column.
-
Select Post or Submit at the top of the page.
- Select OK.
- On the Post/Submit dialog box, information about your bulk action is displayed. Select Continue.
Duplicate multiple entries
The ability to duplicate multiple entries into a journal associated with the same or a different book enables faster processing and testing options.
Because these changes are made all together, select entries whose changes you're making to the same book and journal.
To duplicate multiple entries to another journal:
- Go to General Ledger > All > Journal entries.
- Find the applicable journal in the list and select View transactions.
-
Select the checkbox for each transaction to duplicate.
To select all, select the checkbox at the top of the column.
- Select Duplicate at the top of the page.
- Select OK.
- On the Duplicate To dialog box:
- Select the book and journal into which the entries will be duplicated.
- Optionally, enter different dates.
- Select Continue.
Duplicate entries to a different book
You can duplicate entries into a journal associated with a different book. Doing this lets you review the entry impact before recording the transaction to your main books.
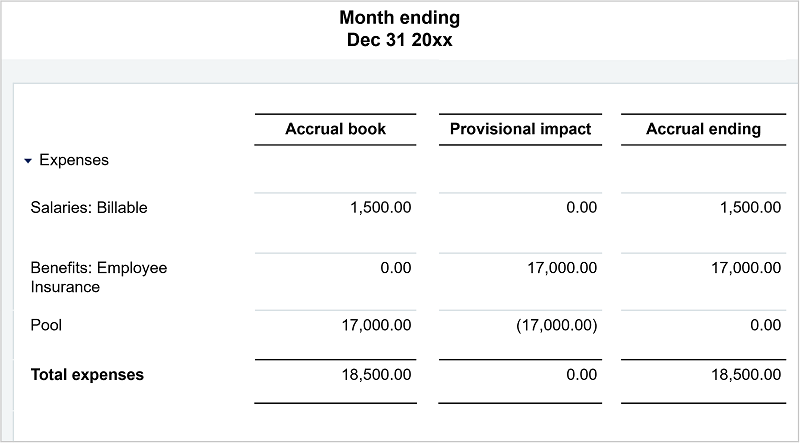
For example, to see the impact an entry will have, create a user-defined book named “Provisional” and record the transaction to that book. Then review the impact from a financial statement. If the change is acceptable, move (duplicate) the entry to your main book (usually accrual) and reverse it from the Provisional book.
Reverse multiple entries
Use the mass update feature to reverse multiple entries at once. For reversals, you can use the original date (as long as it's in an open period) or enter a new one. Only posted journal entries can be reversed.
- Go to General Ledger > All > Journal entries.
- Find the applicable journal in the list and select View transactions.
-
Select the checkbox for each transaction to reverse.
To select all, select the checkbox at the top of the column.
- Select Reverse at the top of the page.
- Select OK.
- Optionally, on the Reverse Entry Parameters dialog box, enter different dates.
- Select Continue.
Add an attachment to multiple journal entries
This section describes how to add an attachment to multiple journal entries. For more detailed information on adding attachments in general, including within a record, go to Attachment overview.
When you add an attachment to multiple journal entries simultaneously, the attachment shares the same ID across those entries. In this case, any changes to the attachment affect all journal entries using the same attachment ID.
To add the same attachment to multiple journal entries simultaneously:
-
Go to General Ledger > All > Journal entries.
Alternately, you can select a different type of entry, such as Adjusting or User-defined.
- Select View transactions.Only journal entries that are posted directly to General Ledger can use this attachment feature. An error message appears if you try to add an attachment to a journal entry that was posted through a subledger.
- Select the journal entries to be targeted for the attachment.
- Select Attach at the top left of the page, and then select OK.
- Select an existing attachment or create a new attachment.
- Select Continue to save your changes.
A paper clip icon appears toward the end of each selected row in the list.
Delete journal entries
You can delete several journal entries as long as the entries are not in a closed period.
- Go to the appropriate journal entries list (for example, General Ledger > All > Journal entries or General Ledger > All > Statistical journal entries) and select View transactions to display the transactions for the journal.
- Select the transactions to delete using the Delete column to the right of the transactions.
- Select Delete at the top of the page, then select OK.
To ensure regulatory compliance and keep accurate audit trail activity and historical reporting, re-open the book, make the edits, and close the book again.