Bins
Related information
This list supports the enhanced lists interface. Learn more about using enhanced lists.
A bin identifies a specific location within a warehouse where items are or can be stored. Bins make it easier to find items when you put away, pick, and cycle count inventory. You can also assign bin attributes to help manage different sizes of items (bin sizes), and specific bin locations in aisles (bin faces).
To view your list of bins, go to Inventory Control > Setup > Warehouses and select Bins.
About bin tracking
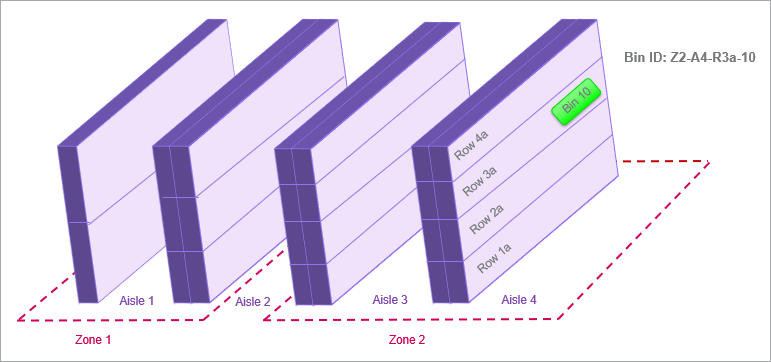
In Sage Intacct, a bin is unique across all warehouses. You can assign zone, aisle, row, and face attributes to a bin to create a coordinate system that describes the exact position of the bin within the warehouse:
- Zone: An area within a warehouse, such as refrigeration, dry goods, high security, or oversized
- Aisle: The space for walking between rows or shelves, like the aisles in a grocery store
- Row: The level of a shelf within an aisle
- Bin face: The section between pillars in an aisle
The movement of inventory items is more efficient when your warehouses use a thorough coordinate system. The setup of a coordinate system is flexible because all the bin location attributes are optional. Use only the attributes that make sense for each of your warehouses.
The following example shows how you might use zones, aisles, and rows to identify the location of bins in one of your warehouses. It also shows a naming convention that gives your bins useful identifiers. In the example, the highlighted bin identifier Z2-A4-R3a-10 translates to Zone 2, Aisle 4, Row 3a, and Bin 10:
When bin tracking is enabled, your users specify which bins to receive and put away items on Purchasing transactions. They also specify which bins to pick items from on Order Entry transactions. And, cycle counting is completed faster because your counters can more easily find the bins in which the items being counted are stored.
When a user creates a transaction that includes an item for which bin tracking is enabled, the user must enter the applicable bin value for the item to save the transaction.
The use of bin tracking needs the following setup steps:
- Enable bin tracking on the Configure Inventory Control page.
- Enable bin tracking for each item that you want to track in bins.
- Define the appropriate zones, aisles, rows, and bin faces for your needs.
- Define bins, assigning each bin to a specific warehouse and assigning zone, aisle, row, and bin face attributes to each bin, as appropriate.