Project estimate basics
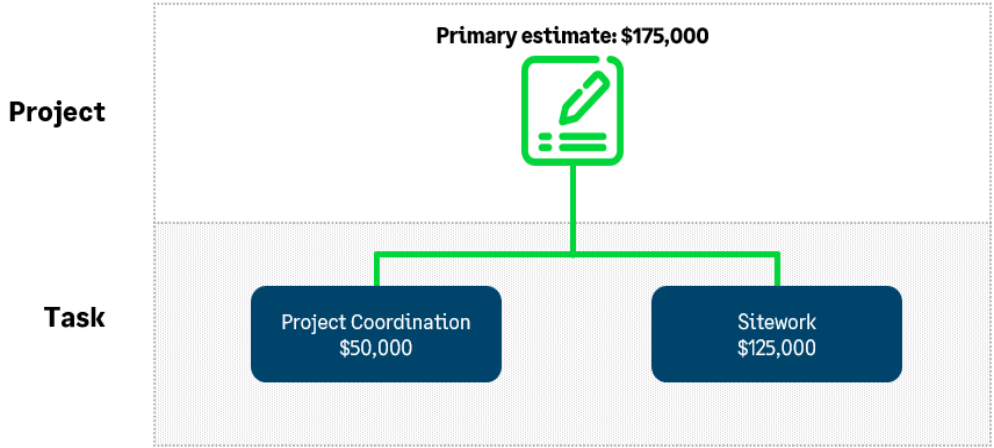
A project estimate enables you to approximate how much a project may cost to complete. Then, you can track the actual costs against your estimate to determine your project's profitability.
Videos
Training
Sage University provides training that you can take at your own pace. The courses are designed to help new users get started with Sage Intacct quickly.
Connect with Sage University then select a training link.

Creating projects and project estimates
Learn how to set up your jobs as projects, establish the project's work breakdown structure, and record project estimates.

See all on-demand training.
Get up to speed quickly with short video tutorials and interactive training applications.
Understand the basics
A project estimate enables you to approximate how much a project might cost to complete. Then, you can track the actual costs against your estimate to determine your project's profitability.
Use the project, task, and cost type (for Construction subscriptions only) dimensions to capture and track actual project amounts from other applications, like the General Ledger (GL), Accounts Payable (AP), and Purchasing. Report on your project costs using dimensions.
For Construction subscriptions only, you can use cost types to track task details, like labor or overhead.
Workflow
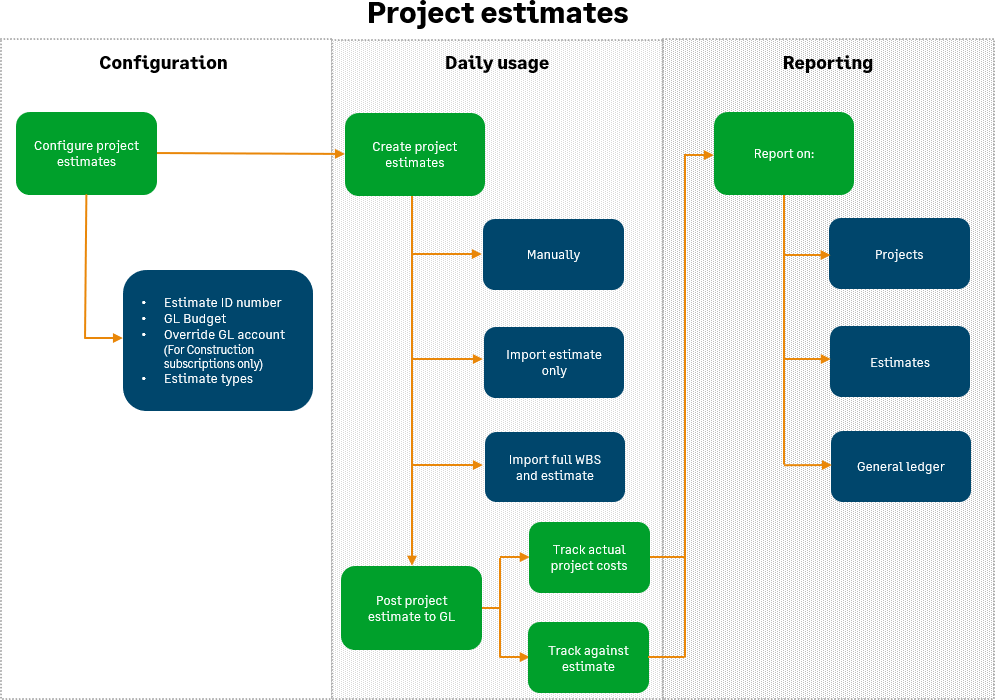
Before adding project estimate details, set up the project's work breakdown structure first so you don't have to add new tasks and cost types (for Construction subscriptions only) for each estimate line.
| Subscription |
Projects, Module: Project Costing |
|---|---|
| Regional availability |
All regions |
| User type |
Business Construction Manager Project Manager Employee |
| Permissions |
|
| Previous step |
- To create a project estimate, go to Projects > Setup > Projects Estimates
- Select Add to create a project estimate.
- Enter an estimate ID. If you're set up to use an automatic estimate ID sequence, the estimate ID is generated when you save the estimate.
- Associate the estimate with the corresponding project by selecting an existing project ID, which populates the project information section.
- Enter a description of the estimate.
- Projects users must enter a GL account on every line
- Enter an estimate date.
- If applicable, select an estimate type (optional).
- Enter a status of active (default), inactive, or finalized.
- Use the active status on current estimates. New estimates default to the active status.
- Use the inactive status on estimates for historical reference (like an original customer bid). Then, on the Project Estimates listing, you can use the Include inactive checkbox to include those estimates in the view.
- Use the finalized status to lock estimates from further changes; they become read only. You can change a finalized estimate to an active status at any time.
- For projects with more than one estimate, select the Primary forecast checkbox to indicate the project's main estimate. Only one estimate per project can be set as a primary forecast.
- To attach electronic documents to the estimate, such as spreadsheets or blueprints, select the paper clip next to Attachments.
- If you intend to post the estimate to a budget, choose a posting option in the Integrate with GL section.
Dates cannot precede the project begin date. Posting options are read-only on finalized estimates.
- Period of project begin date: posts the amounts to the period in which the project begin date falls. Verify that a project begin date exists when selecting this option.
- Period of estimate date: posts estimate entries to the GL period that corresponds with the project estimate date. You can change this date, but you can't enter a date before the project begin date. Selecting a project prefills the project begin and end dates. The estimate date is read-only on final estimates.
- Period of each estimate entry effective date: posts each estimate line entry to the effective date for that line; each line might post to different periods due to different effective dates. If you choose this option, enter an effective date for each entry line. Multiple estimate line entries for the same GL account, dimension, and budget period are summarized and posted as a single line to the same budget period.
- Distribute evenly to periods between the project begin and end date: spreads the amounts equally across periods between the project begin and end date; both dates are required for this option. If you select this option, ensure that the project has a begin and end date. Avoid using for Construction projects.
You can't distribute the estimate across all periods to a balance sheet account.
Posting an estimate to a balance sheet GL budget can only be applied to a single budget period.
-
In the Estimate entries section, you can optionally:
- Associate estimate entries with selected workflow types (original, revision, forecast, approved change, pending change, other) to control what you post to a GL budget from the project estimate or to group estimates by workflow type in reports.
- Select project tasks and their corresponding cost types (for Construction subscriptions only). Enter units of measure (UOM), quantity, unit rates, and amounts, if necessary. If you set up cost types (for Construction subscriptions only) with a GL account and an item ID, that information prefills the GL information when you select the cost type.
- For Construction subscriptions only, add the Production units and Production unit description columns to the Entries section. When you enter production units, select a task and workflow type for that line. When you apply workflow types to production units in the project estimate, the Task > Production Units tab automatically reflects the production units, summarized by workflow type for that task.Enter production units to primary project estimates (for Construction subscriptions only). Then, when you save the primary estimate, the Task > Production Units tab reflects the production units you entered in this estimate.
- To create a project estimate, go to Projects > Setup > Projects Estimates
- Select Create to create a project estimate.
- Enter an estimate ID. If you're set up to use an automatic estimate ID sequence, the estimate ID is generated when you save the estimate.
- Associate the estimate with the corresponding project by selecting an existing project ID, which populates the project information section.
- Enter a description of the estimate.
- Projects users must enter a GL account on every line
- Enter an estimate date.
- If applicable, select an estimate type (optional).
- Enter a status of active (default), inactive, or finalized.
- Use the active status on current estimates. New estimates default to the active status.
- Use the inactive status on estimates for historical reference (like an original customer bid). Then, on the Project Estimates listing, you can use the Include inactive checkbox to include those estimates in the view.
- Use the finalized status to lock estimates from further changes; they become read only. You can change a finalized estimate to an active status at any time.
- For projects with more than one estimate, select the Primary forecast checkbox to indicate the project's main estimate. Only one estimate per project can be set as a primary forecast.
- To attach electronic documents to the estimate, such as spreadsheets or blueprints, select the paper clip next to Attachments.
- If you intend to post the estimate to a budget, choose a posting option in the Integrate with GL section.
Dates cannot precede the project begin date. Posting options are read-only on finalized estimates.
- Period of project begin date: posts the amounts to the period in which the project begin date falls. Verify that a project begin date exists when selecting this option.
- Period of estimate date: posts estimate entries to the GL period that corresponds with the project estimate date. You can change this date, but you can't enter a date before the project begin date. Selecting a project prefills the project begin and end dates. The estimate date is read-only on final estimates.
- Period of each estimate entry effective date: posts each estimate line entry to the effective date for that line; each line might post to different periods due to different effective dates. If you choose this option, enter an effective date for each entry line. Multiple estimate line entries for the same GL account, dimension, and budget period are summarized and posted as a single line to the same budget period.
- Distribute evenly to periods between the project begin and end date: spreads the amounts equally across periods between the project begin and end date; both dates are required for this option. If you select this option, ensure that the project has a begin and end date. Avoid using for Construction projects.
You can't distribute the estimate across all periods to a balance sheet account.
Posting an estimate to a balance sheet GL budget can only be applied to a single budget period.
-
In the Estimate entries section, you can optionally:
- Associate estimate entries with selected workflow types (original, revision, forecast, approved change, pending change, other) to control what you post to a GL budget from the project estimate or to group estimates by workflow type in reports.
- Select project tasks and their corresponding cost types (for Construction subscriptions only). Enter units of measure (UOM), quantity, unit rates, and amounts, if necessary. If you set up cost types (for Construction subscriptions only) with a GL account and an item ID, that information prefills the GL information when you select the cost type.
- For Construction subscriptions only, add the Production units and Production unit description columns to the Entries section. When you enter production units, select a task and workflow type for that line. When you apply workflow types to production units in the project estimate, the Task > Production Units tab automatically reflects the production units, summarized by workflow type for that task.Enter production units to primary project estimates (for Construction subscriptions only). Then, when you save the primary estimate, the Task > Production Units tab reflects the production units you entered in this estimate.
- Each estimate line in the import file must contain a value for either Quantity and Unit rate, or a value for Amount.
If Quantity and Unit rate contain values, those values are used to calculate the Amount.
If the estimate line contains values for Quantity, Unit rate, and Amount, the import process only uses the Amount from the file, without calculating the amount using the Quantity and Unit rate. - For each estimate line, indicate workflow types: original (default), revision, forecast, approved change, pending change, or other. Lines without workflow types default to original.
- Values are case sensitive, so be sure to use the correct uppercase and lowercase letters.
- You can import estimates multiple times; each import creates a new estimate and does not replace existing estimates. If you use automatic sequential estimate IDs and import estimates more than once, each import creates a new estimate.
- Download the Project Estimate CSV template from the Company Setup Checklist page. To learn more, see Company Setup Checklist.
- Read the field descriptions in the CSV template for information on how to populate the CSV file with your project estimate information.
- If you plan to import the project estimate only, populate the CSV file with estimate information only.
- If you plan to import the full project WBS with the project estimate, populate the CSV file with the estimate and the project's full WBS. (Specific project information might be required.)
- The import file can include both standard and custom tasks for the project. But if you add custom tasks, you must include the task IDs and task names in the import file.
- If your Projects application is set up to generate sequential IDs and you include those IDs in the import file, the import process uses the IDs from the import file instead of the system-generated ID numbers.
- From the Project Estimates page:
- To import the estimate only, select Import estimate only and find to your estimate CSV file.
- To import the estimate and create a full project WBS, select Import estimate with WBS and find your estimate + WBS CSV file.
Tasks and their corresponding cost types (for Construction subscriptions only) must already exist in the project's WBS.
If your Projects application is set up to generate sequential IDs, do not include project or estimate IDs in your import file.
For more details on downloading the template and preparing the file, see Prepare your file for CSV import.
If you experience import errors, review the importing tips and common errors.
Import errors occur when you try to import information that doesn’t match the requirements of the template. Each template has a set of required information you must enter to import the file successfully, and formats to follow for certain kinds of information. Read the descriptions in the template to determine the most accurate way to enter your data.
If individual transactions are in error, the rows in the transaction that are in error are saved in a CSV file for you along with an error code for each row. Check your email for information about specific errors. See Find and fix CSV import errors for more information.
For more information about the CSV upload process, read Prepare your file for CSV import.
You can edit all entries, the General Ledger (GL) integration, posting period, and estimate type, along with all lines without a finalized status.
On the estimate line, you can update the GL account if the Project configuration setting allows overrides of the GL account. Otherwise, the GL account is retrieved from the cost type and set to read only.
Construction change request entries are read only on the estimate and can only be edited from unposted change requests linked to a project change order. If the change request entries are linked to a project contract and line and removing the change request entry reduces the value of the line below what is already billed, you cannot edit the change request line.