Select AR sales invoices for payment
Related topics
Use the Select AR sales invoices for Payment page to do the following:
- Receive and record a full or partial payment from a customer
- Apply credit memos
- Apply overpayments
- Apply term discounts
You can start the process of applying a payment to a specific AR sales invoice from the AR sales invoice page or from the AR sales invoices list page.
To view this list: Go to Accounts Receivable > All > AR sales invoices > Receive a payment.
Access can vary depending on your organization's subscriptions and your permissions. You need the following:
| Prerequisites | Application | Items |
|---|---|---|
|
Subscription |
Accounts Receivable |
|
|
Permissions |
Accounts Payable |
Apply Payments |
|
User Type |
Company |
Business user with admin privileges (All), Employee (List, View), Approver (List, View) |
Ask your system administrator for assistance.
The system lists only those AR sales invoices upon which you can take some action. To display AR sales invoices that are fully paid: Go to Accounts Receivable > All > AR sales invoices.
Select AR sales invoices for payment
Use this page to receive and record a full or partial payment made by a customer against a specific AR sales invoice.
Use this page to receive normal AR payments that result from entering an AR sales invoice to a customer. Advance payments use a slightly different process, because an advance is a payment that you issue before creating an AR sales invoice.
To select AR sales invoices against which to apply payments:
-
Go to Accounts Receivable > All > AR sales invoices > Receive a payment.
When the Select AR sales invoices for Payment page appears, at first you see only the Payment Options section.
-
Set Payment Options to their appropriate values. These settings apply to all the AR sales invoices for which you want to apply payment at this time:
- Payment Method: Select the method of payment. For example, to apply payments made by cheque, select Cheque.
- Account Type: Select whether the account is a bank account or an undeposited funds account.
- Account: Choose the account into which to deposit the payment, depending on the account type.
- AR sales invoice Currency: For multi-currency companies, select the currency in which you received payment.
- Customer: Select the customer from whom you received the payment.
The page refreshes and displays the resulting filter set.
-
Enter the payment information.
When you enter a cheque amount, the system automatically populates some or all of the fields in the Available AR sales invoices and Debit Memos list, depending on the preference for Turn off automatic payment suggestions. If the preference is disabled, which is the default, the system proposes which AR sales invoices to pay and the amount to pay for each.
If you usually overwrite the amounts proposed by the system and no longer want the system to propose those amounts, enable the Turn off automatic payment suggestions preference. ( Go to Accounts Receivable > Setup > Configuration.)
-
On the list of Available Credits, you have the following options:
- To apply the full amount of the credit to an AR sales invoice, select the Receive/Full checkbox to the left of the credit.
- To apply partial credit to an AR sales invoice, in Credit to Apply, type an amount less than the Available Credit amount.
To view the details of a credit, select the credit number.
-
On the list of Available Overpayments and Advances, you have the following options:
One minor restriction is that you cannot apply foreign currency overpayments to base currency AR sales invoices.
- To apply the full amount of an overpayment or advance to an AR sales invoice, select the Receive/Full checkbox to the left of the credit.
- To apply a partial amount of an overpayment or advance to an AR sales invoice, in Credit to Apply, type an amount less than the Available Credit amount.
The system tracks the credit and overpayment amounts that you selected to apply to the AR sales invoices and includes those amounts in the Amount Available to Apply box. The amount in this box isn't editable, but you can change it by changing the amounts for the individual credits and overpayments.
-
On the list of Available AR sales invoices and Debit Memos, for each AR sales invoice, you have the following options:
- To view the details of an AR sales invoice, select the AR sales invoice number.
- To apply the full amount received to an AR sales invoice, select the Receive Full checkbox to the left of the AR sales invoice. (The system then automatically enters that amount into the Amount Received box. )
-
If a discount is available, the amount is displayed. Select Apply Discount to apply the discount to the AR sales invoice.
The discount can be calculated on the full transaction amount, or on the total of the line items only, based on the term you set up for the customer. In addition, if you enable the option in Configure Accounts Receivable, the system automatically selects the Apply Discount checkbox, and applies the term discount.
-
If you applied credits or overpayments/advances, change the amounts in the Amount Received fields for the AR sales invoices by the total in the Amount Available to Apply field to actually apply them. Any amount left in the Amount Overpaid field will remain as a credit or overpayment.
For example, assume a customer has one outstanding AR sales invoice for £500, has a credit for £100, and sent a payment of £400. You entered the cheque amount of £400 and checked the box to apply the full amount of the credit. Change the Amount Received from £400 to £500 to apply the £100 credit. The amount overpaid is now 0.00.
- Select Save.
You've now recorded payments for the selected AR sales invoices. Your cash balance goes up, your receivables goes down, and your customer aging no longer shows those AR sales invoices.
Enter an overpayment
If you receive a payment for more than what the customer owes on all AR sales invoices, enter the amount of the payment. The system tracks the excess as an overpayment, which can be applied to future AR sales invoices. If the customer would rather have the excess money returned, refund the overpayment.
Receive other payments
The system offers two additional ways for receiving payments:
- Manual Deposit: Receive a customer payment without applying it to a specific AR sales invoice. Instead, it deposits the receipt directly into a bank account. See Manual deposits for more details.
- Other Receipts: Receive payments from customers that do not have an account in AR. The system either deposits the payment into an undeposited funds account or directly into a bank account. See Other receipts for more details.
When you save with any payment method, the system immediately updates the accounts receivable ledger, general ledger, sales register, statements, customer aging records and so forth. Partial receipts are reflected in the customer's AR sales invoice, showing the reduction and balance due. Full receipts show that there is a zero balance due on the AR sales invoice. (If you chose Balance Forward as the customer type for this customer, the payment is not applied to a specific AR sales invoice, but is applied to the total balance due for that customer with oldest balances being cleared first. You make that choice in the Configure Accounts Receivable page under Customer Type).
Turn off auto payment suggestions
You set preferences in the Configure Accounts Receivable page. (Go to Accounts Receivable > Setup > Configuration.) If you usually overwrite the amounts proposed by the system, and no longer want the system to propose those amounts, select Turn off automatic payment suggestions to disable this feature.
When this feature is enabled, Sage Intacct applies the payment to the AR sales invoices starting with the oldest AR sales invoice. If the amount of the payment is sufficient to fully pay that AR sales invoice, the system automatically selects the Receive Full checkbox for that AR sales invoice, and then applies the remainder to the next AR sales invoice, and so on until the entire payment amount is used. If any amount is left over because the payment amount is greater than the total of the AR sales invoices, the overpayment amount is displayed in the Amount Overpaid field.
Simultaneously, the system also applies any available discounts. In doing so, the system subtracts them from the amount received and places that adjusted number in the Amount Received field. For example, say you receive a cheque from a customer for £200 against two AR sales invoices, each for £100. But the second AR sales invoice has a discount of £10. The system marks both AR sales invoices as Received Full. An amount of £100 is placed in the Amount Received field for the first AR sales invoice, but only £90 is displayed for the second because the system has subtracted the £10 discount. This leaves an overpayment of £10. If you wish, you may override the discount that the system applied by entering £100 into the Amount Received field for that AR sales invoice.
Waterfall method payment
The Waterfall payment method is permanent, and can't be disabled.
Sage Intacct applies both partial and full payments to AR sales invoices using the Waterfall method. With this method, payment begins at the first line of the AR sales invoice and moves to the next line, and the next, until all the line items are paid. Partial payments are made in the same way, except that additional payments continue at the next line item with a balance.
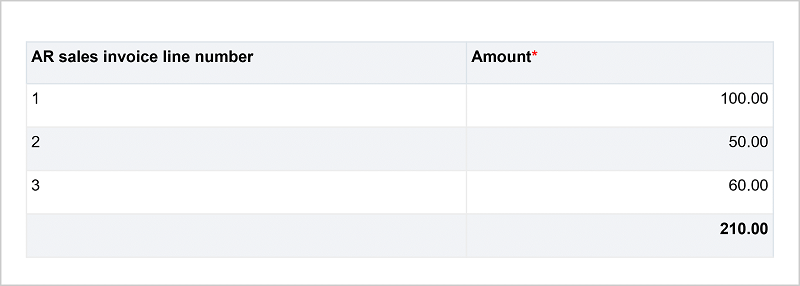
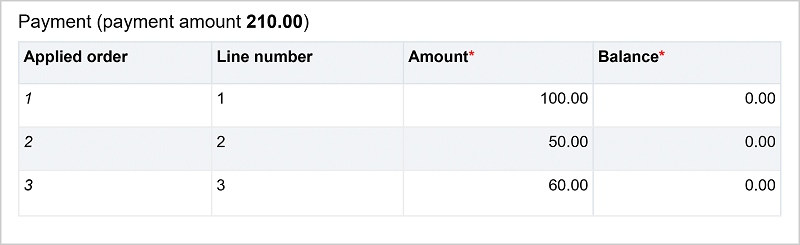
The following example shows an AR sales invoice that is fully paid using the waterfall method. The AR sales invoice amount is 210 units, to which a payment of 210 units is applied to the line items of the AR sales invoice until the balance is paid. The line items are 100, 50, and 60 units, so the 210 unit payment is applied to each line item in order: 100, 50, and 60 units are paid, and the balance is 0.
Payment (payment amount 210.00)
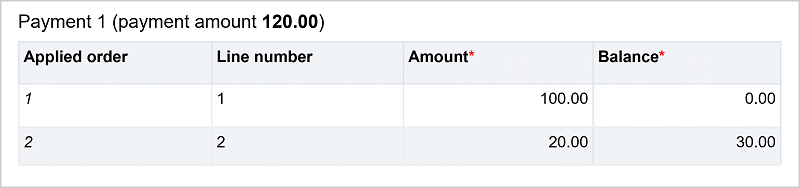
In the next example, the same AR sales invoice is paid with two payments: an initial partial payment amount of 120 units and a second partial payment amount of 90 units. Sage Intacct applies the payments to each line item, such that 100 units of the first payment are applied to the 100 unit balance on line number 1. Sage Intacct then applies the remaining 20 units from the first payment to line item 2, leaving a balance of 30 units on the second line item.
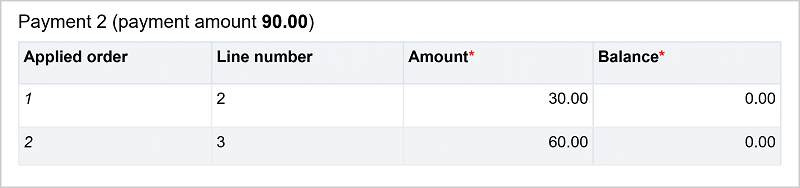
Sage Intacct applies 30 units of the second 90 unit payment to the 30 units balance from line 2, and the remaining 60 units to the 60 unit balance from line 3. The AR sales invoice is now paid, and the balance is 0.
Payment 1 (payment amount 120.00)
Payment 2 (payment amount 90.00)
Field descriptions
The following table describes each field on the Select AR sales invoices for Payment page:
Payment options
| Field | Description |
|---|---|
|
Payment Method |
The method you want to use to pay selected AR sales invoices, such as cheque, credit card, and so on. |
|
Summary |
This field appears if you've configured AR for user-specified summary posting. You won't see this field if you've chosen auto-summary because the system automatically handles the posting. |
|
Account Type |
Selection for how the type of account associated with the payment method: bank account or undeposited funds account. |
|
Account |
The account against which you want the system to draw payments. |
|
AR sales invoice Currency |
If your company uses multiple currencies, the currency you want the system to use to pay selected AP purchase invoices. |
|
Customer |
The customer who made the payment. |
|
Customer Balance |
The amount the customer owes. |
Payment information
The information that displays depends on which payment method you chose.
| Field | Description |
|---|---|
|
Receipt Date |
The date on which you post the payment to the GL. You generally can't enter a payment date that is prior to the AR sales invoice date, unless you disable the Payment dates must be greater than AR sales invoice creation date option in the Configure Accounts Receivable page. (Go to Accounts Receivable > Setup > Configuration.) |
|
Date on Cheque |
The date on the customer's cheque; otherwise, the system defaults to today's date. |
|
Cheque Amount |
The amount on the cheque. The system uses this amount to allocate the payment over multiple AR sales invoices. Depending on how you set a preference, the system automatically populates the Amount Received fields of the AR sales invoices in the Available AR sales invoices and Debit Memos section as described below. The Turn off Auto Application of Receipts preference is in the Configure Accounts Receivable page. (Go to Accounts Receivable > Setup > Configuration.) If your company uses foreign transaction currencies and you picked a foreign-currency payment group, this field is denoted with the currency name to remind you that the cheque amount you enter must be in that foreign currency. |
|
Cheque # |
The customer's cheque number. If this is an overpayment, this number is listed as the document number in the Available Overpayments area after you save. |
|
Credit Card |
The type of credit card for this customer. The system displays the name of the card along with the last four digits so that you may differentiate between multiple cards from the same card company |
|
Payment Date |
If payment is by credit card, the date on which the transaction occurred, according to your statement. If the payment method is Record Transfer, the date on which the transfer occurred according to your statement. Otherwise the system defaults to today's date. |
|
Payment Amount |
The transaction amount. The system uses this amount to allocate the payment over multiple AR sales invoices. Depending on how you set a preference, the system automatically populates the Amount Received fields of the AR sales invoices in the Available AR sales invoices and Debit Memos section as described below. The Turn off Auto Application of Receipts preference is in the Configure Accounts Receivable page. (Go to Accounts Receivable > Setup > Configuration.) |
|
Transferred Amount |
The amount of the transfer. The system uses this amount to allocate the payment over multiple AR sales invoices. Depending on how you set a preference, the system automatically populates the Amount Received fields of the AR sales invoices in the Available AR sales invoices and Debit Memos section as described below. The Turn off Auto Application of Receipts preference is in the Configure Accounts Receivable page. (Go to Accounts Receivable > Setup > Configuration.) If your company uses foreign transaction currencies and you picked a foreign-currency payment group, this field is denoted with the currency name to remind you that the amount you enter must be in that foreign currency. |
|
Cash Payment Amount |
The amount of cash you received. The system uses this amount to allocate the payment over multiple AR sales invoices. Depending on how you set a preference, the system automatically populates the Amount Received fields of the AR sales invoices in the Available AR sales invoices and Debit Memos section as described below. The Turn off Auto Application of Receipts preference is in the Configure Accounts Receivable page. (Go to Accounts Receivable > Setup > Configuration.) If your company uses foreign transaction currencies and you picked a foreign-currency payment group, this field is denoted with the currency name to remind you that the amount you enter must be in that foreign currency. |
|
Reference Number |
The transaction number from the bank. In the event of an overpayment, this number is listed as the document number in the Available Overpayments area after you save. |
|
Authorization Code |
The authorization code you received from the credit card company. If this is an overpayment, this number is listed as the document number in the Available Overpayments area after you save. |
|
Security Code |
Also known as the CVV code, found on the back of the card. This code is for record-keeping purposes only; it is not used in the verification process. |
|
Exchange Rate Type or Translated Base Amount |
The system displays one of these two fields if your company uses multi-currency transactions and either the summary or the AR sales invoice is a foreign currency. If both are foreign currency, the system displays the Exchange Rate Type field. If one is a foreign currency and the other is base currency, you see Translated Base Amount. In the Exchange Rate Type field, you can choose an exchange rate type that is appropriate for this transaction, or default to the Intacct Daily Rate. For example, maybe you want to use a monthly rate that fluctuates less than a daily rate. This applies when the customer payment and the AR sales invoice are both the same currency, which is the typical case. The Translated Base Amount is the effective amount that ends up in your bank account. You get this number from the bank. You customer's remittance information tells you how much of their liability this cheque represents. For example, say your AR sales invoices to the customer are in foreign currency, but your customer pays in base currency. Or, your AR sales invoice is in base currency and the customer pays in foreign currency. Because you deposit the transfer into your bank, the bank uses its own exchange rate. Consequently, you need to get the exact amount from the bank. This is also the amount that the system uses to calculate gain/loss. In addition, say the AR sales invoice was in USD, but the customer pays £100 CAD. The customer's remittance information tells you that this represents payment for a £120 USD AR sales invoice. |
Available Credits (Credit Memos/Negative AR sales invoices/Inline Credits)
| Field | Description |
|---|---|
|
Receive Full |
Select to apply the full amount of the credit. When you do so, the full amount appears in the Credits To Apply field. If you do not want to apply the full amount, you can enter a lesser amount in the Credits to Apply field. |
|
Credit/Cheque # |
The information that was entered when the credit was created. |
|
Description |
The information that was entered when the credit was created. |
|
Date |
The information that was entered when the credit was created. |
|
Due Date |
The information that was entered when the credit was created. |
|
Currency |
The information that was entered when the credit was created. |
|
Total Credit |
The information that was entered when the credit was created. |
|
Available Credit |
All the credit memos, negative AR sales invoices, advances and overpayments available for this customer are added together and displayed in this field for all the AR sales invoices. To apply credits and/or advances, enter an amount in the Credits To Apply field. When you apply credits, this number does not change until you save. |
|
Credits to Apply |
You can enter a "lump sum" dollar amount of credit against an AR sales invoice. All the credit memos, negative AR sales invoices and advances available for this customer are added together and displayed in the Credits Available field so you can decide how much that lump sum should be. You can take the credit shown in the Credits Available field in one AR sales invoice, or divide it between multiple AR sales invoices. However, you can't take more than the total available credit. (That is, you can't enter the same amount in this field for all the AR sales invoices for that customer, or enter amounts that add up to more than the credit available.) Advances are applied before any credit adjustments or prior overpayments. To take some or all of the credits and/or advances, enter an amount in the Credits To Apply field. The system applies credits in the following order: advances, overpayments, negative AR sales invoices, and then adjustments. In other words, say you received an advance of £1,000 and also issued a credit memo for £500. You will have a total credit available of £1,500. Let's say you then enter £1,200 in the Credits To Apply field. The system first uses the entire £1,000 advance, and then uses £200 of the credit memo, leaving £300 on that credit memo. The amount of credit that you apply is automatically subtracted by the system when you select Save. If an AR sales invoice is fully paid by the application of credit, the system removes it from the list when you save. In addition, the amount of credits/advances that you applied to the first AR sales invoice is no longer available to apply to other AR sales invoices. For example, say you had £132 in credits for that customer, but you only apply £100. The system remembers that you have an additional £32 that you can take later. However, if you reverse the resulting transaction, the amount of the credits/advances is returned to the full original amount. |
Available Overpayments and Advances
| Field | Description |
|---|---|
|
Receive Full |
Select to apply the full amount of the credit. When you do so, the full amount appears in the Credits To Apply field. If you do not want to apply the full amount, you can enter a lesser amount in the Credits to Apply field. |
|
Credit/Cheque # |
The information that was entered when the credit was created. |
|
Available Credit |
The system tracks the credits and overpayments and presents the subtotal here. You cannot edit this field directly, however, you can change the amounts for the individual credits and overpayments and this subtotal changes. |
|
Credits to Apply |
Same as for Available Credits section above. |
Available AR sales invoices and debit memos
| Field | Description |
|---|---|
|
Receive full |
Select to apply the full amount received to an AR sales invoice. The full amount appears in the Amount Received field. If you don't want to apply the full amount, you can enter a lesser amount in the Amount Received field. |
|
Apply discount |
If a discount is available, the amount is displayed. Discounts are calculated based on the Receipt Date, according to the terms for the customer. The Receipt Date is the date the AR sales invoice is recorded as paid in the GL, and it is the date used in the bank reconciliation. The discount can be calculated on the full transaction amount, or on the total of the line items only, based on the term you set up for the customer. In addition, if you enable the option in Configure Accounts Receivable, the system automatically selects the Apply Discount checkbox, and applies the term discount. Regarding effects of changed terms: The system subtracts any discounts from the amount received and places that adjusted number in the Amount Received field. If you do not want to allow some, or all, of that discount, enter a new amount in the Amount Received field. If an AR sales invoice has both positive and negative amounts, the discount is based only on the positive amount. For example, say you have an AR sales invoice that has a positive line item of £100 and a negative one of £40. The discount is based on the positive amount of £100, not the net of £60. |
|
Amount received |
The system automatically populates some or all of these fields when you enter a cheque amount, depending on if you set the Turn Off Auto Application of Receipts preference on the Configure Accounts Receivable page. |
|
AR sales invoice and debit memo subtotals |
This field subtotals all the amounts in the Amount Received fields. |
|
Amount overpaid |
The total of the amounts you apply in the Amount Received fields is automatically subtracted from the Amount on Cheque. If the cheque is greater, the difference is shown in the Amount Overpaid field. You ca split the overpaid amount across two or more department and location combinations by selecting Split. That way you can later correctly apply the overpayment amounts to their corresponding AR sales invoice line items. In addition, you can apply that overpayment to another AR sales invoice via the Apply More feature.
|
|
Overpayment department Overpayment location |
If applicable, you can assign an overpayment to a specific department and location. |