Account allocation example - allocate source account balances to a different account
Related information
The following is an example of how a dynamic account allocation could be configured in Sage Intacct. We'll then look at how the allocation calculations can be verified using tools supplied by Intacct.
In this example, the original account balances in the source accounts will be allocated to a different account. If you want to maintain the original account balances, see Account allocations example—maintain source account balances.
| Subscription |
Dynamic Allocations General Ledger |
|---|---|
| Regional availability |
All regions |
| User type | Business |
| Permissions |
|
Allocation definition - fringe example
Before you define the allocation, be clear on why you're creating an allocation. Reflect your reasoning in the Methodology field to leave a trail for others explaining why the allocation is set up in a particular way.
For example:
- We need to allocate our fringe expenses on a recurring basis.
- These expenses are in other employee benefits, and we want to align them with the way direct labor salaries were broken down.
To do this, we're going to set up the following dynamic allocation.
Rationale
To start our dynamic allocation, we will add information to the Rationale section of the allocation definition page.
For our fringe allocation:
- We might need more than 1 allocation that deals with the fringe account, so we've given this an Allocation ID of Fringe01.
- This allocation deals with both the fringe account and other employee benefits. Therefore, we've added a Description of Allocate fringe in other benefits to help us remember what this allocation does when it's time to generate the allocation.
- Because we want others to understand why we set up our allocation the way we did, we include the Methodology behind our decisions: Other employee benefits are allocated based on direct labor salaries, which is broken out by employee effort for time period per payroll system.
| Field | Value |
|---|---|
| Allocation ID | Fringe01 |
| Description | Allocate fringe in other benefits |
| Status | Active |
| Methodology | Other employee benefits allocated based on direct labor salaries. |
Dimensions treatment
The Dimensions treatment section allows you to tell Intacct how you want dimensions to behave during your allocation calculations and the level of detail that will be included in the created allocation entries.
For our fringe allocation:
- We've decided we'd like to focus on 2 dimensions: Department and Project and Grant.
These are the dimensions we want to allocate based on the calculation method we'll select in the Basis section of the allocation. Dimensions set to Allocation focus are included in any dynamic calculations for the basis. - We've also decided that we'd like to preserve the values of the Fund dimension.
Dimensions set to Preserve values keep their original values assigned during initial entry. These dimensions are included in the calculations for the source and the basis to ensure their proportional distribution is kept when the allocated entry is recorded. - We've decided the remaining dimensions are not important for calculation or preservation in this allocation.
Dimensions set to Not considered are not used for the calculations during the generation of the allocation but can still be used as a filter to narrow the source pool or basis. However, we will use an override value for the Restriction dimension in the Target section.
| Allocation focus | Preserved Values | Not Considered |
|---|---|---|
|
Department Project or Grant |
Fund |
Customer Employee Item Restriction Site Supplier |
Source pool
The Source pool section allows you to define where Intacct will find the amount to use for the allocation. You can use dimension filters to narrow the scope of the allocation by limiting the source pool to a specific dimension.
For our fringe allocation:
- We've decided that the source of our allocation amounts will come from the Account Group Other Employee Benefits.
- We want 100% of the amounts found to be allocated.
- We want the time period for the allocation to be for the Current month.
- We'd also like to narrow the scope of our allocation, so we've set 2 dimension filters. This means that when Intacct looks in the Other Employee Benefits account group, it will only include in the allocation the amounts it finds in both Entity/Funds dimension 100--General and the Department dimension 999--Shared.
| Field | Value |
|---|---|
| Account Group | Other Employee Benefits |
| Percentage to allocate | 100 |
| Source pool time period | Current month |
| Dimension Filters | |
| Entity/Funds | 100--General |
| Departments | 999--Shared |
Basis
The Basis section allows you to define how the allocation splits your source pool amount into each allocation focused dimension. The Basis is the blueprint for the calculations of the allocation focus dimensions percentage split.
For our fringe allocation:
- We've selected our Allocation method as Dynamic - relative account financial.
This means that the allocation dynamically calculates the applied percentage split by analyzing the proportion of the allocation focus dimensions within the basis account group after any basis dimension filters are applied. - We'd like the allocation to look in the Account group Salary and Wages Expense for the basis of the calculations.
- We've set the Accumulation to Activity.
This means that only the amounts within the basis account group that are interpreted as Activity are used when deriving amounts for the allocation split. - We want our Basis time period to also be the Current month.
| Field | Value |
|---|---|
| Allocation method | Dynamic - relative account financial |
| Account group | Salary and Wages Expense |
| Accumulation | Activity |
| Basis time period | Current Month |
| Dimension Filters | |
| Entity/Funds | 100--General |
Target Entry
The Target entry is where you want your allocated entry to be posted. You select the journal where the allocated entry will be recorded, and then select the accounts to be used for the allocation destination and reversing source pool.
For our fringe allocation:
- Our Reporting Book was selected as ACCRUAL, but because Allocations have to be posted to a user-defined book, we also select an Alternate Book. We've selected the ALLOCATIONS book, which replaces the Reporting Book with this Alternate Book selection.
- The Alternate Book determines the Journals we can select. We selected the ALLOC--Allocations journal for where we want the allocation to be posted.
- The Account we want to post the allocation to is the same as the Source pool: 5127--Other Employee Benefits.
| Field | Value |
|---|---|
| Alternate Book | Allocations |
| Journal | ALLOC--Allocations |
| Allocation Destination | |
| Account | 5127--Other Employee Benefits |
| Dimension overrides | Restriction: 3--Unrestricted |
| Reversing source pool | |
| Use source account | Checked |
| Dimension overrides | Restriction: 3--Unrestricted |
Generate the allocation - fringe example
After your allocation definition is set up, you save the definition and then generate an allocation based on this definition.
When you generate an account allocation, Intacct dynamically finds the source amount, applies the basis calculations in tandem with preservation of any dimension values, and returns an allocation entry. If you post your allocation to a book specifically for allocations, you can report on the pre- and post-allocation activity levels.
For our fringe allocation:
- We'd like to post this allocation on the last day of October, so our GL posting date is 10/31/2022.
- Allocations are processed offline, so we put in an email address where we can receive notification on the allocation after it’s complete.
- We'd also like the allocation to impact the activity in October, so our As of date is also 10/31/2022.
- We select the allocation we just created, Fringe01.
When we select Fringe01, information about the allocation is displayed to remind us of the time periods defined in the allocation. If we want to change the As of date based on this information, now is the time to change it.
| Field | Value |
|---|---|
| GL posting date | 10/31/22 |
| Your email address | example-email@sage.com |
| As of date | 10/31/2026 |
| Account Allocation ID | Fringe01 |
We select Generate and the allocation begins to be processed.
Review and verify the allocation - fringe example
The most effective way to review your allocation and verify that amounts were moved in the way you expected is to run a financial report. Everyone's standard financial reports are different, so you can pick the statement type that works best for you.
For our fringe allocation:
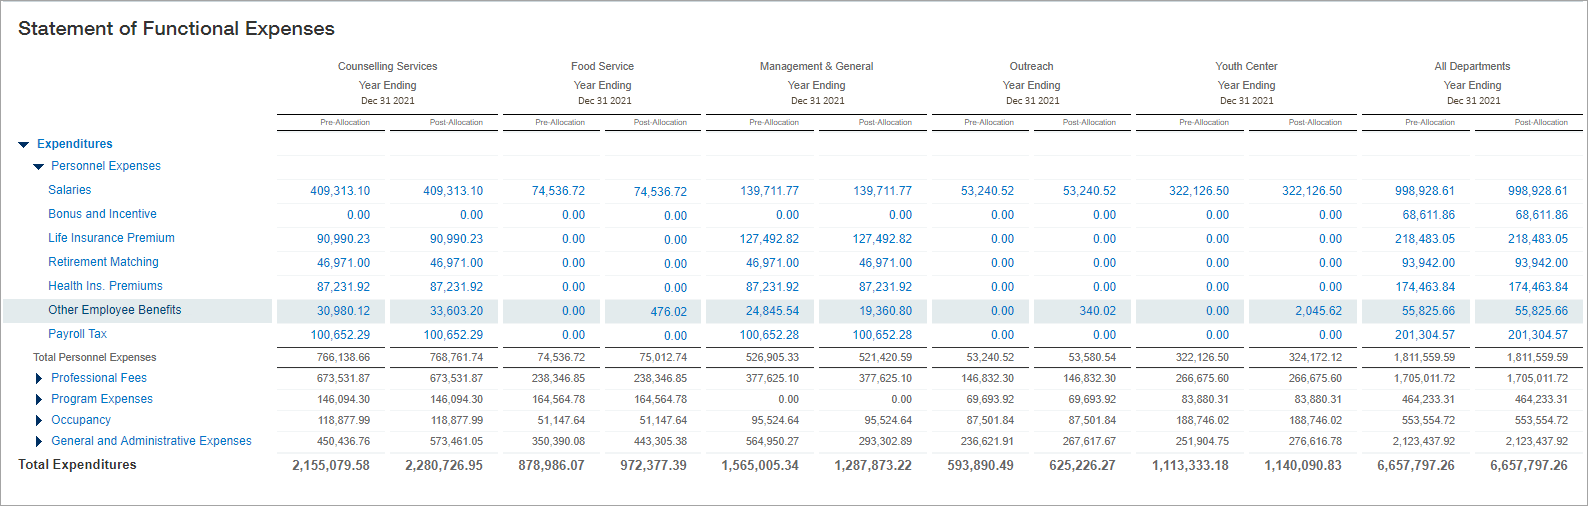
- We've decided to run a Statement of Functional Expenses from the financial Reports center in Intacct.
- We will look in the Other Employee Benefits section of the report to review our allocation amounts because that was where the source pool was looking for amounts to allocate, and the target entry was going to post new entries.
- The report includes columns that display Pre-Allocation and Post-Allocation amounts, so you can see where amounts were moved.
Hover over the graphic to review the allocation report.
Other review options
If you want to review more than just the amounts moved during an allocation, as seen in a report, you can review your allocation in these ways:
- Review the journal entries
- Review the source pool calculations
- Review the basis calculations
- Review the dynamic split calculations
Allocation journal entry
You can review the journal entry generated by the allocation.
For our fringe allocation:
We first need to navigate to our generated allocation to review the journal entry for the allocation.
- Go to General Ledger > All > Account allocations > View allocation log.
- Select View next to the allocation you want to view.
The journal entry for the account allocation opens. Review the journal entries for your allocation at the bottom of the page.
Source pool calculations
You can review the calculations Intacct created based on the settings you chose for your source pool.
For our fringe allocation:
We first need to navigate to our generated allocation to review the snapshot of the source pool at the time of allocation.
To view the source pool calculations for the allocation:
- Go to General Ledger > All > Account allocations > Allocation log.
- Select View next to the allocation you want to view. The journal entry for the account allocation opens.
- Select the link under the Description heading.
The Allocation Information page for the Fringe01 definition opens, showing information about who initiated the allocation, and when. - In the Source pool section, select See Source Pool Calculation.
This is a link to an Excel file that contains the source pool information at the time the allocation was run.
When we download and open the Excel file, we see the amounts Intacct found for the Fringe01 source pool, based on the dimensions treatment and the source pool parameters we defined.

This appears to be the correct source pool for our allocation, so we can close the Excel file.
Basis calculations
You can review the calculations Intacct created based on the settings you chose for your basis.
For our fringe allocation:
We first need to navigate to our generated allocation to review the basis calculations at the time of allocation.
To view the basis for the allocation:
- Go to General Ledger > All > Account allocations > View allocation log.
- Select View next to the allocation you want to view. The journal entry for the account allocation opens.
- Select the link under the Description heading.
The Allocation Information page for the Fringe01 definition opens, showing information about who initiated the allocation, and when. - In the Basis section, select See Basis Calculation. This is a link to an Excel file that contains the basis information at the time the allocation was generated.
When we download and open the Excel file, we see the amounts Intacct found for the Fringe01 basis, based on the dimensions treatment and the basis parameters we defined.
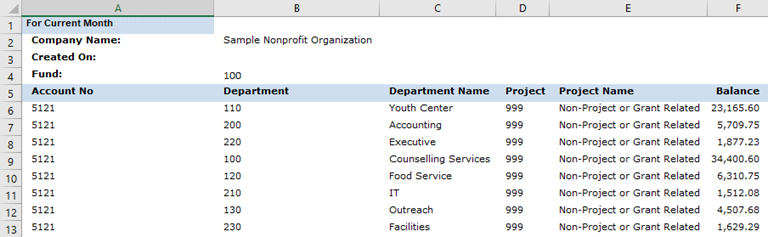
This appears to be the correct basis for our allocation, so we can close the Excel file.
Dynamic split calculations
The dynamic split calculations are the percentage determined by Intacct based on your source, basis, and dimensions treatment settings. These percentages are used to allocate the amount found in the source pool.
For our fringe allocation:
We first need to navigate to our generated allocation to review the dynamic split calculation created at the time of allocation.
- Go to General Ledger > All > Account allocations > View allocation log.
- Select View next to the allocation you want to view. The journal entry for the account allocation opens.
- Select the link under the Description heading.
The Allocation Information page for the Fringe01 definition opens, showing information about who initiated the allocation, and when. - In the Target entry section, select See Dynamic Split Calculation. A dialogue box opens showing the percentages used by Intacct to allocate the amounts found in the source pool.
The dynamic split is based on settings you chose for how dimensions are treated, the source pool, and the basis. Review all these settings to verify that the dynamic split calculations match what’s expected.
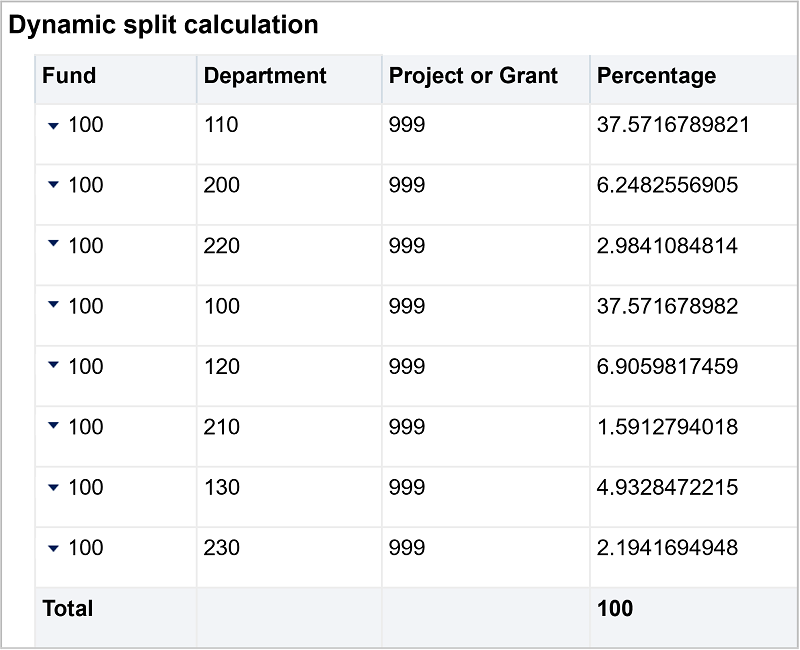
This appears to be the correct dynamic split calculations for our allocation, so we can close the dialogue box.