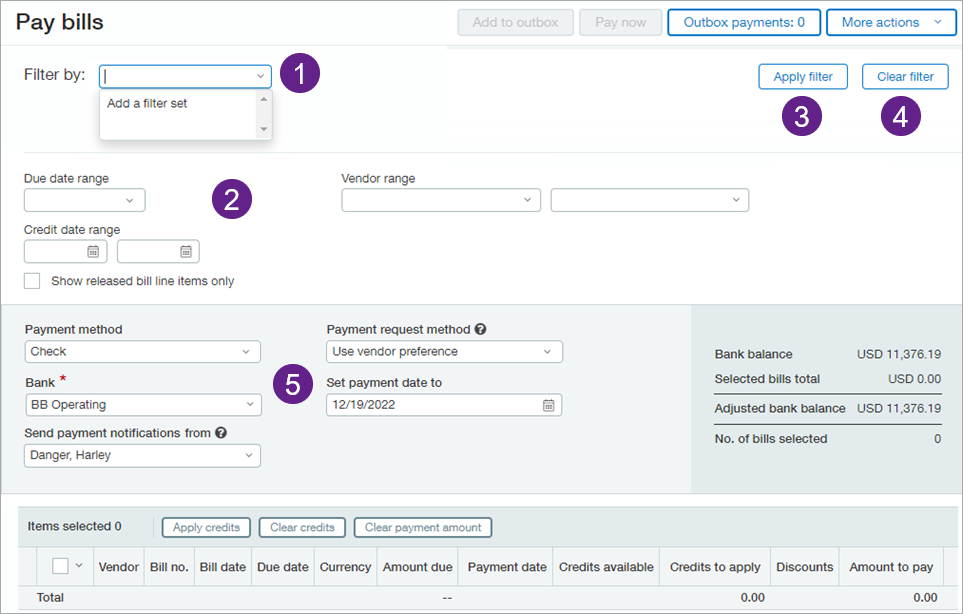
Filter for bills to pay
Related information
Unless your company is configured to display all ready-to-pay bills, apply a filter to load bills on the Pay bills page. You can filter on-the-fly using the filters immediately available on the page, or you can create an advanced filter (also referred to as a filter set) which you can save for reuse.
| Subscription | Accounts Payable |
|---|---|
| User type | Business |
| Permissions | Pay bills: Run |
Overview
On the Pay bills page, you can:
- Create and save an advanced filter set: From the Filter by dropdown, select Add a filter set.
The Advanced filters page appears, where you can create a filter set and save it for reuse.
- Filter on-the-fly: Instead of applying a filter set, you can quickly filter on-the-fly for payments within a Due date range or Vendor range.
- Apply a filter: After you select a filter set or filter by Due date range or Vendor range, select Apply filter to load bills.
- Clear a filter: Select to clear any applied filters.
- Set payment information: The fields in the gray area are not filters.
Instead, this area is where you set payment information for your selected payments.
Filter option 1: Filter on-the-fly
Quickly filter on-the-fly for bills by due date, by vendor, or by due date and vendor. You can also select a range of due dates and a range of vendors, as needed.
On-the-fly filters cannot be saved or shared. If you want to create filters that you can reuse and share, create a filter set.
- Due date: View bills due on a specific date or within a range of dates.
- Select Today, This week, Next week, This month, or Next month.
- Select Custom. Two date fields appear in which you can enter the required range of dates.
- Vendor: View bills for a vendor.
If you choose a range, this selects the range based on sequential vendor ID.
Filter by a single vendor nameIf you do not want to filter by vendor ID, you can filter for a single vendor name, using the same Vendor range fields.
- In the starting field for the vendor range, begin entering the vendor name.
As you type, Sage Intacct shows matching vendors in the list.
- Select the vendor.
- Select or tab away from the field.
Intacct uses the same vendor name to autofill the ending field of the range.
- Select Apply filter.
- In the starting field for the vendor range, begin entering the vendor name.
- Credit date range: Filter available credits to include only credits with transaction dates in the range you specify.
- Show released bill line items only: When you have Release to pay enabled with the option to show all bills, including line items yet to be release for payment, this allows you to exclude unreleased line items from the list.
- Combination of due dates and vendors.
After you make your selection, select Apply filter.
- In Pay bills, select the dropdown for Due date range and select Custom.
Two date fields appear beside the Custom field.
- Enter the required start date for the range in the first date field and the range end date in the second field.
- Enter or select the vendor in the first Vendor range field.
Intacct autofills the selected vendor to the vendor field. (If you want to filter for a range of vendors, you can select a different vendor here.
- Select Apply filter. The resulting set of bills appears.
- In Pay bills, select Due date range, and select Custom.
Two date fields appear beside the Custom field.
- Enter the required start date for the range in the first date field and the range end date in the second field.
- For Credit date range, select the same start and end dates that you provided for the Due date range.
- Select Apply filter.
The resulting set of bills appears. The Credits available column shows the total amount of adjustments, advances, and inline credits with transaction dates that fall within the selected range.
Filter option 2: Create an advanced filter
For more advanced filtering, use an advanced filter, also referred to as a filter set. With advanced filters, you can:
- Set criteria for granular filtering of bills
- Sort your bills
- Set multi-entity filter parameters
- Drill-down on a filter attribute
- Save a filter set for reuse
- On the Pay bills page, select the Filter by dropdown, and select Add a filter set.
The Advanced filters page appears.
- Enter a unique Name for the filter set.
-
To make the filter set visible to other users, select Make shared.
Only the person who created the filter set can remove it from the Filter by dropdown or delete it from Intacct. Make sure to only share filter sets that you know others will use so as not to clutter the dropdown. As a best practice, consider having an admin create shared filter sets. - Enter or select options for filtering, then select Save.
Your filter set appears in the Filter by dropdown. After you select it, select Apply filter to apply.
General options
There are a myriad of options to help you create and save filters that target and drill down to a specific set of bills. You can even set the sorting for the filter.
- To set a range of due dates by which to display bills, select the Due date range dropdown and select the appropriate range.
You can select:
- Standard time periods, such as past due, today, this week or next week, and this month or next month.
- Custom time periods. After you select Custom, the page displays two additional date fields for you to enter the beginning and end dates of the required date range.
- In the Vendor range fields, you can enter or select one vendor or a range of vendors.
- To set a range of bill entry dates by which to display bills, select the Bill date range dropdown, and select the appropriate range.
You can select:
- Standard time periods, such as past 30 days, today, this week or next week, and this month or last month.
- Custom time periods. After you select Custom, the page displays two additional date fields for you to enter the beginning and end dates of the required date range.
- To filter by priority, select Bill Payment Priority, then select the priority level you want to filter by.
- To filter bills with a Recommended to pay on date that is calculated to be on or before a specific date, enter or select the appropriate date in Recommended Payment Date.
The Recommended to pay on date is calculated based on the Default bill payment date settings on the Vendor information page.
This field is left empty in either of the following circumstances:- You did not define a Default bill payment date in the vendor record.
- You selected discount date for the Default bill payment date calculation, but the Term does not include a discount.
- To set a range of bill amounts by which to display bills, in Payment range select >=, =, or >, then enter a bottom-of-range amount in the second field. In the next field select <= or <, then enter a top-of-range amount in the last field.
- To select all bills with a discount date below a specific date, in Discount Available as of, type or select a specific date.
- If your company uses multiple currencies, set the Bill currency to be used when paying the selected bills.
Drill down options
You can drill down and filter by any combination of vendor, bill, and bill item attributes.
- Select one of the following objects:
- Vendor
- Bill
- Bill item
The Attribute dropdown populates with all attributes available for the selected object.
- Select the Attribute that you want to filter on.
For example, if you select Vendor, the Attribute dropdown contains vendor filtering criteria, such as name, addresses, contacts, preferred payment method, and more.
- Select an Operator to act upon the attribute, such as equals, less than, not equal to, and more.
- Select a Value for the operator.
- Optionally, select sorting criteria.
- Select the Due date range dropdown and select Next month.
- Under the Drill down filters, select Vendor from the Object list.
- Select Vendor name as the Attribute.
- Select less than as the Operator.
- Select M as the Value.
- Under the Sort by section, select the following:
- Attribute = Vendor name
- Order = Ascending
- Save the filter. The Pay bills page appears.
- Select Apply filter to view the bills that meet the filter criteria.
Add sorting to a filter set
The way to sort bills to pay is to create a filter set or edit an existing filter set.
- On the Pay bills page, select the Filter by drop-down and select the appropriate filter.
- Select Edit filters.
The Advanced filters page appears.
- Under the Sort by section, select the appropriate sorting criteria.
- On the Pay bills page, select the Filter by dropdown menu and select the appropriate filter.
- Select Edit filters.
The Advanced filters page appears.
- In the Sort by section, select Vendor name in the Attribute field.
- Select Ascending in the Order field.
- Save the filter set.
The Pay bills page appears.
- Select Apply filter.
Intacct applies the filter and sorts the list of bills alphabetically, by vendor name.
Entity filters
Use on-the-fly filters or filtered sets to target for multi-entity bill processing:
Create and save a filter set that includes top level transactions.
- On the Pay bills page, select the Filter by dropdown and select Add a filter set.
- Add a Name for your filter.
- Select the Show top-level transactions checkbox.
- Select Save.
- On the Pay bills page at the top level, select a filter and select Edit filter, or select Add a filter set.
The Advanced filters page appears.
- Select Select under Entities to pay.
The multi-select box enables you to view and select from the list of entities that have a defined business relationship.
- Do one of the following:
- Select Add all to include all entities in your filter, then select Done.
- Select the arrow beside each entity that you want to add to the filter, then select Done.
The number of selected entities appears under Entities to pay. You can edit this selection anytime. After you apply the filter, the resulting list includes bill line items associated with the selected entities.
You can hold off on paying bills for specific entities that do not have the resources yet to pay in full.
- On the Pay bills page at the top level, select Pay by entity at the top of the page.
- Check the Select entities with ability to pay all bills in full checkbox.
- Select Apply filter.
- On the Pay bills page at the top level, select a filter and select Edit filter.
The Advanced filters page appears.
- Select one of the following:
- Include: Include bills that have multi-entity line items so long as one line item meets the criteria.
- Exclude: exclude bills that have multi-entity line items even though one or more line items meet the criteria.
- Only: show only bills that have multi-entity line items; bills with multiple line items for the same entity are excluded.
Apply an advanced filter set
After you create and save an advanced filter set, you can apply it. On the Pay bills page, select a filter from the Filter by dropdown and select Apply filter.
Clear a filter or advanced filter set
To clear a filter, select Clear filter at the top of the Pay bills page.
Clearing a filter or filter set removes all loaded bills from the view. Apply a filter to load bills again.