Process customer payments using Bank transaction assistant
Related information
Use Bank transaction assistant to assign customers and receive payments in bulk from unmatched bank transaction data.
First assign customers to unmatched bank transactions. Then, begin the receive payment process. After you receive a payment, a posted payment is created and matches with the bank transaction for reconciliation.
If you're not ready to post payments to the General Ledger, or you want to verify transactions before you post, you can create draft payments and view them in Accounts Receivable. Currently, creating draft payments is not supported for companies enabled for French taxes.
On the Bank transactions page, use the Cash in view to display unmatched credit type transactions. This view includes the Customer ID and Customer columns so you can quickly check which transactions need to be assigned to a customer.
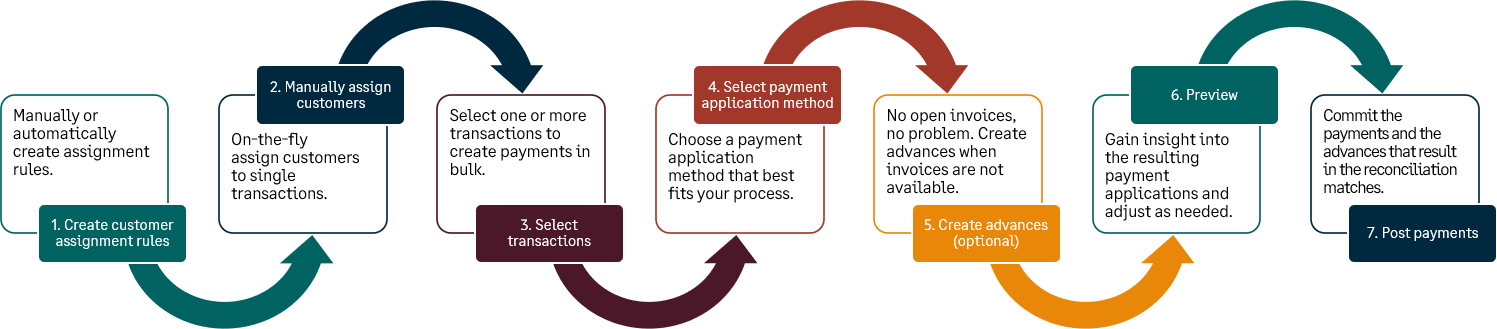
To receive a payment, the customer on the invoice needs to match the customer on the bank transaction. You can assign a customer manually or you can create an assignment rule to assign customers to bank transactions automatically.
This feature is not available for the following use cases:
- Invoices created at the entity level are not available to apply as payments to bank transactions at the top level.
- If the bank transaction currency does not match the currency of the invoice.
- If invoices have a terms discount assigned.
- If the invoice has a negative line item that's not applied; unless Accounts Receivable is configured to apply negative lines automatically.
- If Accounts Receivable payment and advance summary frequencies are set to user-specified.
- If you’re a company enabled for French taxes and want to create a draft payment.
In multi-entity, multi-currency companies:
-
You can only receive a payment at the top level if all the following currencies match:
- The currency of the bank account.
- The currency of the owning entity of the bank account.
- The currency of the owning entity of the customer record.
- The invoice currency.
- Within an entity, the bank transaction currency must match the currency of the invoice.
To receive a payment, first assign customers to bank transactions. You can automate this process by using Assignment rules.
Create an assignment rule on the Assignment rule page.
| Subscription |
Cash Management |
|---|---|
| User type | Business |
| Permissions |
Bank transaction assignment rules: List, Add |
-
Go to Cash Management > Setup > Reconciliation rules and select Add (circle) next to Assignment rules.
- In the Assign to section, select the customer you want to create the assignment rule for.
-
Select the Bank account or All bank accounts that make the payment to the customer.
If you select a single bank account, the assignment rule only runs for that selected account.
-
Enter an ID and Name.
-
Enter an optional Description.
This description is to describe and identify the assignment rule itself.
-
The status defaults to Active.
-
In the Filter transactions by section, there are two defaulted filters:
-
One filter is to target only credits to the account. You’re only targeting credits because they represent customer payments.
- Data source: Bank transactions
- Field: Transaction type
- Operator: Equals
- Value: Credit
-
The second filter is where you enter the description from the bank transaction.
- Data source: Bank transactions
- Field: Description
- Operator: Contains
- Value: Enter the description to identify the customer as it appears on bank transactions. Case sensitive.
-
- Set any other filters.
-
Select Preview to view which transactions will be affected by the assignment rule.
Based on the results, change what you need and then select Preview again.
-
Select Save.
Alternatively, you can manually assign customers to bank transactions from the Bank transactions list. During the manual process, you can also create an assignment rule on the fly.
| Subscription |
Cash Management Accounts Receivable |
|---|---|
| User type |
Business |
| Permissions |
Bank transactions: List, View |
-
Go to Cash Management > All > Transactions > Bank transactions.
-
From the View menu, select Cash in.
The Bank transactions list refreshes with credit type transactions.
-
Select transactions that do not have a customer and select Assign to customer.
-
On the Assign transactions to customers page, select a Customer for each transaction.
To create an assignment rule on the fly, enter the value Intacct should look for within a bank transaction description to assign a customer automatically. For example, if you have a customer called ACME Customer, you might enter ACME in the Assignment mapping value field and then select Save.
-
Select Save.
To view assignment rules: Go to Cash Management > Setup > Reconciliation rules > Assignment rules.
After you assign customers to bank transactions, you can receive a payment. You can also receive payments in bulk. After you receive a payment, a posted payment is created which matches automatically to the bank transaction for reconciliation. You can also create draft payments if you're not ready to post.
| Subscription |
Cash Management |
|---|---|
| User type |
Business |
| Permissions |
Bank transactions: List, View Receive payments from bank transaction: Add |
-
Go to Cash Management > All > Transactions > Bank transactions.
-
From the View menu, select Cash in.
The Bank transactions list refreshes with credit type transactions and additional columns for Customer name and Customer ID.
If you're using assignment rules, Intacct automatically assigns customers to bank transaction so you can quickly receive a payment. Otherwise, follow the steps above to manually assign a customer to a bank transaction.
- Select transactions and select Receive payments.
-
Select the Payment application method.
Payment is applied to invoices using the waterfall payment method.
- Oldest invoice first: Apply the payment to invoices with the oldest date.
- Earliest invoice first: Apply the payment to customer invoices that was created first.
- Smallest amount first: Apply the payment to customer invoices with the smallest amount out of all invoices.
- Largest amount first: This is the customer invoice with the largest amount out of all invoices.
- Create advance: Instead of applying a payment to an invoice, create an advance. Make sure to select an AR advance template to detail how you want the advance to be created.
- Match to amount: Apply the payment to an invoice of the same open amount.
- Add an optional Payment memo.
- Filter invoices by Payment method.
-
You can Create advances for transactions with no invoice if there are no invoices in Intacct that match to the bank transactions.
To create an advance, select an Advance template.
-
Select Preview payment application.
In the Bank transactions section, you see the appropriate invoice in the Apply to column. If the payment covers more than one invoice, those invoices are also listed. The type of transaction that you’re creating, either a payment or an advance, appears in the Pending txn column.
- Select Create draft payments if you're not ready to post to the General Ledger.
-
Select Post.
You received a payment, created an advance, or created a draft payment for the selected invoice.
Posted payments and draft payments appear on the Posted payments list. Posted payments are matched for reconciliation with the bank transaction. If you created an advance, it appears on the Advances list and is matched to the bank transaction for reconciliation.
The bank transaction remains on the Bank transaction list, but not in the Cash in view as a payment was received.
If a transaction was incorrectly assigned to a customer, you can unassign the customer from the transaction.
-
Go to Cash Management > All > Transactions > Bank transactions.
- From the View menu, select Cash in.
- Select the transaction and then select Assign to customer.
- Select the checkbox to the left of the transaction and select Unassign and remove.
-
Select Save.
The transaction is no longer assigned to a customer.