Adjust MICR alignment
Related information
Learn what to do if your bank rejected your checks because the numbers at the bottom of the check, also known as MICR ("My-ker") were misaligned. These series of numbers must be accurately aligned per the bank's specifications.
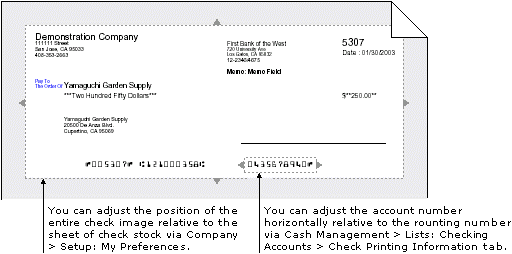
Adjust the account number horizontally
Your bank might have a preference for the position of the account number. By default, the account number is right aligned.

If your bank requires a special horizontal alignment of the account number, you can change the alignment from right to left and, if necessary, nudge the account number left or right in increments of one space.
-
Go to Cash Management > All or Setup > Accounts > Checking.
- Find the checking account you need.
-
Select Edit at the end of the row.
-
On the Check printing tab, in the Magnetic Ink Character Recognition (MICR) section select Left or Right to align the account number.
-
If you need to move the account number slightly left or right, select the account number alignment. To move a right-aligned number slightly left, or to move a left-aligned number slightly right, in the Account number positioning box enter a number between 1 and 5 to add space on that side.


-
Go to Cash Management > All or Setup > Accounts > Checking.
- Find the checking account you need and select Edit.
-
On the Check printing tab, in the Magnetic Ink Character Recognition (MICR) section select Left or Right to align the account number.
-
If you need to move the account number slightly left or right, select the account number alignment. To move a right-aligned number slightly left, or to move a left-aligned number slightly right, in the Account number positioning box enter a number between 1 and 5 to add space on that side.
Adjust the entire check image position
You can also adjust how the entire check image is printed on the sheet of check stock relative to the top left corner of the sheet. This alignment guide will be accurate only if you print it with a good quality laser printer.
-
Select your login name at the top of any page and select My preferences.
-
Go to the Check preferences section and select Verify your printer alignment for Intacct checks.
A PDF appears with alignment instructions.
- Print the PDF.
- Follow the PDF instructions, using the printed crosshairs to adjust your Horizontal and Vertical printing offsets.
-
Select Save.