Create warehouses
Related information
Use the Warehouses page to add a new warehouse or to view and edit information about existing warehouses.
The enhanced list for this area of Intacct supports CSV and Import service imports. Open the Import dropdown to choose the option that best fits your needs.
To view your list of warehouses, go to Inventory Control > Setup > Warehouses.
| Subscription | Inventory Control or Supplies Inventory |
|---|---|
| Regional availability | Australia, Canada, UK, USA, South Africa |
| User type | Business (any), CRM, Employee, Warehouse |
| Permissions |
Inventory Control, Purchasing, or Order Entry
|
| Restrictions |
Only Business users can add, edit, and delete warehouses. |
Add a warehouse
If you’re creating a warehouse hierarchy, add the parent warehouses before adding the children warehouses.
If you’re using bin tracking, you can create the applicable bins and their associated attributes before adding the warehouse. Alternatively, you can create and manage the bins from the Warehouse information page.
- Go to Inventory Control > Setup and select Add (circle) next to Warehouses.
- In the Warehouse ID field, enter a short identifier for the warehouse.
- In the Name field, enter a meaningful description of the warehouse.
- Use the dropdown list in the Location field to select the geographic location of the warehouse.
Sage Intacct applies the base currency of the selected location (or the location's parent location, if applicable) to inventoried items for consolidations.
- To specify a person responsible for the warehouse, use the dropdown list in the Manager ID field to select an employee.
- If this warehouse is part of a hierarchy, use the dropdown list to select the Parent warehouse for this warehouse.
- Use the dropdown list in the Contact field to select the warehouse contact.
If you’re using the Avalara AvaTax integration, Avalara uses this contact's address as the Ship from address.
- Use the dropdown list in the Ship to contact field to select the ship to contact for the warehouse.If you’re using the Avalara AvaTax integration, Avalara might use the Ship to contact to calculate line-level tax on a purchasing transaction. If there's no deliver-to contact at the line level, Avalara relies on the Ship to contact instead.
- Accept the default Status selection, Active. If you do not want the warehouse to be available for use yet, use the Status dropdown list to select Inactive.
- If Inventory Control is configured for replenishment, the Enable replenishment for this warehouse checkbox appears. Deselect the checkbox if you do not want the warehouse to be replenished.
- If Inventory Control or Order Entry is configured to prevent negative inventory (Do not allow negative inventory globally option is selected), and is not configured for bin tracking, the Allow negative inventory for this warehouse checkbox appears. Select this checkbox to save transactions that cause the inventory for items in this warehouse to be negative, which is useful for high-turnover locations.
- If the warehouse prevents negative inventory, and Inventory Control and is configured for bin tracking, the Tracking information section appears. If you plan to track items by bins for this warehouse, define the bins and their associated attributes.
If a bin is already defined on the Bin information page and associated to this warehouse, the bin automatically appears in the table. Any changes you make to the bin are reflected back on the Bin information page. If you delete the bin, it's removed from the system.
In the Bins table, you can:- Sort on any of the columns by selecting the column heading
- Rename a bin
- Change any of the attributes associated with the bin
- Add a new bin
- Delete a bin with the trash can icon at the end of a row
- Add more lines with the + sign at the end of a row
- Select Save.
See the Field descriptions for more information.
Import warehouses
Importing warehouses is another way to add warehouses, several at one time. Users with the appropriate permissions can create multiple warehouses by importing the data using a spreadsheet file. If you’re creating a warehouse hierarchy, import the parent warehouses before importing the children warehouses.
Edit a warehouse
You can change any warehouse field except Warehouse ID.
-
Go to Inventory Control > Setup > Warehouses.
-
Find the warehouse that you want to edit.
-
Select Edit at the end of the row.
-
Make your changes.
-
Select Save.
-
Go to Inventory Control > Setup > Warehouses.
-
In the Warehouses list, select Edit next to the desired warehouse.
-
Make your changes.
-
Select Save.
Create a warehouse hierarchy
If you have multiple warehouses or stocking locations, you can create a warehouse hierarchy by associating a parent warehouse to each applicable child warehouse. To see warehouse hierarchy data in a report, create the applicable dimension structure(s) and use the Financial report writer to create the desired report.
-
Go to Inventory Control > All > Warehouses.
-
Find the child warehouse that you want to edit.
-
Select Edit at the end of the row.
-
In the Parent warehousedropdown list, select the applicable parent warehouse.
-
Select Save.
-
Repeat for each child warehouse.
-
Go to Inventory Control > All > Warehouses.
-
In the Warehouses list, select Edit next to the desired child warehouse.
-
In the Parent warehousedropdown list, select the applicable parent warehouse.
-
Select Save.
-
Repeat steps for each child warehouse.
Example
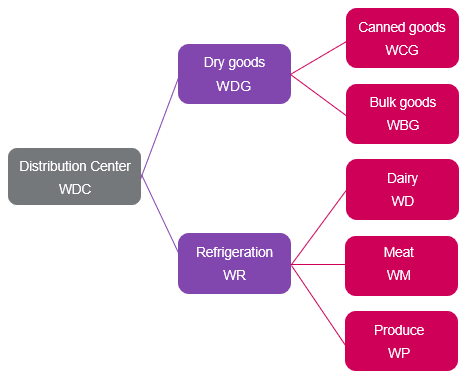
A warehouse can be a child and a parent. For example, you might have several warehouses, such as Distribution Center warehouse, Dry goods warehouse, and Canned goods warehouse. In this scenario, the warehouse hierarchy might be set up in the following manner:
-
The Distribution center warehouse is a parent warehouse. It is not a child of any other warehouse.
-
The Dry goods warehouse is a child of the Distribution warehouse and a parent of the Canned goods warehouse.
-
The Canned goods warehouse is a child of the Dry goods warehouse. It is not a parent of any other warehouse.
Set a default warehouse
Default warehouses can speed up transaction data entry. You can set a default warehouse for a transaction definition that will populate a particular warehouse for all selected Inventory or Stockable kit items when users create transactions from that transaction definition. Users can also select their own preferred default warehouse in their user preferences that will override the default warehouse setting in the transaction definition. In either scenario, users can override the suggested warehouse in a transaction with another warehouse available in the warehouse selection list as applicable.
Set the default warehouse for a transaction definition
-
From Inventory Control, Order Entry, or Purchasing, go to Setup, and select Transaction definitions.
-
Find the transaction definition that you want to set a default warehouse for.
-
Select Edit at the end of the row.
-
In the Inventory Control section of the transaction definition, use the Warehouse selection method dropdown list to select Use the default warehouse.
-
Use the Default warehouse dropdown list to select the desired default warehouse.
-
Select Save.
-
From Inventory Control, Order Entry, or Purchasing, go to Setup, and select Transaction definitions.
-
In the Transaction definitions list, select Edit next to the desired transaction definition.
-
In the Inventory Control section of the transaction definition, use the Warehouse selection method dropdown list to select Use the default warehouse.
-
Use the Default warehouse dropdown list to select the desired default warehouse.
-
Select Save.
Set up your default warehouse
To have a preferred warehouse appear by default in a transaction, make sure the applicable transaction definition has Warehouse selection method set to Use the default warehouse.
- Select your login name at the top of the page, then My Preferences.
- In the Preferences for <username> page, scroll down to the General preferences section and use the Default warehouse selection list to select the desired warehouse.
- Select Save.