Warehouse transfer overview
Related information
Warehouse transfer is a workflow that makes it easier to transfer items between warehouses and between bins in the same warehouse. When warehouse transfer is enabled, you enter all the information on a single page. Sage Intacct then does the work of creating the underlying transfer transactions, including automatically propagating the costs of the items. You cannot change the cost of the items when they move into the destination warehouse.
Ensure more complete inventory tracking with Warehouse Transfer transaction definitions. They are automatically installed when you enable warehouse transfers, and provide more robust inventory activity tracking compared to the existing Inventory Transfer In/Out transaction definitions.
About warehouse transfers
When your company has several warehouses, you might need to move inventory between warehouses. For example, you might need to move 100 units of item A and item B from a warehouse in California to a warehouse in Arizona. When you use a warehouse transfer, you specify all the information about the transfer on one page and Intacct does the rest of the work.
You can create immediate or in-transit warehouse transfers. If you’re using Supplies Inventory, warehouse transfers can be completed from the Supplies Inventory workbench.
Immediate transfers
An immediate transfer does not accommodate for the time it takes to move or ship inventory from one warehouse to another. When you post an immediate transfer, the ONHAND quantities are decreased at the source warehouse (the from warehouse). At the same time, the ONHAND quantities are increased at the destination warehouse (the to warehouse).
This approach is suitable if all your warehouses are on a single property or in close proximity, and the time it takes to move the inventory is minimal.
An immediate transfer might go through a few steps, where you:
- Create a warehouse transfer and specify the inventory to be transferred.
- Save the warehouse transfer as draft so you can create a pick list.
- Post the warehouse transfer.
Intacct creates an underlying transfer-out transaction and immediately converts it to a transfer-in transaction, automatically propagating the cost of the transferred items from the transfer-out to the transfer-in. These transactions decrease the ONHAND quantities at the From warehouse, increase the ONHAND quantities at the To warehouse, and post to the General Ledger (GL).
Warehouse transfer options Transaction Explanation State Transfer out
Decreases the ONHAND quantities at the From warehouse and transfers the value of the quantities from an inventory account to an in-transit clearing account.
Converted
Transfer in
Increases the ONHAND quantities at the To warehouse and transfers the value of the quantity from the in-transit clearing account to an inventory account.
Closed
In-transit transfers
With an in-transit transfer, you can accommodate for the time it takes to move inventory between warehouses. For example, you might have multiple warehouses across the city, across the country, or in different countries. While the inventory is being moved, it's not in the ONHAND quantities at either the source warehouse (the from warehouse) or the destination warehouse (the to warehouse). Instead it's counted in the INTRANSIT quantity for the To warehouse.
An in-transit transfer also goes through a multi-step process, where you:
- Create a warehouse transfer and define the inventory to be transferred, including specifying transfer-out and transfer-in dates. These dates become the dates for the system-generated transfer-out, in-transit, and transfer-in transactions.
- Save the warehouse transfer as draft so you can create a pick list.
- Pick the inventory at the From warehouse and prepare for shipping.
-
Edit the warehouse transfer to transfer the inventory out. System-generated transactions are created that automatically decrease the ONHAND quantities at the From warehouse, increase the INTRANSIT quantities for the To warehouse, and post to the GL.
Warehouse transfer options Transaction Explanation State Transfer out
Decreases the ONHAND quantities at the From warehouse and transfers the value of the quantities from an inventory account to an in-transit clearing account.
Converted
In transit
Increases the INTRANSIT quantities. The INTRANSIT quantities are assigned to the To warehouse
In Progress
Transfer in
Increases the ONHAND quantities at the To warehouse and transfers the value of the quantity from the in-transit clearing account to an inventory account.
Draft
- Wait while the goods are shipped.
-
When the transferred goods arrive at the To warehouse, edit the warehouse transfer to transfer the inventory in.
The system-generated transactions From the transfer out are deleted and re-created. The transfer-in transaction automatically increases the ONHAND quantities at the To warehouse and posts to the GL. The INTRANSIT quantities decrease.
Warehouse transfer options Transaction Explanation State Transfer out
Decreases the ONHAND quantities at the From warehouse and transfers the value of the quantities from an inventory account to an in-transit clearing account.
Converted
In transit
Increases the INTRANSIT quantities. The INTRANSIT quantities are assigned to the To warehouse
Converted
Transfer in
Increases the ONHAND quantities at the To warehouse and transfers the value of the quantity from the in-transit clearing account to an inventory account.
Closed
Automatic cost propagation
The cost method of the items determines how Intacct propagates the cost of the transferred items:
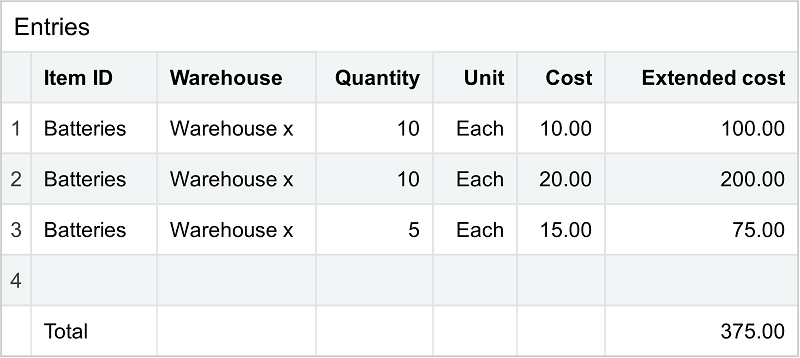
- Average, FIFO A stock management method and valuation method where the first product received into stock is the first to be issued., and LIFO A stock management method and valuation method where the last product received itno stock is the first to be issued.. The cost of an item at the time it’s transferred out of the source warehouse is the cost assigned when it’s transferred in to the destination warehouse. For FIFO and LIFO, if the quantity transferred out includes more than one cost layer, then the underlying transfer-out and transfer-in transactions have separate lines for each cost layer.Example of cost layers
Assume you transfer 25 batteries that were purchased in 3 FIFO layers from one warehouse to another. The warehouse transfer transaction shows one line item for the 25 batteries.
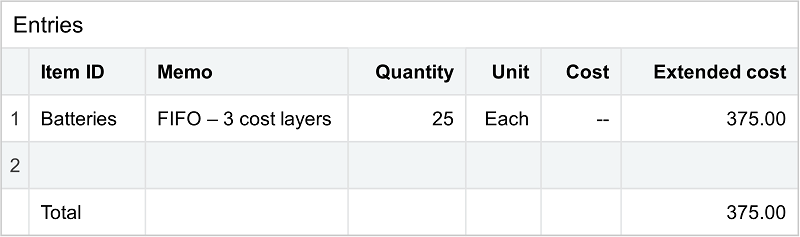
However, the Entries section in the underlying transfer-out and transfer-in transactions that are automatically created, shows a line item with the quantity and cost for each cost layer:
- Standard. Standard cost items work a little differently because costs can be different per item per warehouse. An item is transferred out using the standard cost in effect at the source warehouse. The item is transferred in using the standard cost in effect at the destination warehouse at the time of the transfer. For example, the cost of an item might be $10 at the source warehouse and $9 at the destination warehouse.
Currency conversion is not applicable for standard cost items, which are always transferred in using the standard cost in effect at the destination warehouse.
GL posting
The systems posts differently to the GL based on whether the warehouses are in the same or different entities:
- Transfers between warehouses within the same entity. Intacct posts to the GL using the accounts specified in the transaction definitions for the underlying transfer-out and transfer-in transactions. Part of setting up warehouse transfer includes editing these transaction definitions (SYS-Warehouse Transfer Out and SYS-Warehouse Transfer In) to specify the GL accounts on the Posting configuration tab.
- Transfers between warehouses located in two different entities.The system posts to the GL using a combination of the accounts specified in the transaction definitions for the underlying transfer-out and transfer-in transactions and the accounts defined for inter-entity transactions from the entity records:
GL entries in same and different entities GL entry Transfer-out transaction Transfer-in transaction Debit An inter-entity receivable account from the From entity (on the Inter-entity setup tab for the entity) Inventory debit account from the SYS Warehouse Transfer In transaction definition Credit Inventory credit account from the SYS Warehouse Transfer Out transaction definition An inter-entity payable account from the From entity (on the Inter-entity setup tab for the entity) Example of GL posting for transfers between two entitiesAssume you are a wholesale distributor who uses separate entities for your operations in Arizona, California, and Texas. From the top-level, you create a warehouse transfer to move 100 units of an item from a warehouse in California to a warehouse in Texas.
The GL entry for the underlying transfer-out transaction is:
- Debit: An inter-entity receivable account for the California entity
- Credit: Inventory account from the SYS-Warehouse Transfer Out transaction definition
Here’s how the system finds the inter-entity receivable account to debit. The Out entity for the transfer (California) is used as the source entity and the In entity for the transfer (Texas) is used as the target from within the source entity. So, the system looks up the inter-entity receivable account for the target entity in the California entity information. If California is not set up to use entity overrides, the system uses the default inter-entity receivable account. If entity overrides are enabled, the system looks for Texas as a target entity within California and uses the receivable account specified for Texas.
The GL entry for the underlying transfer-in transaction is:
- Debit: Inventory account from the SYS-Warehouse Transfer In transaction definition
- Credit: An inter-entity payable account for the Texas entity
Intacct looks up the inter-entity payable account in the Texas entity information. If Texas is set up to use entity overrides, the system looks for California as a target entity and uses the payable account for California. If California does not exist as a target entity, the system uses the default inter-entity payable account.
Inventory reports
While there are no standard reports for warehouse transfers, you can use the Warehouse Transfer and Warehouse Transfer Items custom report objects to create reports about your warehouse transfers and the items that were transferred.
In the custom report writer, select the Warehouse Transfer or Warehouse Transfer Items object as the primary data source in Step 1. Then select the desired columns, select the column sequence, and so on.
For in-transit warehouse transfers, the Inventory Valuation report will correctly reflect the value of the inventory in each given warehouse, but will not include the in-transit inventory until it's received at the destination warehouse.
Learn how to create custom reports.