Define object relationships
Related information
Relationships define the connections between records in different objects, so they create much of the functionality of the objects. For example, you might have an object that lists customers. Another object lists contacts at those companies. You need a connection between the company records and corresponding contact records. When you establish a relationship between the objects, you can indicate which contacts are related to each company.
| Subscription |
Platform Services |
|---|---|
| Regional availability |
All regions |
| User type | Business user with admin privileges (Full admin privileges) |
| Permissions | Permissions to the Platform Services application |
Terms may differ from those used in your location when choosing an object in Customization Services and Platform Services. For information on terms that may differ in your location, see Terminology across locales.
Add a relationship
One thing that separates a set of data objects from an application is the interaction or relationships that exist between the objects. For instance, you might have an object for tracking collections activities. This list of interactions by itself does not offer an advantage over a spreadsheet. However, when you create a relationship between the collections activity object and the customer object, you can do more: You can assign customer IDs to collection activities and then view collection activities as part of the customer record.
To add a relationship:
- Go to Platform Services > Objects. A list of all objects appears.
- Find and select the object for which you want to create a relationship.Use the Filter by application dropdown list at the top of the page to filter by custom applications.
- On the Object Definition page, select Relationships at the top, then select New relationship.
- Choose the Related object to which you want to create a relationship, then select Next.
- Enter a Singular name and a Plural name for either side of the relationship.
Changing names here does not affect either object name. These names only apply to lookup fields and related list sections that refer to the relationship.
- English (Australia)
- English (United States)
- English (United Kingdom)
- English (South Africa)
- French (France)
- French (Canada)
- German (Germany)
- Spanish (Spain)
- Set UK English as the company's default language.
- Defined a custom object with a label for German but not for French.
- In Relationship type, choose how many records can be related on either side of the relationship. Do not use allocation splits with one-to-one and one-to-many relationships. Using an allocation split in these cases results in multiple line item entries based on the allocation definition. All transactions supporting allocations are affected.
Relationship type details Relationship type Details One to one Any record in either object can have only one corresponding record in the other object. For example, if you create an employee profile object, you could create a one-to-one relationship between that object and the standard Intacct employee object. One to many Any one record in the first object can have many related records in the second object. For instance, an invoice can have many related line items. Those line items, however, only relate back to one invoice. Many to one Many records in the first object can be related to a single object in the second object. This behavior is similar to the one-to-many relationship, but, instead, it is established through the object on the other side of the relationship. For example, in an invoice, a line-item object in an invoice would all relate back to a single invoice object. Many to many Many records in the first object are related to many records in the second object. Many to many relationships are often difficult to maintain and avoided in database design by creating an intermediate table.
For instance, you can have many sales orders for many objects. This approach might be seen as a simple many-to-many relationship. However, to make sense and take control of the transaction, we create an intermediate object called a line item. The line item has a many-to-one relationship with the sales order object and a many-to-one relationship with the product object. This also allows us to store information about this sales order, such as pricing, and freeze it in time. Even if Product pricing changes, the pricing for this transaction is stored in the line item for the transaction.
- Optionally, select one or both Deleting records control options to prevent accidentally deleting any records in your relationship.
- Under Properties of lookup field, enter an Integration name for each object. Integration names can only contain alphanumeric characters, hyphens (-), and underscores (_).
- Optionally, use Add related list views to pages to select views to which you want to automatically list related records.
- Select Save.
To choose the language to use for the label or labels, select Add labels for different languages.
Prerequisite: Ensure that Enable developer translation tools is on. Go to Company > Setup and select Company to edit this setting.
A dialog appears to define language labels.
The language selection only applies to the labels and not to the field data.
You can select from the following languages:
The company’s default language determines the base language from which custom object, custom field, and relationship labels are defined. For example, if UK English is the company's default language, the custom object's base labels default to UK English.
The user's language preference overrides the company language preference.
Let's say that you:
If you have a user whose language preference is set to German, they see the German label. Users whose language preference is set to French see the label displayed in UK English.
Custom labels defined for multiple languages appear in all locations within Sage Intacct that single language labels appear.
Edit a relationship
- Go to Platform Services > Objects. A list of all objects appears.
- Find and select the appropriate object.
Use the Filter by application dropdown list at the top of the page to filter by custom applications.
- On the Object Definition page, select Relationships at the top, then select Edit next to the appropriate relationship.
- Make changes as needed. You can modify the relationship properties or orphan records controls, but not the relationship type. If you need a different relationship type, delete the relationship and recreate it with the correct relationship type.
- Select Save.
View a list of relationships for an object
- Go to Platform Services > Objects. A list of all objects appears.
- Find and select the appropriate object.
Use the Filter by application dropdown list at the top of the page to filter by custom applications.
- On the Object Definition page, select Relationships at the top.
Delete a relationship
Before deleting a relationship, double check the objects that shared that relationship to clean up any references or structures you created around the relationship. For example, you might have created a new tab on a standard object to display a view from a related object. You would want to remove that tab.
To delete a relationship:
- Go to Platform Services > Objects. A list of all objects appears.
- Find and select the appropriate object.
Use the Filter by application dropdown list at the top of the page to filter by custom applications.
- On the Object Definition page, select Relationships at the top.
- Select Del next to the relationship to delete.
- On the confirmation dialog box, select Yes, then select Delete.
Use a picklist for related object selection
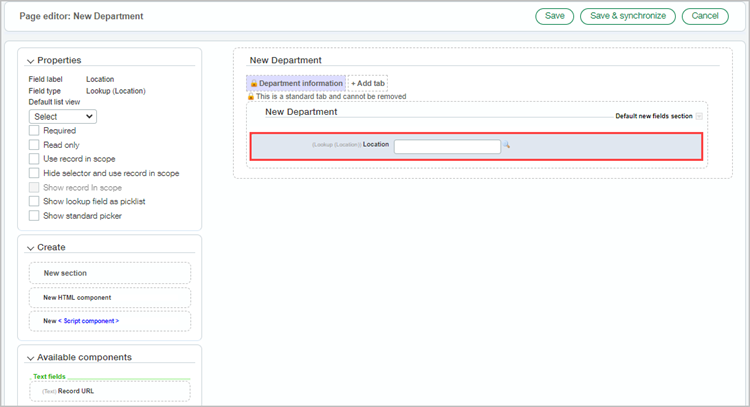
Let's say you add a field to an object that has a relationship to another object. In the user interface, rather than having users select an option from a lookup field, it might make sense to include a picklist. For example, you might have a relationship defined where Location can have many Departments. When creating or editing a department, it would be easiest for users to select a location from a picklist.
To use a picklist option in the UI instead of a lookup field:
- Go to the object page that contains the lookup field.
- At the top of the page, select Add.
- At the top of the page, from More actions, select Edit this page.
- On the page editor, select the fields section for Location lookup.
- Under Properties, select Show lookup field as picklist.
- Save your change.
- Now let's make sure the edit page also uses a picklist: Go to the object page that contains the lookup field.
- In the list view, select Edit next to one of the records.
- Repeat steps 3 - 6.
In this example, from the Application menu, go to Company > Setup > Departments.
We'll first add the picklist option to the Department creation page.
Make sure to select Edit and not View. The View page does not include the option to change the lookup field.
While you don't need to use a picklist on both the create and edit pages, it probably doesn't make sense to use a picklist on one page and a lookup field on the other.