Add your own help to Sage Intacct
Related information
Add custom help to Sage Intacct to provide users with easy access to your custom resources.
There are two methods for adding custom help:
-
Host your custom help files in Intacct for users to download.
-
Embed a link on an Intacct record that goes to an external page.
This is useful when you have your own internal processes and standards documented for your employees to reference. Or perhaps you're a partner and you want to give clients easy access to your firm's resources. Examples of resources that you can add include training videos, workflow diagrams, and step-by-step instructions for internal processes.
Host help files in Intacct
You can host help files in Intacct with a subscription to Platform Services. After you add a hosted file, edit the pages where you want a download link to appear. When users go to that page, they can select the link to download the hosted file.
This download link appears whenever a user adds, edits, or views that page.
Permissions and other requirements
| Subscription | Platform Services |
|---|---|
| User type | Business user with administrative privileges |
| Permissions | Hosted files: Add, Edit |
| Restrictions |
Limited to object record pages. The download link only works for users logged into Intacct. If you need to share a hosted file with a person outside of Intacct, this link will not work. |
| Prerequisites | Have help files to upload. |
-
Go to Platform Services > Platform tools > Hosted files, then select Add.
-
Enter a name for the hosted file.
-
Select Choose file.
-
Select the file to host from the file explorer.
-
Select Save.
-
Go to the page where you want the download link to appear.
-
Select More actions and select Edit this page.
-
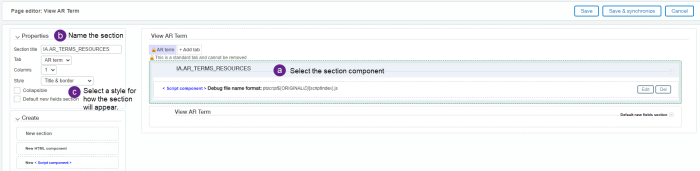
Add a New section and New <script component> for the section by dragging the components on the left into the page editor.
Optionally, you can add the section and script component to a new tab that you name, for example "Resources." Highlighted areas indicate where you can drop the components.
-
Edit the section component.
-
Select the section component.
-
In the section properties box, enter a Section title.
-
Select a Style.
-
-
In the script component, select Edit.
-
Use the Select field type dropdown and choose Hosted files.
-
Use the Select field dropdown to select the hosted file that you uploaded in Step 1.
-
Copy the resulting merge field token into the code editor and add the link code as follows:
Copy<a href="ENTER_MERGE_FIELD_TOKEN_HERE" target="_blank">Enter link text here</a>Link code for script component.
You can add multiple links to the same page component.
-
Select Save.
-
Select Save & synchronize.
-
To have the link display on pages in add and edit modes, choose the Select all option.
-
Select Save again.
-
Go to the page that you edited in view mode.
-
Verify that the download link appears and works.
Now when users go to that page, they can use the link to download the hosted file.
Link to an external page
A Smart link click is a conditional link that's embedded in view mode of a record. You can set up the link to only appear if certain criteria are met, such as if a specified field has information entered. You can also add links without conditions, so that the link always appears for users when they view that record.
Permissions and other requirements
| Subscription | Customization or Platform Services |
|---|---|
| User type | Business user with administrative privileges |
| Permissions | Smart link clicks: Add, Edit |
| Other | A valid link to a website or hosted file. |
-
Go to Platform Services > Object customization > Smart link clicks, then select Add.
-
Select an Owner object.
This is the record where you want the link to appear. For example, if you want this link to show on Accounts Receivable terms, select AR terms from the list.
-
Select Next.
-
Enter the Target URL that users will be directed to when they select the link.
-
Optionally, enter any conditions that you want for the link.
For example, you can set a condition where a field in the customer record called Website must contain text for the link to display to users. If the field is empty, users do not have access to the link.
-
Select Next.
-
Enter a Label for the link.
This is the link text that displays on the record.
-
Enter the name of the section or tab where the link will appear.
You can set the link to appear on an existing section or tab, or add a new tab for the link.
-
If you enter text for Section where field appears, Intacct creates a new section with that name. For example, you could name this new section "Resources."
-
If you select an existing tab for Tab where field appears, Intacct adds the section to that tab.
-
If you enter text for New tab where field appears, Intacct creates a new tab with that name and adds the section to that tab.
-
-
Select Save.
-
Go to the list for the object that you extended.
-
Select View next to a record.
-
Verify that the link appears and works.
Now when users go to the object that you extended, they'll see the link when in view mode.