Price list entries—Order Entry
Related information
A price list entry contains the pricing for a selected item within a selected price list. You can create price list entries for items whose prices are determined based on an amount, a discount or mark up percentage, the quantity sold, and more.
| Subscription |
Order Entry, Purchasing, or Inventory Control |
|---|---|
| User type |
Employee Business Project Manager Warehouse |
| Permissions |
|
| Restrictions | Employee and Project Manager users can only list and view price list entries. |
| Subscription |
Order Entry, Purchasing, or Inventory Control |
About price list entries
A price list entry contains the pricing for a selected item within a selected price list. Each associated price list entry should have a unique combination of item or product line, currency, start and end date range, and, optionally, minimum and maximum quantity range.
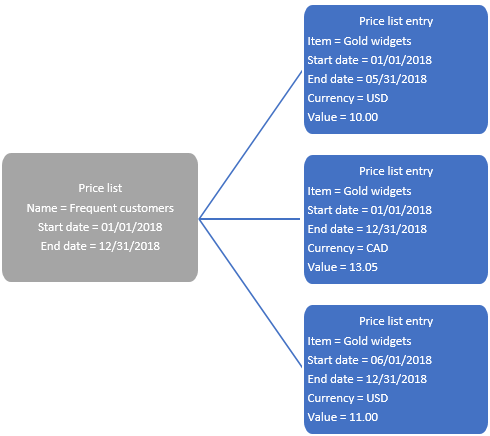
You can create multiple entries in one price list for one item that each use a different currency. For example, if you do not want to create separate price lists for dollars and euros, you could create two entries for a single item in one price list and assign USD to one entry and EUR to the other. Alternatively, you could have multiple price lists, with each price list containing price list entries in a single transaction currency.
About price list dates
Intacct allows you to have multiple price list entries for the same item that cover all or part of a common date range. In this scenario, Intacct will use the price list entry with the latest End date. This can lead to unexpected results. The best practice is not to have overlapping date ranges within a price list for an item that use the same currency. If a price changes and you want to update the price, add a new price list entry for the updated price that starts on the applicable date. Then update the End date on the existing price list entry record to end on the new price list entry start date minus one.
There's no date validation between the price list start and end dates and its associated price list entry start and end dates. For example, say your price list ends on Dec 31 2024. It contains a price list entry that ends Dec 31 2025. If the price list is still associated with objects, Intacct will continue to evaluate the price list entry until Dec 31 2025.
About the Fixed flag
The Fixed field on a price list entry indicates whether the price is the fixed or final price. In a cascading (or layered) price list structure, the first time the system encounters Fixed = Y for an item, it will present that price as the suggested price on the transaction regardless of any other price defined for that item in other price lists.
Learn how the system evaluates the price lists.
Add a price as an amount
Adding a price as an amount simply means you are entering a straightforward price for the item. If the item's price is $500.00, you enter 500.00 in the Value field.
To add a price as an amount:
-
Go to Order Entry > Setup > Price > Lists.
- Find the price list and select Entries next to it.
- Select Add.
- Select either an Item ID or a Product line ID from the dropdown lists. Do not select both an Item ID and a Product line ID.
- Use the calendar tool to select a Start date and End date for the price list entry.
- If applicable, use the dropdown list to select a transaction Currency.
- Use the dropdown list to select Actual as the Value type.
- Enter the amount in the Value field. For example, if the price for the item is $10.00, enter 10.00.
- If you do not want this price list entry to be the final price, use the dropdown list to set Fixed to N.
-
Select Save.
-
Go to Order Entry > Setup > Price > Lists.
- Find the price list and select Details next to it.
- Select Add.
- Select either an Item ID or a Product line ID from the dropdowns. Do not select both an Item ID and a Product line ID.
- Use the calendar tool to select a Start date and End date for the price list entry.
- If applicable, use the dropdown list to select a transaction Currency.
- Use the dropdown list to select Actual as the Value type.
- Enter the amount in the Value field. For example, if the price for the item is $10.00, enter 10.00.
- If you do not want this price list entry to be the final price, use the dropdown list to set Fixed to N.
-
Select Save.
Add quantity price breaks
Use this option if you want to give or get price breaks according to the quantity ordered. With this type of pricing, the system multiplies the transaction quantity by the rate mapped to the quantity range in which the transaction quantity falls.
For example, say you sell widgets, and you want to give price breaks. You want to sell up to 100 widgets at the regular price of $10.00 each, and then quantities over 100 at a discounted price of $9.00 each. In this example, you create two price list entries that contain the same data, except the first price list entry's Minimum and Maximum quantity range would be 1-100, and the second price list entry's Minimum and Maximum quantity range would be 101-999,999 (or your usual maximum end point). If a customer buys 75 widgets, the suggested price is $10.00 each for an extended transaction price of $750.00. If the customer buys 101 widgets, the suggested price is $9.00 each for an extended transaction price of $909.00.
To add quantity price breaks:
-
Go to Order Entry > Setup > Price > Lists.
- Find the price list and select Entries next to it.
- Select Add.
- Select either an Item ID or Product line ID from the dropdown lists. Do not select both an Item ID and a Product line ID.
- Use the calendar tool to select a Start date and End date for the price list entry.
- If applicable, use the dropdown list to select a transaction Currency.
-
Enter the Minimum quantity for the quantity range. For example, if the quantity range is 1-100, enter 1 in this field.
Quantities cannot be negative.
- Enter the Maximum quantity for the quantity range. For example, if the quantity range is 1-100, enter 100 in this field.
- Use the dropdown list to select Actual as the Value type.
- Enter the amount in the Value field. For example, if the sales price for the item is $10.00, enter 10.00.
- If you do not want this price list entry to be the final price, use the dropdown list to set Fixed to N.
-
Select Save.
- Repeat steps 3 through 12 to add price list entries for each quantity range for the item.
-
Go to Order Entry > Setup > Price > Lists.
- Find the price list and select Details next to it.
- Select Add.
- Select either an Item ID or Product line ID from the dropdowns. Do not select both an Item ID and a Product line ID.
- Use the calendar tool to select a Start date and End date for the price list entry.
- If applicable, use the dropdown list to select a transaction Currency.
- Enter the Minimum quantity for the quantity range. For example, if the quantity range is 1-100, enter 1 in this field.
Quantities cannot be negative.
- Enter the Maximum quantity for the quantity range. For example, if the quantity range is 1-100, enter 100 in this field.
- Use the dropdown list to select Actual as the Value type.
- Enter the amount in the Value field. For example, if the sales price for the item is $10.00, enter 10.00.
- If you do not want this price list entry to be the final price, use the dropdown list to set Fixed to N.
-
Select Save.
- Repeat steps 3 through 12 to add price list entries for each quantity range for the item.
Add a price as a mark up or discount
You can have Intacct automatically mark up or discount an item's price by an amount or by a percentage.
The system will only be able to use mark up or discount price list entries if it finds the item priced as an amount in another price list before it finds the mark up or discount price list entry. This is achieved via layered price list assignment.
To add a price as a mark up or discount
-
Go to Order Entry > Setup > Price > Lists.
- Find the price list and select Entries next to it.
-
Select Add.
- Use the dropdown list to select either an Item ID or Product line ID. Do not select both an Item ID and a Product line ID.
- Use the calendar tool to select a Start date and End date for the price list entry.
- If applicable, use the dropdown list to select the Currency for the price list entry.
-
Use the dropdown list to select one of the following Value types.
- Dollar markup: adds the amount entered in the Value field to the last price list entry found for the same item.
- Dollar discount: subtracts the amount entered in the Value field from the last price list entry found for the same item.
- Markup percent: the amount of the last price list entry found by the percentage entered in the Value field and then adds the result to the last price list entry found.
- Discount percent: multiplies the amount of the last price list entry found by the percentage entered in the Value field and then subtracts the result from the last price list entry found.
- Enter the dollar amount or percentage in the Value field. For example, if the dollar markup is $25.00, enter 25.00 If the discount percentage is 15%, enter 15.
- If you do not want this price list entry to be the final price, use the dropdown list to set Fixed to N.
-
Select Save.
-
Go to Order Entry > Setup > Price > Lists.
-
Find the price list and select Details next to it.
-
Select Add.
- Use the dropdown list to select either an Item ID or Product line ID. Do not select both an Item ID and a Product line ID.
- Use the calendar tool to select a Start date and End date for the price list entry.
- If applicable, use the dropdown list to select the Currency for the price list entry.
-
Use the dropdown list to select one of the following Value types.
- Dollar markup: adds the amount entered in the Value field to the last price list entry found for the same item.
- Dollar discount: subtracts the amount entered in the Value field from the last price list entry found for the same item.
- Markup percent: the amount of the last price list entry found by the percentage entered in the Value field and then adds the result to the last price list entry found.
- Discount percent: multiplies the amount of the last price list entry found by the percentage entered in the Value field and then subtracts the result from the last price list entry found.
- Enter the dollar amount or percentage in the Value field. For example, if the dollar markup is $25.00, enter 25.00 If the discount percentage is 15%, enter 15.
- If you do not want this price list entry to be the final price, use the dropdown list to set Fixed to N.
-
Select Save.
Add a price as a project billing rate
You define billing rates by using a combination of employee and item. You identify the employee ID and the type of service performed by the employee, and then specify the rate associated with that combination. For example, you might charge your customers $100.00 an hour for Clare Johnson for project design, but you charge $125.00 an hour for Clare Johnson for project implementation.
To add a price as a project billing rate:
-
Go to Order Entry > Setup > Price > Lists.
-
Find the price list and select Entries next to it.
- Select Add.
The Price List Entry Information page appears.
-
Use the dropdown list to select the desired Item ID. For example, select Project design.
The item type cannot be Inventory. - Use the dropdown list to select the desired Employee ID.
- Use the calendar tool to select a Start and End date for the price list entry.
- If applicable, use the dropdown list to select a transaction currency.
- Use the dropdown list to select Actual as the Value type.
- Type the amount in the Value field. For example, if the hourly rate for the employee/item combination is $100.00, type 100.00.
- If you do not want this price list entry to be the final price, use the dropdown list to set Fixed to N.
- Select Save.
-
Go to Order Entry > Setup > Price > Lists.
-
Find the price list and select Details next to it.
- Select Add.
The Price List Entry Information page appears.
-
Use the dropdown list to select the desired Item ID. For example, select Project design.
The item type cannot be Inventory. - Use the dropdown list to select the desired Employee ID.
- Use the calendar tool to select a Start and End date for the price list entry.
- If applicable, use the dropdown list to select a transaction currency.
- Use the dropdown list to select Actual as the Value type.
- Type the amount in the Value field. For example, if the hourly rate for the employee/item combination is $100.00, type 100.00.
- If you do not want this price list entry to be the final price, use the dropdown list to set Fixed to N.
- Select Save.
Import price list entries
You import price lists and price list entries together in one import file. Order Entry uses the same price list import template file as Inventory and Purchasing. See Import an Inventory price list.
Edit a price list entry
You have two options for changing a price in a price list:
- Add a new price list entry that has a new price, new Start date, and new End date, and then update the End date of the existing price list entry to end one day before the new price list entry starts. This lets you keep a history of price changes.
Intacct considers a price to be effective as of its start date. When suggesting a price for a selected item, Intacct evaluates the price list entry that's effective as of the transaction date.
If you have multiple price list entries for the same item that cover all or part of a common date range, Intacct will only evaluate the price list entry with the latest end date. For example, you have a price list entry for widgets for $10 with a date range of January 1, 2025 through December 31, 2025. You add another price list entry for widgets for $12 with a date range of March 1, 2025 through August 31, 2025. If the transaction date is April 1, 2025, Intacct will evaluate the $10 price and ignore the $12 price. - Edit the existing price list entry. This changes the price, but does not display any history, so you will not know from looking at this page what price was previously used. You could use the Audit trail to see changes.
If you change an item's price, it will be immediately available to all new or modified transactions that occur after the price revision. Changing a price will not affect existing transactions.
-
Go to Order Entry > Setup > Price > Lists.
-
Find the price list and select Entries next to it.
-
Go to Order Entry > Setup > Price > Lists.
-
Find the price list and select Details next to it.
To edit a price list entry:
-
Go to Order Entry > Setup > Price > Lists.
-
Find the price list and select Entries next to it.
- Select Edit.
- Edit the fields as needed.
-
Select Save.
-
Go to Order Entry > Setup > Price > Lists.
-
Find the price list and select Details next to it.
- Select Edit.
- Edit the fields as needed.
-
Select Save.
View a price list entry
-
Go to Order Entry > Setup > Price > Lists.
-
Select Entries next to the desired price list.
Need help finding a price list?-
Records designated as Inactive do not appear in the list by default. To view these records, select Filters at the top of the list and select Remove next to the Status filter to remove it.
-
When you access the list from the top level, you initially only see records created at the top level. To see records created within entities, select Filters and then select Include entity records. Select Apply to update the filter.
-
- Select View next to the applicable price list entry.
-
Go to Order Entry > Setup > Price > Lists.
- Select Details next to the desired price list.
- To view inactive price list entries, select the Include inactive checkbox.
- If you accessed this page from the top level of a multi-entity shared environment, select the Include private checkbox to view the price list entries that were created at the entity level.
- Select View next to the applicable price list entry.
Delete a price list entry
You can delete a price list entry if it has not been used by any transactions. This removes the price list entry from the system. Alternatively, you can deactivate the price list entry (change the status to Inactive), which prevents it from displaying in any selection lists but retains the price for historical purposes.
-
Go to Order Entry > Setup > Price > Lists.
-
Select Entries next to the desired price list.
- On the Price list entries page, select the check box at the start of the row for each price list entry you want to delete and select Delete.
Depending on your user preferences, Intacct might prompt you to confirm the deletion.
-
Go to Order Entry > Setup > Price > Lists.
- From the Price list entries for <price list> page, select the Delete checkbox at the end of the row for each price list entry you want to delete.
-
Select Delete at the top of the list.
Depending on your user preferences, Intacct might prompt you to confirm the deletion.
Field descriptions
The following table describes each field on the Price list entry information page.
| Field | Description |
|---|---|
|
Item ID |
Use the Item selection list to select the desired item. If you do not know the item ID, select the Find link in the Item ID dropdown. If you select an Item, do not select a Product line. |
|
Employee ID |
This field is only applicable if your company is subscribed to Projects and Time and Expenses. If you want to define a project billing rate, you use a combination of employee and item. Intacct will use the price associated with this item/employee combination for applicable timesheets when you generate invoices for time and materials projects. Billing rates defined for this employee/item combination on a project's Resources and billing tab will override this price during invoice generation even if the price list entry has Fixed = Y.
|
|
Product line ID |
Use the Product line ID selection list to select the desired product line. If you select a product line, do not select an Item ID |
|
Start date and End date |
Use the calendar tool to select the date on which the price becomes effective and when it ends. You can enter past or future dates. Intacct considers a price to be effective as of its start date. When suggesting a price for a selected item, Intacct uses the price list entry that's effective as of the transaction date. The best practice is to have each unique combination of item or product line, currency, and optionally the minimum and maximum quantity range price list entry span a unique start and end date range with no overlapping dates. If you have multiple price list entries for the same item that cover all or part of a common date range, Intacct will only evaluate the price list entry with the latest End date. For example, you have a price list entry for widgets for $10 with a date range of January 1, 2025 through December 31, 2025. You add another price list entry for widgets for $12 with a date range of March 1, 2025 through August 31, 2025. Regardless of the transaction date, Intacct will evaluate the $10 price and ignore the $12 price.
|
|
Minimum quantity and Maximum quantity |
Use this option if you want to give or get price breaks according to the quantity ordered. With this type of pricing, the system multiplies the transaction quantity by the rate mapped to the quantity range in which the transaction quantity falls. For example, say you sell widgets, and you want to give price breaks. You want to sell up to 100 widgets at the regular price of $10.00 each, and then quantities over 100 at a discounted price of $9.00 each. In this example, you create two price list entries that contain the same data, except the first price list entry's Minimum and Maximum quantity range would be 1-100, and the second price list entry's Minimum and Maximum quantity range would be 101-999,999 (or your usual maximum end point). If a customer buys 75 widgets, the suggested price is $10.00 each for an extended transaction price of $750.00. If the customer buys 101 widgets, the suggested price is $9.00 each for an extended transaction price of $909.00. Quantities cannot be negative. |
|
Currency |
Use the Currency selection list to select the currency in which the price will be evaluated. This field is only applicable to multi-currency companies. |
|
Value |
The value you enter depends on the Value type that you select. The following list shows each Value type that you can select and what to enter for Value:
You can enter a negative number when Value type is Actual for items where the Item type is Non-Inventory, Non-Inventory (Sales only), or Non-Inventory (Purchase only). You cannot enter a negative number if the Item type of the selected item is Inventory, Kit, or Stockable kit to prevent costing issues. |
|
Value type |
Options are:
|
|
Fixed |
Indicates whether or not the price is the fixed or final price. In a cascading (or layered) price list structure, the first time Intacct encounters Fixed = Y for an item, it will present that price as the Suggested price on the transaction regardless of any other price defined for that item in other price lists. For example, say that your company has a regular price list and a seasonal price list that each contain a different price for the same item. On the transaction definition, the regular price list is specified as the Initial price list and the seasonal price list is specified as the Special price list. Intacct evaluates the Initial price list first and then evaluates the Special price list to determine the item's Suggested price. If the item has Fixed = N in both price lists, Intacct presents the Special price list price as the Suggested price. If the item has Fixed = Y in the Initial price list, Intacct stops further evaluation and presents the fixed price as the Suggested price on the transaction. |
|
Status |
Options are:
|