How tax works in the Taxes application
Related information
 Related topics
Depending on the tax solution and the transaction, the user either selects a tax rate and Intacct then calculates the tax based on that rate, or Intacct automatically determines the tax rates and calculates the tax.
How VAT and GST work
For a VAT or GST tax solution, several tax objects work together to calculate the tax for the transactions created in Accounts Receivable, Accounts Payable, Cash Management, General Ledger, Order Entry, Purchasing, and Expenses.
The tax detail (type of tax and percent rate) applied to a line item in a transaction is defined by assessing the tax schedule maps. The following diagram summarizes how a tax schedule map matches the combination of a contact tax group and an item tax group to determine which tax schedule and corresponding tax detail to apply:
| Object | Description |
|---|---|
Tax schedule map | Associates a tax schedule with a contact tax group and item tax group combination. The item tax group is only used in the Order Entry and Purchasing applications. |
Tax schedule | Identifies the tax detail that's applied when the map is used. |
Tax detail | Identifies the type of tax and its percent rate. The same tax detail can be used in multiple tax schedules. The tax detail also identifies the GL account for posting tax. Example tax details for Australia
Example tax details for South Africa
Example tax details for United Kingdom
|
Contact tax group | Enables different tax rates to be applied to your customers and vendors, according to their jurisdictions. A customer, vendor, or contact can belong to only one contact tax group. Learn more about contact tax groups. |
Item tax group | Enables different tax rates to be applied to your items. An item can belong to one item tax group per tax solution. Learn more about item tax groups. |
In Accounts Receivable, Accounts Payable, Cash Management, General Ledger, and Time and Expenses, the user manually selects one or more tax details for each line item in a transaction. Intacct then calculates the tax based on the selected tax detail. In Order Entry and Purchasing, Intacct automatically determines the tax details to apply to each line item and calculates the tax.
- You create an invoice and select Customer A in the header. The ship-to contact for Customer A is associated with contact tax group Group-C1.
Intacct looks through the tax schedule maps and finds four tax schedule maps that match contact tax group "Group-C1". The tax schedule for each map contains one tax detail. So, four tax details will appear in the Tax detail dropdown list in the Entries section.
- For each line item you enter, you use the Tax detail dropdown list to select which of the four tax details to apply to the line. When you select the tax detail, Intacct calculates the tax for the line based on the selected tax detail:

A transaction in Accounts Payable works similarly, except Intacct uses the tax schedule maps that match the contact tax group that's associated with the vendor pay-to contact.
- You create a sales invoice and select Customer B in the header. The ship-to contact for Customer B is associated with contact tax group Group-C2.
- You enter the first line item for Item-A, which is associated with item contact tax group Group-I2.
Intacct looks through the tax schedule maps and finds one tax schedule map that matches contact tax group "Group-C2" and item tax group "Group-I2". The tax schedule for the map contains one tax detail. Intacct automatically applies the percent rate for the tax detail to the line and calculates the tax.

- As you enter each subsequent line item, Intacct continues to evaluate the tax schedules maps to automatically determine the tax details to apply and calculates the tax.
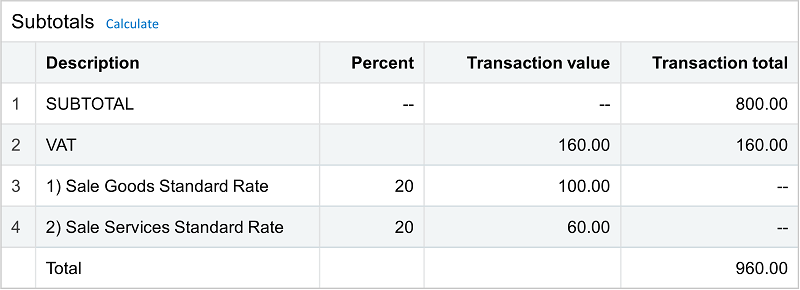
- When you calculate the subtotals for the transaction, a summary of all the taxes that were applied to the line items is displayed:
A transaction in Purchasing works similarly, except Intacct uses the tax schedule maps that match the contact tax group that the customer pay-to contact is associated with and the item tax group.
For more details and examples of how tax schedule maps work, see About tax schedule maps.
A default set of tax objects is automatically created for Australia GST, Canadian Sales Tax, Deutsche Umsatzsteuer, South Africa VAT, TVA Française, and United Kingdom VAT, using the applicable tax rates for those countries. For custom VAT (or GST), you create your own tax objects that apply the tax rates. For each of the solutions, it's important to assign customer ship-to contacts and vendor pay-to contacts to the appropriate contact tax groups and items to the appropriate item tax groups before entering any transactions. For more information about setting up VAT, see Set up Taxes.
How Advanced Tax works
For an Advanced Tax solution, several tax objects work together to automatically calculate the sales tax for transactions created in Order Entry and Purchasing.
The tax details (type of tax and percent rate) applied to a line item in a transaction is worked out by assessing the tax schedule maps. The following diagram summarizes how a tax schedule map associates a tax schedule with customers or vendors (through a contact tax group) and items (through an item tax group). The tax schedule contains the tax detail records, which define the amount of tax to apply.
| Object | Description |
|---|---|
Tax schedule map | Associates a tax schedule with a contact tax group and item tax group combination. The item tax group is only used in the Order Entry and Purchasing applications. |
Tax schedule | Identifies the tax details that are applied when the map is used. |
Tax detail | Identifies the type of tax and its percent rate. The same tax detail can be used in multiple tax schedules. The tax detail also identifies the GL account for posting tax. Example tax details
|
Contact tax group | Enables different tax rates to be applied to your customers and vendors, according to their jurisdictions. A customer, vendor, or contact can belong to only one contact tax group. Learn more about contact tax groups. |
Item tax group | Enables different tax rates to be applied to your items. An item can belong to one item tax group per tax solution. Learn more about item tax groups. |
After you set up your tax objects and complete all the other setup tasks, Intacct automatically determines the tax details to apply to each line item and calculates the tax when you enter Order Entry or Purchasing transactions.
When you enter a line item in a transaction, Sage Intacct uses the tax schedule maps to determine which tax details to use to calculate the tax for the item. The tax details from all tax schedule maps that have the combination where the item belongs to the item tax group and the customer or vendor belongs to the contact tax group are used.
- You select Customer A in the header of a transaction. The ship-to contact for Customer-A is associated with contact tax group Group-C1.
- You enter Item A in line item 1. Item A is in item tax group Group-Tax1. Intacct finds a tax schedule map that associates contact tax Group-C1 with item tax group Group-Tax1 that has a tax schedule with the three tax details: California state tax, County 2 tax, and City 1 tax. Intacct applies all three tax details to the item.
- You enter Item B in line item 1. Item B is in the item tax group Group-Tax2. Intacct finds a tax schedule map that associates contact tax Group-C1 with item tax group Group-Tax2 that has a tax schedule with only the California state tax. Intacct applies that one tax detail to the item.
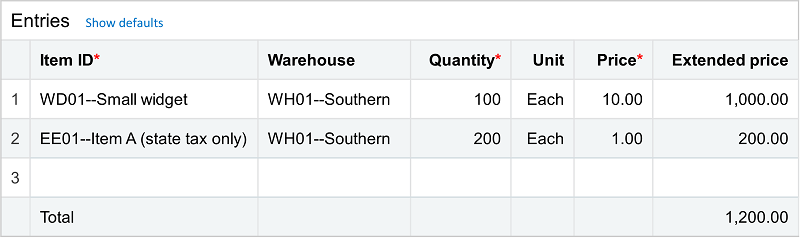
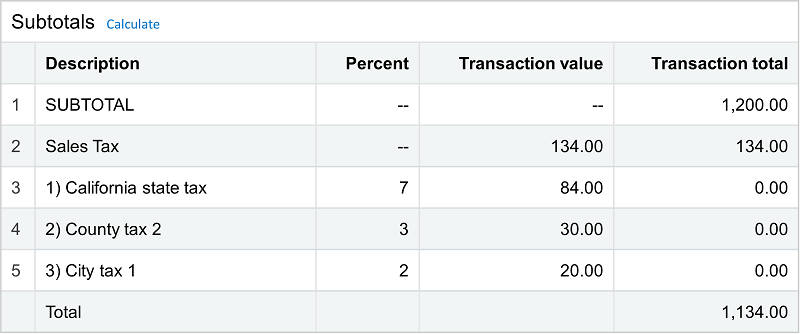
If the transaction definition has Show expanded tax details set to true, Intacct shows the descriptions of the tax detail records associated with the tax schedules used for the tax subtotal based on the tax schedule maps.
An example in Purchasing works similarly, except Intacct uses the tax schedule maps that match the contact tax group that the customer return-to contact is associated with and the item tax group.
How Avalara AvaTax works
With an Avalara AvaTax tax solution, you can enable having sales tax automatically calculated for transactions created in Accounts Receivable, Order Entry, and Purchasing.
When you click Calculate in the Subtotals section of a transaction or save the transaction, Intacct sends the needed information to AvaTax. AvaTax then determines the taxability and tax rates, computes the tax amounts, and sends the rates, jurisdictions, and amounts back to Sage Intacct.
To use AvaTax, you establish an account with Avalara and configure the Avalara account to determine the nexus, taxability, reporting, and filing profiles unique to your business. Avalara offers services in jurisdiction assignment, rate research, calculations, maintenance, reporting, tax returns, and remittance.
On the Sage Intacct side, you set up your customers and vendors, assign Avalara tax codes to your items, and set up invoice numbering.
Learn more about Avalara AvaTax.
