Accounts Payable
Announcing vendor approval
This idea came from you!
We're excited to announce Vendor approval, one of our most requested features. You can now manage your vendor approval process directly within Sage Intacct, ensuring the correctness of vendor records before the information is used in Accounts Payable and Purchasing transactions.
Users with the proper permissions use the Vendor approval page to review new vendors and updates to existing vendor records. While a vendor record is pending approval, new Accounts Payable and Purchasing transactions for that vendor can be saved as drafts, but they cannot be posted. After the vendor is approved, the transactions can be posted.
Details
Vendor approval supports a single-level approval structure. To designate an approver, assign the Approve vendors permission to the user.
When a user submits a new or updated vendor, Sage Intacct sets the vendor state to Submitted and adds the vendor to the approval queue. Approvers who configured their preferences receive an email notifying them that a vendor is awaiting their approval. From the Approve vendors list, they can review changes and approve or decline vendors.
While a vendor is awaiting approval, or if the vendor is declined, users cannot do the following:
- Post Accounts Payable and Purchasing transactions for that vendor
- Edit existing transactions for the vendor
- Select vendor transactions for payment
Users can save new transactions as drafts, even for submitted or declined vendors. This allows you to capture new transactions as they comes in, then post the them after the vendor is approved. This also means that incoming draft transactions from AP Automation are saved normally.
If a vendor is declined, the submitter can edit the vendor record and resubmit it for approval.
How it works
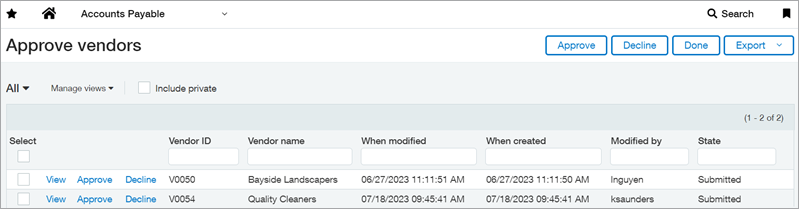
To approve or decline a vendor:
- Go to Accounts Payable > All tab > Approve vendors.
- Select View next to the vendor name to open the vendor record.
- To see changes made by the submitter, select More actions > View the audit trail.
- Select Approve or Decline.
- Optionally, enter Comments.
- Select Approve or Decline again.
Vendor states
A new State column appears in the Vendors list to let you know where the vendor record is within the approval process. This field is also visible on the Vendor information page and the Approve vendors page.
| State | Description |
|---|---|
| Submitted | The vendor is new or updated and is awaiting approval. New transactions for this vendor can be saved as drafts only, and posted transactions cannot be edited or selected for payment. |
| Declined |
An approver declined the new or updated vendor. The approver has the option to include a comment that explains why it was declined and what needs to be done to resubmit. As with submitted vendor records, new vendor transactions can be saved as drafts, only. The submitter can update the vendor record and resubmit. |
| Approved | The new or updated vendor was approved. Vendor transactions can now be posted. |
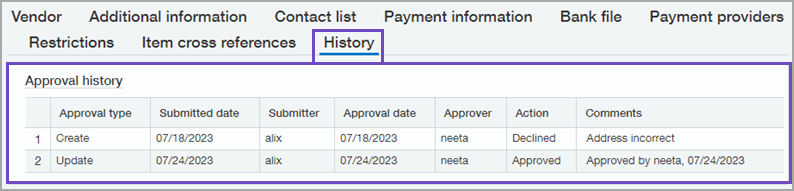
Approval history
Use the History tab on the vendor information page to review the approval history. You can see who approved the vendor and when, or where the vendor is in the approval process.
Setup
- Before you enable Vendor approvals, verify that you have the Approve vendor: List permission.
The permission is necessary because after you enable Vendor approvals, Sage Intacct automatically updates the audit trail for all active and inactive vendors to show them as approved. The user who enables Vendor approvals recorded as the approver. You can remove the permission after all vendors are updated.
The process of updating the audit trail might take some time, depending on how many vendors you have. Users will not be able to add, edit, delete, or import vendors until the process completes, so you might want to enable this feature during off hours. - At the top level, go to Accounts Payable > Setup > Configuration.
- Under Vendor approval settings, select the checkbox for Enable vendor approval.
- To allow users to receive notifications, select the checkbox for Email notifications.
- Select Save.
Sage Intacct begins the process of updating the audit trail for existing vendors, then sends you an email notification when the update is complete.
- Add additional approvers by assigning the Approve vendors: List permission, as needed.
- If you configured vendor approval to support email notifications, let users know that they can update their preferences to receive notifications.
Approvers can receive notifications when a vendor is ready for their review, and submitters can receive notifications when vendors they submitted are approved or declined.
Requirements
| Subscription |
Accounts Payable |
|---|---|
| Regional availability |
All regions |
| Permissions |
Approve vendors: List |
| User type |
Approve vendors: Business, Employee, Project manager, or Platform user Submit vendors: Business user |
| Configuration |
Set up Vendor approval in Configure Accounts Payable. |
| Migration |
All existing vendors are set to the Approved state after you enable vendor approval. |
| CSV import | Approvals are not supported when vendors are updated using the following CSV imports:
The vendor state remains unchanged after these imports. |
| Restrictions |
Vendor approval API not currently available. |