Company and Administration
Authenticate and validate your custom domain before May 2025
Starting May 2025, all customers who send emails using a custom domain must authenticate and validate their domain. This is a critical step as we transition fully to using the enhanced email delivery service.
Why is this important?
Authenticating your domain helps ensure your email communications are secure and reliable.
Domain authentication delivers the following benefits:
-
Improved email deliverability, reducing the chances of your messages being marked as spam or not reaching recipients.
-
Protects your domain from being used in phishing attacks or other fraudulent activities.
-
Aligns with best practices for email security and compliance.
To avoid any email deliverability issues that might affect your communications to customers and partners, make sure to authenticate your domain by May 2025.
How it works
Your Intacct administrator will need work with your email administrator to obtain the DNS keys and other information for your domains.
Step 1. Add and authenticate a domain
-
Go to Company > Setup > Company.
-
Go to the Security tab and select Edit.
-
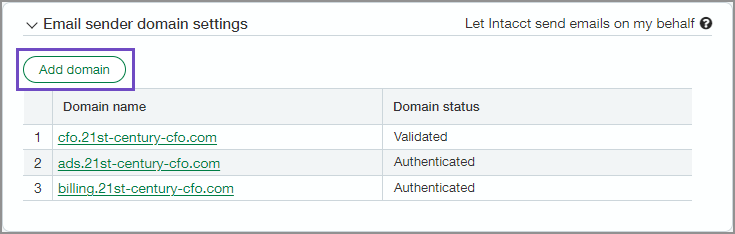
Scroll down to Email sender domain settings.
-
Select Add a domain.
-
Enter your Email sender domain.
For example, if you enter example.com, then emails will be sent from intacct-mailservice@example.com.
-
Select Authenticate domain.
When the authentication process is complete, a DNS key table is available which contains the following values:
-
The CNAME used to configure the SPF record.
-
The two CNAMEs used to configure DKIM authentication.
-
One or two TXT strings that are used to configure EKS.
-
The TXT string used to configure SPF for the previous email delivery service.
Intacct recommends copy and pasting the DNS keys to a file for reference when configuring your DNS. Entering DNS keys manually is often error prone and leads to incorrectly configured DNS. -
-
Save your changes.
Step 2. Add DNS keys to your configuration
The DNS keys must be added to your domain's DNS configuration. Your business email administrator can help with this process.
Come back to the Email sender domain settings to validate your domain after the DNS keys have been added to your DNS configuration.
Step 3. Validate a domain
After the DNS keys have been added to your configuration, validate your domain.
-
Go to Company > Setup > Company.
-
Go to the Security tab and select Edit.
-
Scroll down to Email sender domain settings.
-
Select the domain name you want to validate.
The Domain configuration opens.
-
Select Validate domain.
DNS keys can take up to 72 hours to be updated and validated. -
Save your changes.
For more information, see Enhanced email delivery service domain settings.
Permissions and other requirements
| Subscription | Administration |
|---|---|
| Regional availability |
All regions |
| User type | Business user with admin privileges |
| Permissions | Company info: View, Edit |