Import customer refunds
Import large batches of customer refunds into Sage Intacct using a CSV file upload.
Prepare a CSV file for import
When you download a template, the correct headers are in the template already. All you have to do is fill in the columns with your data, save it as a CSV file, and upload the file.
The header titles in the template you download correlate to fields in Intacct. Incorrect header titles will cause an upload error.
For more information about the CSV upload process, including best practices, common errors, and how to upload your CSV file, see Prepare your file for CSV import.
Download a new blank template whenever you import information into Sage Intacct. Using a new template is important because:
- Templates are automatically customized based on your company configuration, including any dimensions and custom fields you created.
- Templates can be updated by Intacct at any time, especially when a new version of Intacct is released. When templates are updated, an older template might not work.
About importing refunds
There are several things to consider when you import customer refunds into Intacct:
-
Customer refunds must be enabled and set up in Accounts Receivable before you can import refunds.
-
Refunds that you import with a status of Submit post directly to the General Ledger based on the bank account that you specify.
-
The amount refunded cannot exceed the available credit amount.
-
Verify import data before you upload to Intacct. Bulk reversal is unavailable. If you must delete customer refunds that have already been imported, ask your designated support user to contact Support. For more information about contacting support, see The Sage Intacct Community.
Best practice: Upload a single refund first to test your import data. That way, you can make data corrections as needed before importing multiple refunds.
Supported refunds
Use the following table to see which refund use cases are supported. Exceptions are not supported for import at this time.
| Payment element | Supported cases | Exceptions |
|---|---|---|
|
Accounts |
|
|
|
Payment methods |
|
|
|
Credit types |
|
To import a refund for a customer advance using CSV, the following must be true:
|
|
Transaction currency |
|
|
How to format refunds for import
Use row numbers
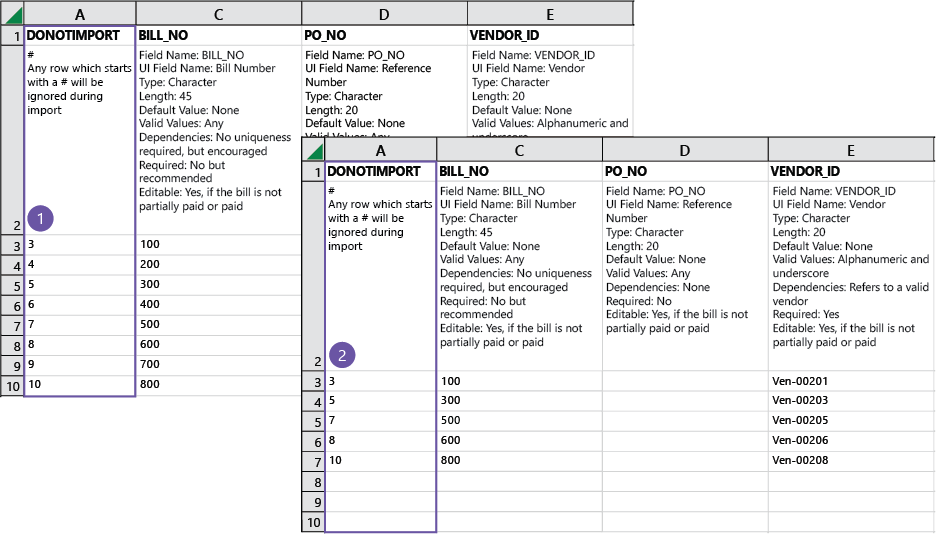
When importing AP purchase invoices or AR sales invoices, if errors are found during upload, the entire CSV file is rejected. You can more easily find the errors in the file if you use row numbers in the Do Not Import column (1). If your CSV file is rejected because errors are found, the error file contains the original row number, allowing you to quickly pinpoint where to make changes (2).
How to import refunds
| Subscription |
Accounts Receivable |
|---|---|
| Regional availability |
All regions |
| User type |
Business |
| Permissions |
Customer refunds: Add, Post Importing draft refunds does not require Customer refunds: Post permissions. |
| Configuration | |
| Restrictions |
Customer refunds are not supported in transactions that use cash basis tax capture. |
-
Go to Accounts Receivable > All > Refunds.
-
Select Import.
-
In the window that appears, select Download template.
Populate the template with refund data and save it as a CSV file.
-
Return to the import window and select Choose file.
Select the saved payment import file in the file explorer that appears.
-
Select a Date format that matches the date format in the file.
-
Select a File encoding option and Process offline.
Best practice: When importing payments in bulk, select Process offline to make sure that the import is successful regardless of how much data is imported for processing.
-
Enter an email address for results.
-
Select Import.
Results: You receive an email after the import is complete. If there are any errors, they appear in the email that you receive.
Field descriptions
The field definitions in your template explain what type of information is required for each field, and how to enter valid information. It's always a good idea to read the field definitions before making entries.
You can reorder the columns of your CSV file for ease of use. However, the column header must contain the field name exactly as it appears in the original template.
If you downloaded a template from the Company Setup Checklist or an object list page, your template contains the headers and dimensions that are specific to your company. The headers in a standard template might not contain field definitions specific to your company.
To import dimension values, enter information in the appropriate dimension column of the import spreadsheet. Otherwise, no information appears for that dimension.
If you relabeled any dimensions (see Terminology for more information), your dimension name does not appear in the CSV template, but the original Intacct dimension name does.
When importing data, names in the FIELD column may differ from terminology used in your location. For information on terms that may differ in your location, see Terminology across locales.
| Field Name: | DONOTIMPORT |
|---|---|
|
# |
Any row that starts with # is ignored during import. |
| Field Name: | CUSTOMERID |
|
UI Field Name: |
Customer |
|
Type: |
Character |
|
Length: |
21 |
|
Default Value: |
None |
|
Valid Values: |
Any |
|
Dependencies: |
A valid customer |
|
Required: |
Yes |
| Field Name: | BANKACCOUNTID |
|
UI Field Name: |
Bank |
|
Type: |
Character |
|
Length: |
20 |
|
Default Value: |
None |
|
Valid Values: |
Any |
|
Dependencies: |
A valid bank account. |
|
Required: |
Yes |
| Field Name: | PAYMENTMETHOD |
|
UI Field Name: |
Payment method |
|
Type: |
Character |
|
Length: |
20 |
|
Default Value: |
EFT |
|
Valid Values: |
Any valid date format |
|
Dependencies: |
None |
|
Required: |
Yes |
| Field Name: | REFUNDDATE |
|
UI Field Name: |
Refund date |
|
Type: |
Date |
|
Length: |
12 |
|
Default Value: |
Today's date |
|
Valid Values: |
Any valid date format. |
|
Dependencies: |
None |
|
Required: |
Yes |
| Field Name: | BASE_AMOUNTREFUND |
|
UI Field Name: |
Translated amount refunded in base currency. |
|
Type: |
Currency |
|
Length: |
14 |
|
Default Value: |
None |
|
Valid Values: |
Digits 0-9 |
|
Dependencies: |
None |
|
Required: |
Yes, only if making a multi-currency refund. |
|
Notes: |
Only base-to-base currency refunds are supported. |
| Field Name: | TRX_AMOUNTREFUND |
|
UI Field Name: |
Txn amount refunded |
|
Type: |
Currency |
|
Length: |
14 |
|
Default Value: |
None |
|
Valid Values: |
Digits 0-9 |
|
Dependencies: |
None |
|
Required: |
Yes, only if making a multi-currency refund. |
|
Notes: |
For refunds involving multi-currency, this field is the total transaction refund amount received. |
| Field Name: | DOCNUMBER |
|
UI Field Name: |
Reference |
|
Type: |
Character |
|
Length: |
15 |
|
Default Value: |
None |
|
Valid Values: |
Any |
|
Dependencies: |
None |
|
Required: |
No |
|
Notes: |
Enter the reference number for the record transfer. |
| Field Name: | SUPDOCID |
|
UI Field Name: |
Attachment |
|
Type: |
Character |
|
Length: |
20 |
|
Default Value: |
None |
|
Valid Values: |
Any |
|
Dependencies: |
Must reference an existing attachment ID in Intacct. |
|
Required: |
No |
|
Notes: |
Enter the attachment ID in Intacct to link an existing attachment to the refund. |
| Field Name: | STATE |
|
UI Field Name: |
State |
|
Type: |
Character |
|
Length: |
20 |
|
Default Value: |
Submit |
|
Valid Values: |
Draft, Submit |
|
Required: |
No |
|
Notes: |
Provide a state of Draft to create a draft refund that you can edit and post later. |
| Field Name: | CREDIT_TYPE |
|
UI Field Name: |
Credit type |
|
Type: |
Character |
|
Length: |
20 |
|
Valid Values: |
Advance, Adjustment, Negative, Overpayment |
|
Required: |
Yes |
|
Notes: |
The type of credit that you’re refunding. This credit type must match the credit type of the transaction number that you provide. |
| Field Name: | TRANSACTION_NO |
|
UI Field Name: |
AR sales invoice no., Payment ID, or Adjustment no. |
|
Type: |
Character |
|
Length: |
15 |
|
Default Value: |
None |
|
Valid Values: |
Any |
|
Dependencies: |
None |
|
Required: |
Yes |
|
Notes: |
Enter the number of the advance, negative AR sales invoice, credit memo, or overpayment here. (For example, inv123 or adj456). This number must match a unique transaction record ID in Intacct. To add a refund to multiple credits, add rows for each transaction number beneath the refund header row. |
| Field Name: | TRX_AMOUNT_TOREFUND |
|
UI Field Name: |
Refund amount |
|
Type: |
Currency |
|
Default Value: |
None |
|
Valid Values: |
Digits 0-9 |
|
Dependencies: |
None |
|
Required: |
Yes. |
|
Notes: |
Enter the refund amount for the transaction number. |
Required fields when importing refunds
Some columns of an import template are required fields. If these fields are left blank, your import will fail. Be sure to enter information for all required fields.
-
CUSTOMERID
-
BANKACCOUNTID
-
PAYMENTMETHOD
-
REFUNDDATE
-
BASE_AMOUNTREFUND: If making a multi-currency payment
-
TRX_AMOUNTREFUND: If making a multi-currency payment
-
CREDIT_TYPE
-
TRANSACTION_NO
-
TRX_AMOUNT_TOREFUND