Set up scheduled invoicing—Contracts
Related information
This topic describes how to set up scheduled invoice runs for your organization.
- Define the notification email address.
- Create scheduled invoice policies.
- Define the invoice policy order of precedence.
1. Define the notification email address
All companies that want to use scheduled invoicing need to specify an email address to receive invoice policy run notifications. If you use a generic email address, make sure to check the inbox regularly.
Whether or not you need to enable scheduled invoicing depends on the following:
- If your company subscribed to Contracts after August 19, 2022, your company is automatically enabled for scheduled invoice policies.
- If your company subscribed to Contracts before August 19, 2022, you can opt in to scheduled invoice policies when desired. Turning on this option is permanent. It restricts invoice generation to the level in which a contract is created in multi-entity companies. So if a contract is created at the top level, it can only be invoiced at the top level. If it is created at the entity level, it can only be invoiced at the entity level.
| Subscription | Contracts |
|---|---|
| Regional availability |
|
| User type | Business user with admin privileges |
| Permissions |
Administration Application Subscriptions: List, View, Subscribe, Configure, Remove |
- Go to Contracts > Setup > Configuration.
- If your company subscribed to Contracts before August 19, 2022, select the Enable scheduled invoice policies checkbox.
- Enter the applicable email address in the Scheduled invoice policies notification email field.
- Select Save.
2. Create scheduled invoice policies
You can either create new invoice policies with scheduling information or edit existing ones to include schedules.
Note the following expected behavior:
- If you create the invoice policy at the top level of a multi-entity company, you can assign the invoice policy to multiple entities to use.
- If you create the invoice policy at the entity-level, the invoice policy can only be used by that entity.
| Subscription |
Contracts |
|---|---|
| Regional availability |
|
| User type | Business |
| Permissions |
Invoice Policies: List, View, Add, Edit, Delete
|
| Configuration | If your company subscribed to Contracts before August 19, 2022, the Automatic invoicing section only appears on the Invoice Policy page if you have configured Contracts to enable scheduled invoice policies. |
-
Go to Contracts > Setup > More and select Add (circle) next to Invoice policies.
-
In the Name field, enter a meaningful identifier.
This identifier will appear in the applicable selection lists in Intacct. You cannot change the Name after you save the invoice policy.
-
Use the Set "As of date" to dropdown list to select the option that will determine the default As of date when Intacct runs the invoice policy.
This field uses the Next execution date as the reference point. For example, if you specify End of month as the Set "As of date" to value and the Next execution date is August 01, then Intacct filters for invoices as of August 31 when it runs the invoice policy.
-
Select the Scheduled checkbox.
Intacct displays the fields related to invoice policy scheduling.
-
Use the calendar tool to select the Start date for the schedule.
The Start date must be on or after today's date. This date will be the Next execution date for the first invoice policy run. The Next execution date will be the invoice date and GL posting date for any scheduled invoices.
- Use the Repeats and Every fields to specify the frequency with which the schedule occurs.
For example, if Repeats = Months and Every = 1, then Intacct will run the invoice policy once a month.
-
Select the other filters as desired.
See Invoice Policy: Field descriptions for information on each field.
-
Select Save.
-
Optionally, test the invoice policy using Preview in the Generate Invoices page.
If the preview does not show the expected results, edit the invoice policy to adjust the filters.
3. Define the invoice policy order of precedence
Use the Invoice policies configuration tab on the Configure Contracts page to determine the processing order for multiple invoice policies. If you create invoice policies at the top level of a multi-entity company, you can also use this tab to assign the invoice policies to the desired entities.
For example, say that your company has two invoice policies with different filter criteria that both include the same invoice and will run on the same date. Which invoice run should take precedence?
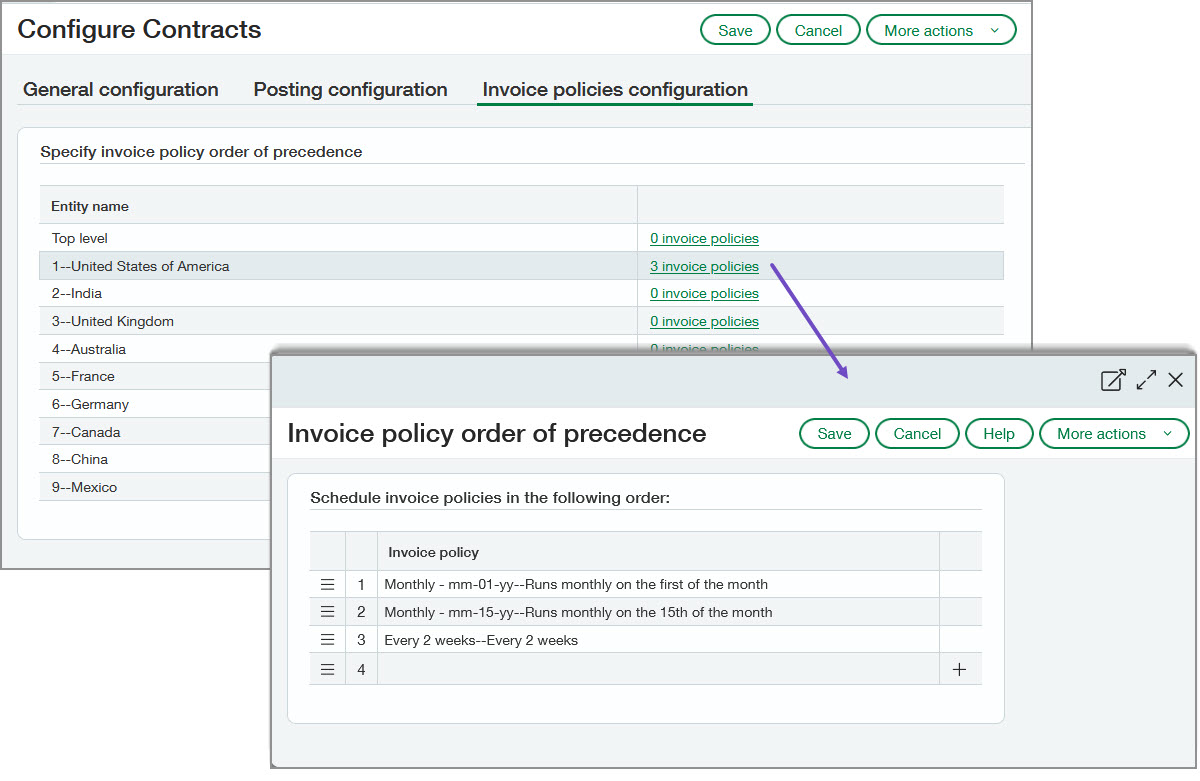
You can drag and drop the invoice policies in the desired order in the Invoice Policy Order of Precedence dialog box. For example, in the above illustration, Intacct processes the invoice policy in row 1 first, then row 2, and so on.
When you create a scheduled invoice policy at the entity level, Intacct automatically assigns it to the next available row in that entity's Invoice Policy Order of Precedence table. For example, say that Entity A already has two scheduled invoice policies. In Entity A, you create a new scheduled invoice policy. Intacct automatically assigns the new scheduled invoice policy to row 3 in Entity A's Invoice Policy Order of Precedence table. You do not need to change the default order unless desired.
When you create a scheduled invoice policy at the top level, you need to manually add the invoice policy to one or more entities' Invoice Policy Order of Precedence table. The invoice policy will not be processed until it is assigned to at least one entity's Invoice Policy Order of Precedence table.
| Subscription | Contracts |
|---|---|
| Regional availability |
|
| User type | Business user with admin privileges |
| Permissions |
Administration Application Subscriptions: List, View, Subscribe, Configure, Remove |
- Go to Contracts > Setup > Configuration.
- Select the Invoice policies configuration tab.
- Select the # invoice policies link next to the applicable entity. The Invoice Policy Order of Precedence popup window appears.
- In the applicable row, use the dropdown to select the desired invoice policy.
For example, if this is the first invoice policy that you want Intacct to evaluate, use the dropdown in row 1.
Only scheduled invoice policies appear in the dropdown lists.
- Repeat step 4 for all invoice policies you want to specify for the selected entity.
- Select Save.
- Repeat steps 3 - 6 for each entity to which you want to assign invoice policies.
- Select Save to close the Configure Contracts page.