Configure Contracts
Related information
Use this page to configure your company's preferences for the Contracts application. For instructions on other setup tasks required to implement Contracts, see also Set up Contracts.
| Subscription |
Contracts |
|---|---|
| Regional availability |
|
| User type | Business user with admin privileges |
| Permissions |
Administration Application Subscriptions: List, View, Subscribe, Configure, Remove |
Configure Contracts for the first time
As Contracts works hand-in-hand with the Order Entry and Revenue Management applications, you’ll need to set configuration options in both of those applications to complete your first-time Contracts configuration. It's important that you complete the configuration tasks in the following order to ensure all applicable configuration data is captured.
- Create the revenue and expense journals
- Create the Contracts GL accounts
- Configure General Ledger and Order Entry
- Subscribe to Contracts
- Configure Revenue Management
- Create the contract invoice transaction definition
- Complete the Configure Contracts page
- Next steps
Prerequisites
You can subscribe to Contracts if both of the following are true:
- Your company's GL Accounting method = Accrual. If it does not equal Accrual, see your account representative for more information.
- Your company is using standard accounting periods. Contracts doesn’t support custom accounting periods.
1. Create the revenue and expense journals
The following are the valid journal configuration combinations:
| Journal 1 | Journal 2 |
|---|---|
| User-defined book | -- |
| -- | User-defined book |
| Accrual | -- |
| -- | Accrual |
| User-defined book 1 | User-defined book 2 |
Depending on how you want to track your contract data, do one of the following:
-
If you will use one set of journals, do one of the following:
- If you want to use user-defined journals, create a user-defined book and then create one revenue journal and one expense journal and assign them to the user-defined book.
- If you want to use accrual journals, create one revenue journal and one expense journal. Learn how to create a General Ledger journal.
-
If you will use two sets of journals, create two user-defined books and then create a revenue journal and an expense journal for each user-defined book.
Keep in mind the following when naming your journals:
- Intacct refers to the journals as journal 1 and journal 2. When configuring Contracts and when you create custom reports, you'll see Journal 1 and Journal 2 when selecting columns and other relevant data.
- In the Contracts user interface, users will see the applicable journal symbol instead of journal 1 or journal 2. If you’re using two journals, use meaningful journal symbols to help your users identify the correct journals in the Contracts application. For example, if you associate RRJ-606 with Revenue journal 1 and RRJ-INT with Revenue journal 2, the Contracts line page will display the following:
The revenue and expense journals specified in your Contracts configuration are used for automatic posting activity associated with Contracts. Typically when you need to make an adjustment, you'll create a new contract line to record the activity in the contract.
However, there may be times when a manual journal entry is necessary to adjust contract balances. To keep your data clean and avoid confusion, create a separate user-defined journal to use for manual contract adjustments. Name it "Contracts manual adjustments" or similar and associate it with the same user-defined book you used for the revenue and expense journals.
2. Create the Contracts GL accounts
Create at least eight unique GL accounts to use for revenue as outlined in the following table. These GL accounts are exclusively for Contracts and should not be used with other applications. If you’re subscribing to Contracts Expense Recognition, create at least three new expense accounts as outlined in the following table.
In order to be ASC 606 compliant, companies are required to disclose the state of contracts (or category of contract) as having either recognized revenue greater than cash collected (contract asset), or recognized revenue less than cash collected (contract liability). Contracts is designed so your financial statements can potentially separate out each line item of each contract into the various GL accounts when revenue is in a particular state.
Unbilled Deferred Revenue acts as a contra account to Unbilled AR in the asset section of the balance sheet so that the unbilled accounts have no effect on the balance sheet until Unbilled Sales Revenue is recognized. That event reduces Unbilled Deferred Revenue, so Unbilled AR only appears on the balance sheet when Unbilled Sales Revenue is posted. This correctly shows unbilled AR only when unbilled revenue is recognized.
When payment is received prior to revenue recognition, the amounts may need to be recorded as a contract liability. You can analyze the status of Paid Deferred Revenue, Paid Sales Revenue accounts, and Unbilled Sales Revenue and Unbilled will show the net contract asset/liability positions.
The Billed AR, Billed Deferred Revenue, and Billed Sales Revenue accounts are for amounts that are neither unbilled nor paid.
Learn more about the Contracts accounting flow.
If you want to separate revenue by item GL group, you’ll need separate sets of revenue and/or expense accounts for each item GL group except Billed AR (you can use the same Billed AR account for all item GL groups). This means creating at least seven revenue accounts or three expense accounts for each item GL group you want to track.
Best practice: Name the accounts similar to the account names in the following table. If you’re creating accounts for each item GL group, append the item GL group name to the account name, for example, Unbilled AR - Subscriptions, Unbilled Deferred Revenue - Subscriptions, and so on.
Although Intacct generally recommends against using subaccounts, you may choose to use subaccounts for each item GL group for your Contracts configuration. For example, have Unbilled Deferred Revenue as the primary account, then Unbilled Deferred Revenue - Subscriptions as a subaccount. If you choose to use subaccounts here, you do not need to configure the primary accounts as posting accounts in Step 4. Subscribe to Contracts. In this scenario, just configure the subaccounts as posting accounts.
| Account name | Description | Account type | Normal Balance |
|---|---|---|---|
| Unbilled AR | The contract line amount that hasn’t been invoiced. | Balance sheet | Debit |
| Billed AR | The contract line amount that has been invoiced and not paid. | Balance sheet | Debit |
| Unbilled Deferred Revenue | The Deferred Revenue amount that hasn’t been recognized or invoiced. | Balance sheet | Credit |
| Billed Deferred Revenue | The Deferred Revenue amount that has been invoiced but not recognized. | Balance sheet | Credit |
| Paid Deferred Revenue | The Deferred Revenue amount that has been paid but not recognized. | Balance sheet | Credit |
| Unbilled Sales Revenue | The Sales Revenue amount that hasn’t been invoiced. | Income statement | Credit |
| Billed Sales Revenue | The Sales Revenue amount that has been invoiced. | Income statement | Credit |
| Paid Sales Revenue | The Sales Revenue amount that has been paid. | Income statement | Credit |
| Expense Accrual | The total expense amount. This accrual is offset against the amount in Accounts Payable. | Balance sheet | Credit |
| Deferred Expense | The expense amount that hasn’t been recognized. | Balance sheet | Debit |
| Recognized Expense | The expense amount that has been recognized. | Income statement | Debit |
Learn how to add a GL account.
See Revenue recognition accounting flow and Expense recognition accounting flow to learn how Contracts uses each account.
3. Configure General Ledger and Order Entry
The Contracts application inherits its settings for dimensions, multi-currency, and decimal places from Order Entry, which in turn derives its dimension and multi-currency settings from the General Ledger configuration. You can also optionally configure GL to include the Contracts user-defined books by default in reports.
Dimensions
Select the standard dimensions you want to use for Contracts reporting in the General Ledger and then again in Order Entry. In General Ledger, you must enable at least the Customer and Item dimensions.
To select dimensions for use in Contracts:
-
Go to General Ledger > Setup > Configuration.
- In the Dimension settings section, select Enable next to each desired dimension and then select Save.
-
Go to Order Entry > Setup > Configuration.
- In the Dimension setup section, select the checkbox next to each desired dimension and then select Save.
Multi-currency
If you want to add contracts in currencies other than your base currency, your GL and Order Entry configurations must have foreign currency enabled.
To enable foreign currency:
-
Go to General Ledger > Setup > Configuration.
- In the Multi-currency management section, select Enable and select Save.
-
Go to Order Entry > Setup > Configuration.
- In the Enable functionality section, select Foreign currency and select Save.
Default decimal places
As Contracts allows up to ten decimal places for price rates, Order Entry must be configured to allow ten decimal places in order to avoid rounding errors on invoices generated from contracts. The Default decimal places configuration setting applies to all items that do not have a Decimal places for unit cost - Sales value set. If an item does have a Decimal places for unit cost - Sales value that doesn’t equal 10, the item must either be updated to set this option to no value or 10. Learn more about updating items.
To set the number of default decimal places in Order Entry:
-
Go to Order Entry > Setup > Configuration.
- In the Enable functionality section under Price and discounts, type 10 in the Default decimal places field and select Save.
(Optional) Specify default reporting books in GL
Sage Intacct can automatically include the Contracts user-defined book data by default in standard reports.
To specify default reporting books:
-
Go to General Ledger > Setup > Configuration.
- Under Accounting method, select Select under Other Books reporting defaults.
- Move the desired book from Available items to Selected items and select Save.
4. Subscribe to Contracts
In this step, you’ll activate the Contracts subscription. However, you will not be able to complete all of the necessary fields yet as some fields are dependent on other Intacct configuration options and will not be available until those options are set. You’ll return to the Configure Contracts page and complete the rest of the fields when you get to step 7. Complete the Configure Contracts page.
To subscribe to Contracts:
-
Go to Company > Admin > Subscriptions.
- On the Subscriptions page, select Contracts, then select Subscribe.
- In the Journals section, use the dropdown lists to select the default Revenue journals that you created in an earlier procedure. You will define the expense journals in a later step.
- If your company is a multi-currency company, use the dropdown list to select the default Exchange rate type. Users can select a different exchange rate type when creating a contract.
- Select whether you want to support Termed (contracts with start and end dates), Evergreen (contracts with no specified end date), or Both in the Term type options field.
- Enter the email address that will receive notifications regarding automatic invoicing in the Scheduled invoice policies notification email field.
- If you want to use quantity-based billing, select the Enable usage billing checkbox.
- If you selected Enable usage billing and you selected Evergreen or Both for Term type options, select whether to associate usage with the "In progress" recurring billing period or the applicable "Closed" recurring billing period. See the Field descriptions table for details.
- In the Contract ID sequence field, use the dropdown list to select numbering sequence use to automatically number contracts. To add a new sequence, select Add in the dropdown list. Leave this field blank to manually input your own identifier when creating a contract.
- Select the Posting configuration tab and enter the applicable Revenue account mapping. See the Posting configuration tab section in Field descriptions for more information.
- Select Save.
5. Configure Revenue Management
If you want to subscribe to Contract Standard Revenue Recognition, Contract Advanced Revenue Recognition, and Contract Expense Recognition, you need to set the applicable options in the Configure Revenue Management page. You will not be able to set permissions for revenue or expense templates in Contracts until you configure Revenue Management.
To configure Revenue Management for Contracts:
-
Go to Company > Admin > Subscriptions.
- On the Subscriptions page, select Revenue Management, then select Subscribe or Configure.
-
On the Configure Revenue Management page, do one of the following:
- If you want to subscribe to Contract Standard Revenue Recognition, select Standard revenue recognition.
- If you want to subscribe to Contract Advanced Revenue Recognition, select Advanced revenue recognition (includes MEA).
- If you are subscribed to Advanced revenue recognition, select the default way to handle open revenue scheduled before the MEA effective date. Users can change this setting when creating an MEA allocation scheme.
- If you are subscribed to Advanced revenue recognition, select the applicable fair value price effective date.
- If you want to use event-based recognition, select Event-based recognition.
-
If you are also subscribed to Projects and want to estimate variable consideration, select Enable deferred revenue for time and materials projects.
Due to the complexity of this feature's integration within the Contracts application, turning this option on is permanent. -
If you want the option to not defer revenue for some contract lines, select Enable revenue recognition on invoice.
After you create at least one contract line that uses this feature, you will not be able to turn off this configuration option. - If you want to subscribe to Contract Expense Recognition, select Expense recognition.
-
Select Save.
6. Create a contract invoice transaction definition
Create at least one invoice transaction definition in Order Entry to use for generating invoices from contracts. In a multi-entity environment, you must create the transaction definition at the top level.
See the Contracts transaction definition requirements.
Learn how to create an Order Entry transaction definition.
7. Complete the Configure Contracts page
-
Go to Contracts > Setup > Configuration.
-
Use the dropdown list to select the default Invoice transaction definition. Users can select a different invoice transaction definition when generating invoices.
This dropdown only displays invoice transaction definitions that have been enabled for Contracts and post to AR. If you do not see the desired transaction definition, verify that Enable for Contracts is selected and Transaction posting = "Accounts Receivable" in the transaction definition.
-
If you’re subscribing to Contract Expense Recognition, do the following:
- Specify a default expense journal in the Expense Journal 1 and optionally in Expense Journal 2 fields.
- Select the Posting configuration tab and complete the Expense posting table. See the Expense posting table in the Field descriptions section for more information.
-
Select Save.
8. Next steps
After your Contracts application is configured, do the following:
- Give yourself and the applicable users the appropriate Contracts permissions. Learn more about Contracts permissions.
- Set up the applicable templates, price lists, and items. See Set up the Contracts application for setup tasks that are applicable to your Contracts subscription.
- Create contracts reports using the custom report writer. Learn more about Contracts report objects.
Changing Contracts configuration
You can change configuration values and options as needed after you start using the Contracts application. Changes to account posting configuration will not affect contract lines or expenses that are In progress as the posting configuration that exists at the time a contract is created is cached on the contract line or expense. Any changes you make here will affect new contract lines or expenses and contract lines created as a result of a renewal (as they will use the current posting configuration).
The exception is that if you turn on the Enable deferred revenue for time and materials projects option in the Configure Revenue Management page, you can't turn it off—it will remain permanently turned on. Learn more about Estimated time-based revenue.
Move from using two journals to one journal
If you have been using Contracts with two journals but no longer require the second journal, you can disable the desired journal. You then have the option to either show or hide the data for the disabled journal.
If you show the disabled journal, you can still see the journal on contract lines, in the Journals tab, and everywhere else that journal information is displayed. You can process existing contract lines for the disabled journal, but you will not be able to add information for the disabled journal in new contract lines. When you no longer wish to see the disabled journal, you can update the configuration to hide it.
Note the following expected behavior for disabling journals:
- You can only disable one set of journals. You cannot disable both.
- The disabled journal columns will still be selectable in custom reports.
- The columns related to the disabled journal will not be available to add data for in the contract line or expense CSV import templates.
- Journal data is cached on the contract line when it is created. Intacct will continue to validate data for contract lines that were In progress when the second journal was disabled. The best practice is to show the disabled journal until all applicable contract lines have ended.
To disable a journal:
-
Go to Contracts > Setup > Configuration.
-
In the Journals section, clear the Enable journal checkbox for the journal you no longer wish to use. For example, if you want to disable journal 2, clear the Enable journal 2 checkbox.
The section expands to display a Show journal checkbox.
-
Do one of the following:
- To show the journal until you have completed processing journal data, leave the applicable Show journal checkbox selected.
- To hide the journal when you no longer wish to see the journal, clear the applicable Show journal checkbox.
-
Select Save.
Move from using one journal to two journals
If you have been using Contracts with one journal and want to start using an additional journal for parallel reporting requirements, you can enable the second journal.
Before completing this procedure, create the applicable user-defined book, revenue journal, and expense journal.
To enable a second journal:
-
Go to Contracts > Setup > Configuration.
- In the Journals section, select the Enable journal checkbox for the journal you wish to use. For example, if you want to start using journal 2, select the Enable journal 2 checkbox.
- Use the applicable Revenue journal dropdown list to select the revenue journal.
- If you’re also subscribed to Contracts Expense Recognition, use the applicable Expense journal dropdown list to select the expense journal.
-
Select Save.
About importing/creating historical contracts
During the initial implementation of Contracts, you may want to import or create a contract that has an End date in the past for historical data purposes. By default, Intacct prevents you from creating or updating contracts with past End dates so that the contracts will not be renewed prematurely. See Allow historical contracts to be imported or created for detailed instructions.
Multi-entity considerations
Multi-entity companies can be configured to only allow subledger transactions to be created from the entity level and not at the top level. You can see the Disable top level subledger transactions configuration option in the Configure Multi Entity page. This configuration option affects contract creation as follows:
- If your company has Disable top level subledger transactions set to true, users can only create contracts at the entity level.
- If your company has Disable top level subledger transactions set to false, users can create contracts at the top level and the entity level.
Existing Contracts companies that have in-flight contracts at the top level and want to set Disable top level subledger transactions to true need to plan before turning on this option:
- Start creating all contracts at the entity level and do not create any more contracts at the top level.
- Disable renewals for top level contracts and manually create the renewal contracts at the entity level.
- When all top level contracts have been fully processed, then set Disable top level subledger transactions to true.
After you set the option to true, you cannot post any revenue, generate invoices, post expenses, and so on for any top level contracts. However, the configuration option is not permanent and you can set it to false if necessary to allow top level contract posting events.
Field descriptions
Invoice policies configuration tab
General configuration tab
Journals
| Field | Description |
|---|---|
|
Enable journal 1 Enable journal 2 |
You need at least one set of journals to use Contracts. Select the checkbox next to the journal set you wish to use. Journal 1 is selected by default for new Contracts subscriptions. When Enable journal is selected, you can select a revenue and expense journal to use with that set. When Enable journal is cleared, the journal set is disabled. If you have been using Contracts and want to change the number of journals you’re using, learn how to enable or disable a journal set. |
|
Revenue journal 1 Revenue journal 2 Expense journal 1 Expense journal 2 |
You can only select a journal if the Enable journal checkbox for the applicable journal set is selected. Use the applicable dropdown lists to select the revenue and expense journals you wish to use. See valid journal combinations. The best practice is to use user-defined journals instead of accrual journals. User-defined journals let you isolate contracts data in reports and let you easily scale from single- book to dual-book accounting if needs change in the future. Learn more about user-defined books.
|
|
Show journal 1 Show journal 2 |
These fields are only applicable if you have been using Contracts with two sets of journal and now wish to disable a set. The Show journal field appears when you clear the applicable Enable journal checkbox. This field behaves as follows:
|
Currency
| Field | Description |
|---|---|
| Exchange rate type | Use the dropdown list to select the exchange rate type to use as the default for contracts. If you do not want to use the default Intacct Daily Rate, select a custom exchange rate type. Users can select a different exchange rate type when creating a contract. |
Billing
| Field | Description | ||||||
|---|---|---|---|---|---|---|---|
| Term type options |
You can choose whether to support only Termed contracts (contracts with start and end dates), only Evergreen contracts (contracts with no specified end dates), or Both types. Although you can choose to support both types of contracts, a given contract can only be either termed or evergreen. So if you have a hybrid business model, you might have two or more contracts per customer to cover all term scenarios.
When you select either Evergreen or Both, Intacct enables several different infrastructure elements to support evergreen contracts in your company. This includes evergreen templates, for which you will need to assign the appropriate user or role permissions. |
||||||
| Invoice transaction definition |
Use the dropdown list to select the invoice transaction definition that you want to be the default for invoices created from contracts. The dropdown list only displays transaction definitions that are defined to post to Accounts Receivable and have Track line-item discount or surcharge and Enable for Contracts set to true. Users can select different invoice transaction definitions when generating invoices from a contract. See Contracts transaction definition requirements for more information. |
||||||
| Enable scheduled invoice policies |
This field only appears for companies that subscribed to Contracts before August 19, 2022. Select this field to opt-in to scheduled invoice runs. When this field is selected, the Automatic invoicing section appears on the Invoice Policy page. Turning on this option is permanent. It restricts invoice generation to the level in which a contract is created in multi-entity companies. So if a contract is created at the top level, it can only be invoiced at the top level. If it is created at the entity level, it can only be invoiced at the entity level.
Companies that subscribe to Contracts after August 19, 2022 are automatically enabled for scheduled invoice policies. This field will not appear on the Configure Contracts page. |
||||||
| Scheduled invoice policies notification email | Specify an email address that will receive notifications concerning invoice policy runs and scheduled invoice run results. | ||||||
| Enable usage billing |
Select this checkbox if you want to bill by the quantity of an item the customer has used or consumed during a specific time period. Selecting this option allows the user to select Quantity based as the Billing method on a contract line. Learn more about usage. |
||||||
| Split tiers into invoice lines |
For items priced using tiered pricing, Intacct will do the following:
For example, say you sell widgets, Tiered pricing = Step, and you defined the following tiers:
In January, the customer used a total of 25 widgets, so you add a usage record with a quantity of 25. The following are examples of how this option affects how Intacct displays the widgets on the invoice. Default behavior when this option is not enabled: Behavior when this option is enabled: Learn more about tiered pricing in billing price list entries. |
||||||
|
Relax GL posting date rules |
This setting helps prevent evergreen contract renewal failures caused by closed periods, scheduling delays, or date mismatches. When enabled, if a new contract line's start date falls in a closed period during evergreen renewal, this setting automatically adjusts the GL posting date. Intacct uses the earliest date in the open period as the GL posting date instead, eliminating the need for a manual data fix. This setting also enables the following functionality for evergreen contract lines:
|
||||||
|
When the usage date is before the current recurring billing period start date, add usage to: |
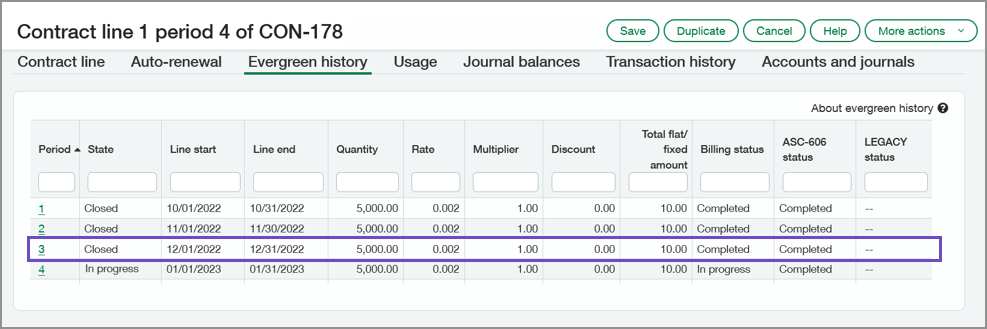
This field is only applicable if Enable usage billing = true and Term type options = Evergreen or Both. Each evergreen contract line has multiple recurring billing periods. The first recurring billing period is period 1, the next is period 2, and so on. To manage recurring billing periods, Intacct creates a new contract line with the same contract line number for each recurring billing period. There can only be one "In progress" instance of a contract line at a time. When Intacct creates a new contract line for the next recurring billing period, it sets the contract line for the previous recurring billing period to "Closed". The new contract line for the next recurring billing period is now "In progress". Usage can be uploaded into Intacct at any time. This configuration option tells Intacct which recurring billing period to associate with the usage record if the usage date is before the current recurring billing period start date when the usage record is uploaded or created. This configuration option affects the following:
Example
Let's assume the following scenario to compare the two configuration options:
If the configuration option is set to The "In progress" recurring billing period, you can open the contract line and add the usage in the Usage tab. This links the usage record dated December 23 with the January recurring billing period. The following is the expected behavior:
If the configuration option is set to The applicable "Closed" recurring billing period, you open the contract line, select the Evergreen history tab, open the December period, and add the usage via the Usage tab.
This workflow requires users to be able to find the applicable closed period in order to add the usage record. The following is the expected behavior:
Typically, businesses upload usage records to Intacct once per month and users only create usage records manually when they need to correct usage. Also, most businesses bill usage in arrears, so it is very common that usage dated in a previous recurring billing period would be associated with the next recurring billing period. Which configuration option you choose really depends on your invoice timing. Learn more about recurring billing periods. |
||||||
|
Billing schedules When the contract line GL posting date is earlier than the internal billing schedule start date |
The contract line GL posting date is the date on which the contract line's Unbilled AR and Unbilled DR (booking revenue) posts to the GL. The "internal billing schedule start date" is either the billing template start date or the contract line start date minus any bill-in-advance period, depending on whether or not the contract line is using a billing template. Choose one of the following configuration options to determine the billing schedule behavior when the contract line GL posting date is earlier than the internal billing schedule start date:
This configuration setting only affects scenarios when the GL posting date is earlier than the internal billing schedule start date. It has no effect if the GL posting date is after the internal billing schedule start date and it has no effect on revenue schedules. This configuration setting controls all contracts in your company. If you change the configuration setting, the change will take effect for all new and edited contract lines. Learn more about the GL posting date on contract lines. |

Document sequencing
| Field | Description |
|---|---|
| Contract ID sequence |
Contracts are required to have a unique contract ID in order to support automatic contract renewals. Use the Document Numbering selection list to select the numbering sequence to use to automatically number contracts. To add a new sequence, select Add in the dropdown list. Leave this field blank to number contracts manually. When users create a new contract, they'll see -New- in the Contract ID field. That means that the contract ID will be populated by Intacct when they save. |
Renewals
| Field | Description |
|---|---|
| Automatic contract renewals |
Choose between On (default) or Off. When turned on, contracts renew automatically as scheduled. By default, entities inherit this setting from the top level, but you can override it at the entity level for finer control. |
| Renewal catch-up period (days) |
Defines how many days past the trigger date a contract can be renewed automatically. The default is 7 days and the maximum is 999 days. By default, entities inherit this setting from the top level, but you can override it at the entity level for finer control. |
Historical contracts
| Field | Description |
|---|---|
| Allow import or creation of contracts with past End dates |
This option is typically only used during Contracts implementation to import historical contract data using Process contract schedules. We also recommend turning automatic contract renewals off during this process to prevent triggering renewals on historical contracts. To allow contracts with end dates in the past to be imported or created:
For evergreen contracts only: If you need to enter a contract line with a start date in a closed recurring billing period, you can turn on this option, add the contract line, and then turn off this option. Learn more about allowing historical contracts to be imported or created. |
Posting configuration tab
Changes to account posting configuration will not affect contract lines or expenses that are In progress as the posting configuration that exists at the time a contract is created is cached on the contract line or expense. Any changes you make here will affect new contract lines or expenses and contract lines created as a result of a renewal (as they will use the current posting configuration).
For information on contracts invoice posting, see 6. Create a contract invoice transaction definition.
Revenue posting table
Use this table to map the accounts to which contract line items should post. See Contract accounting flow for information on how data flows between these accounts.
Revenue posting
| Item GL group
|
Customer GL group | AR unbilled* | AR billed* | DR unbilled* | DR billed* | DR paid* | Sales unbilled* | Sales billed* | Sales paid* | |||
|---|---|---|---|---|---|---|---|---|---|---|---|---|
| 1 | 1100 | 1100 | 2600 | 2700 | 2800 | 4600 | 4700 | 4800 | ||||
| 2 | Subscription | 1100-01 | 1100 | 2600-01 | 2700-01 | 2800-01 | 4600-01 | 4700-01 | 4800-01 | |||
| 3 | Miscellaneous | 1100-02 | 1100 | 2600-02 | 2700-02 | 2800-02 | 4600-02 | 4700-02 | 4800-02 | |||
| 4 | Maintenance | 1100-03 | 1100 | 2600-03 | 2700-03 | 2800-03 | 4600-03 | 4700-03 | 4800-03 | |||
| 5 | Support | 1100-04 | 1100 | 2600-04 | 2700-04 | 2800-04 | 4600-04 | 4700-04 | 4800-04 | |||
| Total |
| Field | Description |
|---|---|
|
Item GL group Customer GL group |
The Item GL group and Customer GL group together form the criteria set for the account mapping. For example, you could have the Maintenance item GL group and the Hardware Customer GL group mapped to a set of accounts, and the Maintenance item GL group and the Software Customer GL group mapped to a different set of accounts. Learn more about Item GL groups and Customer GL groups. |
| AR unbilled |
The account to which to post the contract line amount that has not yet been invoiced. |
| AR billed | The account to which to post the contract line amount that has been invoiced but not paid. |
| DR unbilled |
The account to which to post the total value of the contract that has not yet been recognized or invoiced. |
| DR billed | The account to which to post a Deferred Revenue amount for which you’ve sent an invoice but the customer hasn’t yet paid. |
| DR paid | The account to which to post a Deferred Revenue amount for which you have sent and invoice and the invoice has a payment applied to it. |
| Sales unbilled | The account to which to post a Sales Revenue amount that hasn’t been invoiced. |
| Sales billed | The account to which to post a Sales Revenue amount that has been invoiced but the customer hasn’t yet paid. |
| Sales paid | The account to which to post a Sales Revenue amount that has been invoiced and has a payment applied to it. |
Expense posting table
This table only appears after you save the Configure Revenue Management page with Standard Expense Recognition selected. See Revenue Management.
Use this table to map the accounts to which expense items should post. See Expense recognition accounting flow—Contracts for information on how data flows between these accounts.
| Field | Description |
|---|---|
|
Item GL group Customer GL group |
The Item GL group and Customer GL group together form the criteria set for the account mapping. For example, you could have the Maintenance item GL group and the Hardware Customer GL group mapped to a set of accounts, and the Maintenance item GL group and the Software Customer GL group mapped to a different set of accounts. Learn more about Item GL groups and Customer GL groups. |
| Deferred expense | The account to which to post an expense amount that has been incurred but not yet consumed. |
| Recognized expense |
The account to which to post an expense amount when recognizing the deferred expense. |
| Expense accrual |
The account to which the liability accrual is posted. |
Invoice policies configuration tab
Use the Invoice policies configuration tab on the Configure Contracts page to determine the processing order for multiple scheduled invoice policies. If you create invoice policies at the top level of a multi-entity company, you also use this tab to assign the scheduled invoice policies to the desired entities.
Specify invoice policy order of precedence list
| Field | Description |
|---|---|
| Entity name | This column lists all entities associated with your company. |
| # invoice policies | Select the link to open the Invoice Policy Order of Precedence table for the corresponding entity. |
Invoice Policy Order of Precedence table
| Field | Description |
|---|---|
| Invoice policy |
Use the dropdown to select an invoice policy to run for the selected entity. Use the dropdown in row 1 to select the invoice policy you want Intacct to process first. For example, say that your company has two invoice policies with different filter criteria that both include the same invoice and will run on the same date. Which invoice run should take precedence? Intacct processes the invoice policy in row 1 first, then row 2, and so on. You can also drag and drop the invoice policies in the desired order in the Invoice Policy Order of Precedence dialog box. Only scheduled invoice policies appear in the dropdown lists. |
Learn how to set up scheduled invoicing.