Price lists—Purchasing
Related information
A price list is a container for price list entries. You create the price list name and then create the price list entries associated with the list.
You can view, add, edit, or delete a price list from the Price lists list page.
| Subscription |
Purchasing |
|---|---|
| User type |
|
| Permissions |
|
| Restrictions | Employee and Project Manager users can only List and View price list entries. |
About Purchasing price lists
Purchasing price lists contain the prices for products or services that you purchase from vendors. You can create as many price lists as desired. Typically, you will have one price list per vendor. You can have separate price lists in different transaction currencies or one price list that includes separate price list entries for each transaction currency, and so on.
A price list is a container for price list entries. You create the price list name and then create the price list entries associated with the price list. Each associated price list entry should have a unique combination of item or product line, currency, start and end date range, and, optionally, minimum and maximum quantity range.
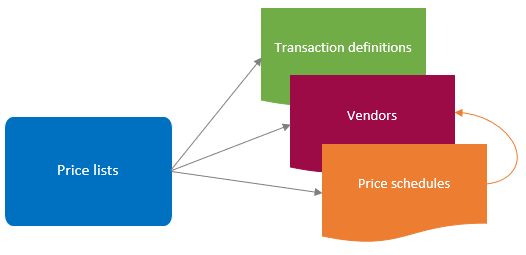
After you create a price list and its price list entries, you need to associate the price list with at least one existing object for the system to use the price list when determining a suggested purchase price for an item in a transaction. You can assign the price list to transaction definitions, vendors, and price schedules. When you assign a price list to a price schedule, you also then need to assign the price schedule to vendors.
When more than one price list is involved in a transaction, the system uses an order of precedence related to which price list is associated with which object when determining the suggested price. See Assign price lists to objects for more information on price list evaluation.
For multi-entity, shared companies: See your Sage Intacct administrator about whether you should create price lists and assign price lists to objects at the top level or at the entity level.
View a price list
-
Go to Purchasing > Setup > Price > Lists.
-
Records designated as Inactive do not appear in the list by default. To view these records, select Filters at the top of the list and select Remove next to the Status filter to remove it.
-
Find the price list.
-
Select More actions > View at the end of the row.
-
Go to Purchasing > Setup > Price > Lists.
- To view inactive price lists, select the Include inactive checkbox.
- Find a price list and select View.
Add a price list
Adding a price list essentially means creating a container for price list entries. After you add the price list container, you need to add the price list entries to the list.
-
Go to Purchasing > Setup > Price and select Add (circle) next to Lists.
- In the Price list name field, enter the price list name.
This name will appear in price list dropdown lists for users to select.
- Select the Start date calendar icon to specify the date on which this price list becomes valid.
- Select the End date to specify the last date on which this price list is valid.
- Set the price list status:
- To include this price list in list pages, select Active.
- Select Inactive to hide it from view. To see the inactive price lists later, select the Include inactive checkbox in a list page.
-
Select Save.
Import a price list
Users with the appropriate permissions can create multiple price lists by importing the data using a CSV file. Importing a price list imports the price list and the price list entries in one file.
-
Go to Company > Setup > Configuration > Import data.
- In the Set up Inventory Master List section of the Company setup checklist page, find Inventory price list and select the Template link.
The template opens in Excel.
- Prepare the CSV file for import. See Import an Inventory price list for detailed information.
Purchasing uses the same price list import file as Inventory and Order Entry. Make sure that the SALEPURCHASE field for each row is set to Purchasing to identify the price list as a Purchasing price list.
- When you are ready to import the file, do one of the following:
- Return to the Company setup checklist page and select Import next to Inventory price list.
- Go to Purchasing > Setup > Price > Lists, then select Import at the top of the page.
The Import company information dialog appears.
- Browse to find the CSV file you want to import.
- Specify the email address where results should be sent. If any records fail to import, you will be notified by email.
- Select other options as needed.
Import Company Information: options
Import file option descriptions Option Description Browse
Use the Browse button to locate and select the CSV file you want to import.
Date format
When you select a date format here, Sage Intacct attempts to import your file using the selected date format. If Intacct can’t import your file with the selected date format, it attempts to discover the date format used in your file and import the data using that date format.
File encoding
Leave this option set to "auto-detect" unless you're unable to import your file. Depending on your operating system, you may need to select a different type of file encoding.
Process offline
Some imports can take considerable time, depending on their size and how much processing the system must do on the uploaded data. If you're not sure how much time your upload will take, select Process offline. When the system completes the process, it sends an email to the address you provide in the Email results to this address field. The system also sends you any errors that may have occurred in the process. If you prefer to wait until the upload process is complete, don’t select the Process offline checkbox.
Transactions and other records that are processed offline show a source of System in the audit trail, instead of CSV import.
Email results to this address
Email address to which import results and errors should be sent. You can enter multiple email addresses, separated by a semicolon (;) or comma (,).
Sage Intacct highly recommends entering an email address.
- Select Import.
One of the following will appear:
- Import Success Notification: all price lists and entries were imported successfully. Select Done to dismiss the dialog box.
- Import Error Notification: at least one price list could not be imported. See Import error notification for detailed information on how to resolve any errors.
Edit a price list
You can change the start and end dates or status of a price list. You cannot change the name of the price list.
-
Go to Purchasing > Setup > Price > Lists.
- Find the price list.
-
Select Edit at the end of the row.
- Edit the Start date, End date, or Status fields and select Save.
-
Go to Purchasing > Setup > Price > Lists.
- Find the price list and select Edit next to it.
- Edit the Start date, End date, or Status fields and select Save.
Delete a price list
You can delete a price list if it has not been assigned to any objects. This removes the price list and all of its associated price list entries from the system.
To delete a single price list:
-
Go to Purchasing > Setup > Price > Lists.
- Find the price list you want to delete.
-
Select More actions > Delete at the end of the row.
Depending on your user preferences, Intacct might prompt you to confirm the deletion.
To delete one or more price lists:
-
Go to Purchasing > Setup > Price > Lists.
-
From the Price lists list, select the checkbox at the start of the row for each price list you want to delete and select Delete.
Depending on your user preferences, Intacct might prompt you to confirm the deletion.
-
Go to Purchasing > Setup > Price > Lists.
-
Find the price list and select Delete next to it.
Depending on your user preferences, Intacct might prompt you to confirm the deletion.
Deactivate a price list
You can deactivate the price list (change the status to Inactive), which prevents it from displaying in any selection lists but retains the price list for historical purposes.
-
Go to Purchasing > Setup > Price > Lists.
- Find the price list you want to deactivate.
-
Select Edit at the end of the row.
- In the Status field select Inactive
-
Select Save.
-
Go to Purchasing > Setup > Price > Lists.
- Find the price list and select Edit next to it.
- In the Status field select Inactive.
-
Select Save.
Duplicate a price list
The Duplicate button in the Price list information page simply adds a new price list container. It only copies the price list start and end dates. It does not create a copy of all of the price list entries contained in the price list.
If you want to make a copy of all price list data to create a new price list, you need to export the existing price list data that you want to copy, download a price list import template, manipulate the data in Excel, and then import the price list data as a new price list.
To create a copy of a price list and its price list entries:
-
Go to Purchasing > Setup > Price > Lists.
- Find the price list that you want to copy and select Entries next to it.
- In the Price list entries for <price list> list, add a custom view that contains the fields you want to copy.
- Export the custom view of the list as a CSV file.
-
Go to Company > Setup > Configuration > Import data.
- In the Set up Inventory master list section of the Company setup checklist page, find Inventory price list and select the Template link.
The template opens in Excel.
- In Excel, reorder the columns in the template and/or exported list view files so that they are both in the same order, then copy the list file data into the import template file so that the data resides in the correct columns.
- Change the price list name to the new price list name in all applicable rows and clean up the price list data as appropriate. See Prepare a CSV file for import for more information.
- Import the price list template file.
-
Go to Purchasing > Setup > Price > Lists.
- Find the price list that you want to copy and select Details next to it.
- In the Price list entries for <price list> list, add a custom view that contains the fields you want to copy.
- Export the custom view of the list as a CSV file.
-
Go to Company > Setup > Configuration > Import data.
- In the Set up Inventory master list section of the Company setup checklist page, find Inventory price list and select the Template link.
The template opens in Excel.
- In Excel, reorder the columns in the template and/or exported list view files so that they are both in the same order, then copy the list file data into the import template file so that the data resides in the correct columns.
- Change the price list name to the new price list name in all applicable rows and clean up the price list data as appropriate. See Prepare a CSV file for import for more information.
- Import the price list template file.
View the list of price list entries
From the Price List Entries list page, you can view, add, edit, or delete price list entries. You can also view history for a price list entry.
-
Go to Purchasing > Setup > Price > Lists.
-
Find the price list and select Entries next to it.
-
Go to Purchasing > Setup > Price > Lists.
-
Find the price list and select Details next to it.
Field descriptions
| Field | Description |
|---|---|
|
Price list name |
The name of the price list. The price list name must be unique. The name appears in the price list dropdown list for users to select. You cannot change the price list name after you save the price list. |
|
Start date and End date |
Use the calendar tool to select the dates during which the price list will be effective. Sage Intacct might continue to suggest prices from this price list if an associated price list entry has an end date greater than the price list end date as there's no validation for price list entry end dates. |
|
Status |
The default status is Active. If you are no longer using this price list and do not want it to appear in dropdown lists, select Inactive. Records designated as Inactive do not appear in the list by default. To view these records, select Filters at the top of the list and select Remove next to the Status filter to remove it. If the price list is still associated with an object, Sage Intacct might continue to suggest prices from this price list even though it is inactive. |
|
Entries |
Select this link to view, add, edit, or delete price list entries for the corresponding price list. |
|
More actions |
Select to view, edit, or delete price lists |
| Field | Description |
|---|---|
|
Price list name |
The name of the price list. The price list name must be unique. The name appears in the price list dropdown list for users to select. You cannot change the price list name after you save the price list. |
|
Start date and End date |
Use the calendar tool to select the dates during which the price list will be effective. Sage Intacct might continue to suggest prices from this price list if an associated price list entry has an end date greater than the price list end date as there's no validation for price list entry end dates. |
|
Status |
The default status is Active. If you are no longer using this price list and do not want it to appear in dropdown lists, select Inactive. You can still view inactive lists by selecting the Include Inactive checkbox in the Price List list page. If the price list is still associated with an object, Sage Intacct might continue to suggest prices from this price list even though it is inactive. |
|
Details |
Links to the Price list entries list page for the corresponding price list. Select this link to view, add, edit, or delete price list entries for the corresponding price list. |