Configure field updates for Opportunity Products
Related information
The most current information from your Opportunities and Products can automatically fill the mapped fields on your Opportunity Product records using the following tools.
You can also define which fields will default on opportunity products as they're added to an opportunity using the bulk update tool. You can configure bulk update fields for both Order Entry and Contracts.
Enable default value updates
You can have fields on opportunity products default to values from Products or Opportunities.
- Log in to Salesforce as an administrator.
- Go to the Intacct Configuration tab in the Advanced CRM Integration application.
- Select the Custom Mappings tab.
- Enable Opportunity Product Default and Save your changes.
Configure default value fields
After default value updates have been enabled, map fields from Opportunities and/or Products to fields on the Opportunity Product. These fields are updated with the most current information when any of the Opportunity, Products, or Opportunity Product records are saved.
To configure default fields:
- Log in to Salesforce as an administrator.
- Go to the Intacct Configuration tab in the Intacct Advanced CRM Integration application.
- Select the Custom Mappings tab.
- Select the Field Mapping for Opportunity Product Save/Update Defaulting.
A popup window opens, showing Opportunity Product Save/Update Defaulting options.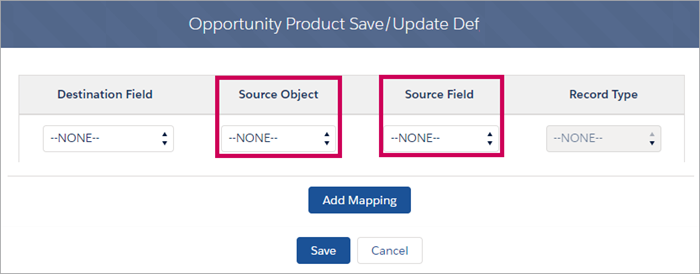
- Select the Destination Field that you want to contain a default value from the dropdown menu.
- Select the Source Object for the Destination Field from the dropdown menu.
The dropdown menu contains all objects that are related to the Opportunity Product. - Select the Source Field on the Source Object that will supply the default value from the dropdown menu.
- The Record Type is automatically filled in based on the selections that you made for the Destination Field, Source Object, and Source Field.
- (Optional) Select Add Mapping to add more default field mappings. Repeat the steps above to add another mapping.
- Save your changes.
- Select the Destination Field that you want to contain a default value from the dropdown menu.
Update empty fields with default values
You can update opportunity products that were created before bulk updates of opportunity products were enabled. When enabled, the default fields
To update empty fields:
- Log in to Salesforce as an administrator.
- Go to the Intacct Configuration tab in the Advanced CRM Integration application.
- Select the Custom Mappings tab.
- Enable Opportunity Product Update Defaulting and Save your changes.
Bulk update fields
You can allow your users to bulk update fields on opportunity products, independent of the default values configured above. You create groups of fields that your users can update with their own values.
For example, if the start and end dates of a Contract change, then the same dates on the opportunity products need to be updated. When your users have multiple opportunity products to update, changing the dates is easier with a bulk update option. You would create a mapping group that includes the start and end date fields to allow your users to update them.
To add fields for bulk updates:
- Log in to Salesforce as an administrator.
- Go to the Intacct Configuration tab in the Advanced CRM Integration application.
- Select the Custom Mappings tab.
- Select the Add Mapping link for Opportunity Product Bulk Update Defaulting.
A popup window opens, showing Opportunity Product Bulk Update Defaulting options.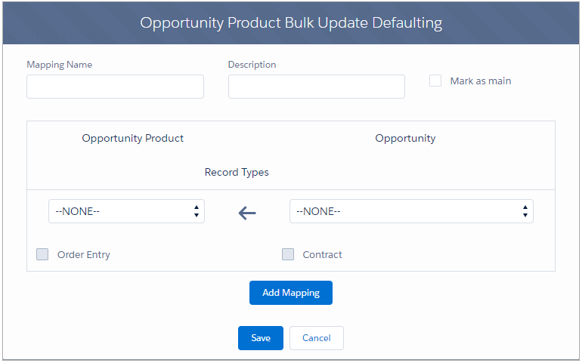
- Add a Mapping Name and a Description for your mappings.
For example, if adding fields for start and end date updates, you could call the mapping Contract Dates. - Select the Opportunity Product field that will receive the default update from the dropdown menu.
- Select the Opportunity field that will be the source for the default from the dropdown menu.
- Select the checkbox for the application that you want to allow bulk updates from: Order Entry, Contracts, or both.
- (Optional) Select Add Mapping to add more default field mappings. Repeat the steps above.
- Save your changes.
Depending on the field you selected in step b., Order Entry might not be available for selection. - Add a Mapping Name and a Description for your mappings.
To edit or delete fields for bulk updates:
- Log in to Salesforce as an administrator.
- Go to the Intacct Configuration tab in the Advanced CRM Integration application.
- Select the Custom Mappings tab.
- Do one of the following.
Steps to edit or delete a field mapping group Action Steps Edit an existing field mapping group - Select the pencil icon.
The Opportunity Product Bulk Update Defaulting window opens. - Make changes.
- Save your changes.
Delete an existing field mapping group Select the trash can icon to delete a mapping group.
- Select the pencil icon.
Lay out customizations by profile
Opportunity product page layout customizations allow you to create custom views of opportunity products for specific profiles in Salesforce. With this tool, you can hide fields that are often only used by finance and expand functionality for sales and revenue operations teams. This tool also eliminates the need to build custom page layouts, which can be complicated or require custom code.
Customizing the Opportunity Product page for a profile retains all fields on an Opportunity Product for calculations, without displaying them all to the user.
To customize the Opportunity Product page by profile:
- Log in to Salesforce as an administrator.
- Go to the Intacct Configuration tab in the Advanced CRM Integration application.
- Select the Custom Mappings tab.
- Select New in the Layout Customization By Profile row.
The Set Add Line Page Fields By Profile dialogue box opens. - Select the profile that you want to customize the page for.
- Select from the Available Fields for either Order Entry, Contracts, or both.
You can change the order the fields are displayed on the page by using the up and down arrows. - Save your changes.
Quantity Billing fields
The Advanced CRM Integration supports committed quantity billing with fields added to the Salesforce Opportunity Product page layout.
When the Billing Method is set to Quantity Based, choose one of the following:
- Variable: default for all new and existing contract lines. The total quantity used for the contract line will vary and quantities might be billed at different rates. There are no billing or revenue schedules for usage associated with this quantity type.
- Committed: the total quantity and usage rate for the contract line is known up front and results in a flat/fixed amount. When selected, decide how you want Intacct to account for these quantities:
- On Contract End Date:
- Bill unused quantity (default)
- Cancel unused quantity
- Do nothing
- If usage exceeds the committed quantity:
- Bill overage (default)
- Do not allow overage
- Do nothing
- On Contract End Date:
In this topic