Import service: General Ledger journal entries
Related information
Import General Ledger journal entry information into Intacct with the import service.
To import General Ledger journal entries, you need the following permissions.
| Subscription |
General Ledger Projects (for revenue recognition of projects) |
|---|---|
| Regional availability |
All regions |
| User type | Business user with admin privileges |
| Permissions |
Journal entries, Business user: List, View, Edit, Add, Delete, Reverse, Reclassify Journal entries, Employee: List Journal entries, Approval: List, View |
Video: General Ledger journal entry import
This video walks you through how to import General Ledger journal entries into Sage Intacct using the import service.
Before you begin: plan your import
The import service has separated creating new records and updating existing records. These separate import actions require different information in the file that you import into Intacct.
Before you start, decide what type of import you're going to do.
-
Create new records
When you create new records, you must include required field data for the import area. Other information can also be included with your import, as needed. Review the template of your import area to learn what other information can be added.
Learn more about the Create process.
-
Update existing records
When updating existing records, you only need to include the unique Record number, and the field or fields you intend to update.
Learn more about the Update process and see an example.
Start with a template
Intacct recommends starting with a template for your import. There are several ways to create or access a template:
Learn more about the import service template options.
1. Enter data and include required fields
The data you put in your file will vary based on the type of import you're performing.
Create new records: To import new records, ensure that all required fields have data. Records with missing required field data must be updated before they can be imported into Intacct. You can update the missing information either in the file you uploaded or directly in the import service UI.
All import templates have information about each field in the import area, including which fields are required.
Update existing records: To update a record, you only need to provide the record number, and one or more specific fields you’re changing in your import file.
The required fields below are listed in the Import service template for this import. The import template also contains fields that are not required by Intacct, but could be useful to your company.
| Field Name: |
JOURNAL |
|---|---|
|
UI Field Name: |
Journal |
|
Type: |
Character |
|
Length: |
4 |
|
Default Value: |
None |
|
Valid values |
Any |
|
Dependencies: |
None |
|
Required: |
Yes |
| Field Name: | DATE |
|
UI Field Name: |
Date |
|
Type: |
Date |
|
Length: |
24 |
|
Default Value: |
Current date |
|
Valid Values: |
Any valid date format |
|
Dependencies: |
None |
|
Required: |
Yes |
|
Note: |
Typically the next day after you close your old accounting system and start a new set of books in Intacct. If you do not enter a date, the default is today. Be careful when entering the beginning date. For example, if you want to print comparative financial statements, enter a date as of 2 fiscal years ago. Then, make journal entries for the ending GL balances for all the periods between your standing balance and the date you begin using Intacct.
If you’re uploading historical transactions, be sure that your starting balances CONTAIN these uploaded transactions, and set the date to that date. If you set the wrong starting date for your GL balances, you can clear the transactions using the Company Setup Checklist and start again. |
| Field Name: | DESCRIPTION |
|
UI Field Name: |
Description |
|
Type: |
Character |
|
Length: |
80 |
|
Default Value: |
None |
|
Valid Values: |
Alphanumeric and underscore. |
|
Dependencies: |
None |
|
Required: |
Yes |
| Field Name: | LINE_NO |
|
UI Field Name: |
No field name as such. These fields are the line numbers on the left side of the transaction area. |
|
Type: |
Number |
|
Length: |
Any |
|
Default Value: |
None |
|
Valid Values: |
Positive integer |
|
Dependencies: |
Start with 1 for the first line of a transaction, and increment by 1 for each subsequent line. Also must be unique per journal entry and per journal. For example, Summary 1 contains line numbers 1-20, Summary 2 contains line numbers 1-44, and so on. |
|
Required: |
Yes |
| Field Name: | ACCT_NO |
|
UI Field Name: |
Account |
|
Type: |
Character |
|
Length: |
24 |
|
Default Value: |
None |
|
Valid Values: |
Any Must conform to the primary/sub account specification in Company > Setup: Company Info. |
|
Dependencies: |
None |
|
Required: |
Yes |
| Field Name: | DEBIT |
|
UI Field Name: |
Debit |
|
Type: |
Number |
|
Length: |
38,2 |
|
Default Value: |
None |
|
Valid Values: |
Any number |
|
Dependencies: |
The uploaded file must contain a number in either the DEBIT or CREDIT field. For example, if you do not have a debit amount, you must have a credit. You can import negative numbers for either debit or credit. In this case, a negative debit amount will be treated as a credit, and a negative credit amount will be treated as a debit. |
|
Required: |
Yes, if the CREDIT amount is not present. |
|
Notes: |
A negative number is treated as a credit. |
| Field Name: | CREDIT |
|
UI Field Name: |
Credit |
|
Type: |
Number |
|
Length: |
38,2 |
|
Default Value: |
None |
|
Valid Values: |
Any number |
|
Dependencies: |
None |
|
Required: |
Yes, if the DEBIT amount is not present. |
|
Notes: |
A negative number is treated as a debit. |
| Field Name: | EXCH_RATE_DATE |
|
UI Field Name: |
Exchange Rate Date |
|
Type: |
Date |
|
Length: |
10 |
|
Default Value: |
Current date |
|
Valid Values: |
Any valid date format |
|
Dependencies: |
None |
|
Required: |
Yes, unless you provide the EXCHANGE_RATE. |
|
Notes: |
Use only in multi-currency companies. This field determines the exchange rate as of this date. |
| Field Name: | TAX_LINE_NO - This field only applies to companies subscribed to the Taxes application. |
|
UI Field Name: |
No field name as such. These fields are the incrementing numbers for the tax lines specific to line items. |
|
Type: |
Number |
|
Length: |
4 |
|
Default Value: |
None |
|
Valid Values: |
Positive integer |
|
Dependencies: |
For VAT and GST tax solutions, start with 1 for the first tax line of a line item, and increment by 1 for each subsequent line. |
|
Required: |
Yes, only if there are Inbound or Outbound tax implications and there are multiple taxes for the line. |
|
Editable: |
No |
| Field Name: | TAX_DETAILID - This field only applies to companies subscribed to the Taxes application. |
|
UI Field Name: |
Tax detail |
|
Type: |
Character |
|
Length: |
100 |
|
Default Value: |
None |
|
Valid Values: |
Alphanumeric and underscore. |
|
Dependencies: |
For VAT or GST tax solutions, refers to a valid tax detail ID. |
|
Required: |
Yes, only if there are Inbound or Outbound tax implications. |
|
Editable: |
Yes |
|
Notes: |
Specify both a tax detail (TAX_DETAILID) and the amount of the tax (TAX_AMOUNT). |
| Field Name: | TAX_AMOUNT - This field only applies to companies subscribed to the Taxes application. |
|
UI Field Name: |
Transaction tax |
|
Type: |
Number |
|
Length: |
38,2 |
|
Default Value: |
None |
|
Valid Values: |
Any number |
|
Dependencies: |
Used for VAT or GST tax solutions |
|
Required: |
Yes, only if there are Inbound or Outbound tax implications. |
|
Editable: |
Yes |
|
Notes: |
Specify both a tax detail (TAX_DETAILID) and the amount of the tax (TAX_AMOUNT). |
2. Load your file and map your data
The following are high-level steps for how to import records into the import service. Learn more about loading your file and mapping your data in the import service.
-
Go to Company > Setup > Import data.
-
Go to the Import workspace section and select New import service.
In some areas of Intacct, you can start an import service import from the list page directly using the Import button. -
Do one of the following:
-
Select Create next to an import in an application area to add new information to Intacct.
-
Select Update next to an import in an application area to update existing information in Intacct,
Update is only available for some imports. If you do not see an update link next to an import, you cannot update records in that area using the import service. -
-
Drag and drop a file containing the information into the import workspace, or select Upload file to use the file explorer.
-
Optionally, select the tab you want to work with first, select the area to import into, and then select Continue.
This option is only available if your file has more than one tab. -
The Map fields page opens. Select the Destination fields for your data using the dropdown menus. Hover over any field to view a preview of the data on the right side of the page. Previewing the data can help you select the correct destination field.
If there are incoming columns of information you do not want to import into Intacct, leave the dropdown blank, or select Do not import. Intacct ignores those columns during the upload process.
Double-check all field mappings before continuing. This ensures your data goes to the right fields in Intacct. As the import service learns more about your imports, the mappings will become more automatic. -
When all incoming fields are mapped to destination fields, select Continue.
-
Optionally, you can map your field values to existing default values in Intacct by selecting them from the dropdown menu. If none of your fields have default values, this step is skipped.
The Import dropdown on enhanced lists
The enhanced list for this area of Intacct supports CSV and Import service imports. Use the Import dropdown to select the option that best fits your needs.
-
Open the enhanced list for the area of Intacct you want to import data into.
For example, go to Accounts Payable > All > AP supplier invoices.
-
At the top of the list, select the Import dropdown and select one of the following options:
-
CSV Import
If available, the CSV import dialogue opens, allowing you to upload and import a CSV file for the current area.
-
Import service
The Import service Welcome page opens, showing the imports you can run based on your user permissions. You can perform multiple imports in sequence across different areas of Intacct. Close the Import service window when you’re finished.
-
3. Data validation and correction
After your fields are mapped, the import service validates the data and loads it into a review sheet. Any errors that might have been encountered are highlighted in red.
This is your opportunity to correct any errors before importing into Intacct. Depending on the number and complexity of errors, you can fix errors in the review sheet, or cancel the import and fix the errors in your file.
You can import files that contain both valid and invalid records. However, any record with an error will not be imported and will be moved to a separate error sheet. From there, you can either correct and re-import the records or delete them.
Find and fix errors
The import service review sheet has tools to help you find and fix errors in your records before you import the data into Intacct.
- Use built-in filters to view only invalid records.
- Hover over highlighted cells to see error messages.
- Correct errors directly in the sheet or in your source file, then re-upload if needed.
- Use Revalidate to check corrections before importing.
Learn more about data validation and correction in the import service.
4. Finalize and import
After errors are resolved, select Import to load your data into Intacct.
After you’ve imported a file, you can check its status in the Files > Available downloads tab in the import workspace. In this area you can download the imported data, or review the file name for details about the import. This makes it easy to confirm your import was successful and access your data whenever you need it.
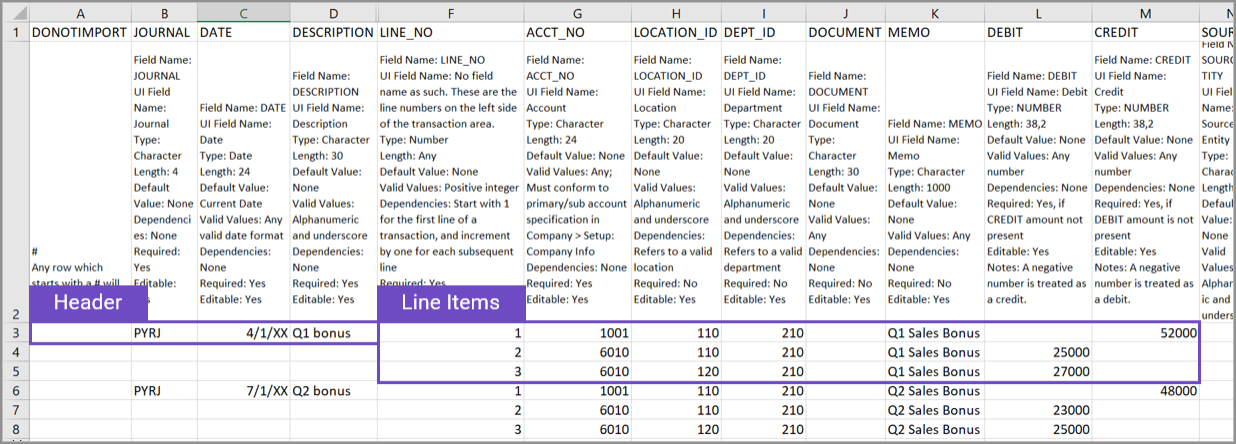
Examples of General Ledger journal entry imports
All journal entries must have header info, and each header can have multiple line items associated with it.
Header fields apply to the entire transaction and include fields such as the transaction date, journal, and a description about the line items.
Line items are the details of the journal entry and include fields such as General Ledger accounts, and amounts. If you have dimensions in use, such as Location or Department, these are also included in the line item rows.
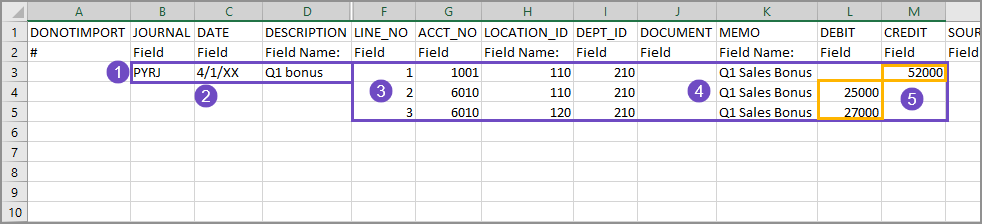
Enter the first journal entry
Let's enter the first journal entry and line items. Select images to make them bigger.
-
The header fields in this example are:
-
The journal ID.
The ID must match exactly to the journal ID in Intacct.
-
The date of the entry.
-
A description of the entry.
The description applies to the whole transaction, and has a 30 character limit.
Lines 4 and 5 do not have header information because the header information in line 3 applies to the whole transaction
-
-
The dates in the file can be in the same format as dates in Intacct, or can be formatted however you want. The import service will show you a preview of the dates before you import, where you can adjust them as needed.
-
The line numbers for each line item in this journal entry are sequentially numbered, starting from 1, within the LINE_NO column.
-
A memo is entered for each line item.
-
The debits and the credits balance.
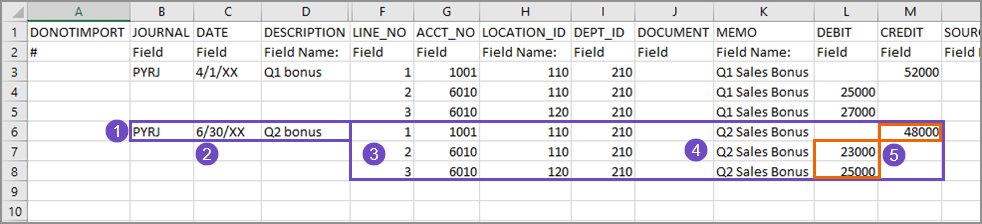
Enter the second journal entry
The second journal entry is put on line 6 of the spreadsheet, after the last entry of the previous journal entry.
-
The header fields contain the journal name, the date of the entry, and a description of the journal entry.
Lines 7 and 8 do not have header information because the header information in line 6 applies to the whole transaction.
-
The dates in the file can be in the same format as dates in Intacct, or can be formatted however you want. The import service will show you a preview of the dates before you import, where you can adjust them as needed.
-
The line numbers (LINE_NO column) for the line items of this journal entry start over at 1, and are also numbered sequentially.
-
A memo has been entered for each line item.
-
The debits and the credits balance.
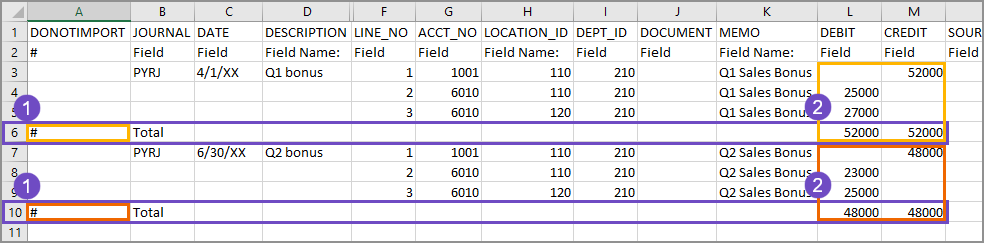
Check your work with DONOTIMPORT
It can be helpful to add additional rows to the template to do calculations or analysis on the data.
For example, because journal entries must balance it can be helpful to add a row to calculate the totals for the line items.
-
A Total row has been added for the first journal entry.
The # sign in the DONOTIMPORT column is used to tell the import service to ignore information in this row during import. The # sign must be the first character in the row. -
Calculations in the Debit and the Credit columns confirm that the debits match the credits for both journal entries.
Tips
When adding data to an import template:
-
Make sure you’re using the General Ledger Journal Entries import template for General Ledger Journal Entries.
-
Verify that the header of the journal entry is only entered one time for each journal entry.
-
General Ledger journal entries must balance.
-
Statistical journal entries do not need to balance.
When entering dimension information in a journal entry, you must have a separate line for each dimension combination. In the example below, a journal entry for payroll has been added. Dimensions used in this journal entry are: Location (LOCATION_ID) and Department (DEPT_ID).

-
Line items 2 and 3 have the same Location dimension, but have different Department dimensions. The dimension combination creates a separate line for each combination.
-
Line item 2: Location 110 + Department 120
-
Line item 3: Location 110 + Department 310
-
-
Line items 4 and 5 also have the same Location dimension, which is different from line items 2 and 3, and have different Department dimensions.
-
Line item 4: Location 120 + Department 130
-
Line item 5: Location 120 + Department 440
-
-
A commented out (#) row has been added to double check that the debits and credits are balanced.
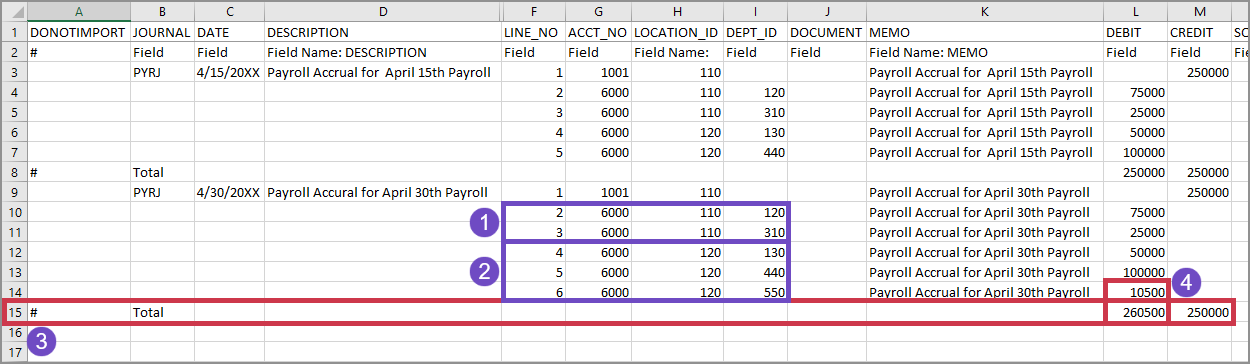
In the example above, a second payroll journal entry has been added.
-
Line items 2 and 3 have the same Location dimension, but have different Department dimensions. The dimension combination creates a separate line for each combination.
-
Line item 2: Location 110 + Department 120
-
Line item 3: Location 110 + Department 310
-
-
Line items 4, 5, and 6 also have the same Location dimension, which is different from line items 2 and 3. All Department dimensions are also different, but this time there's also a new Department.
-
Line item 4: Location 120 + Department 130
-
Line item 5: Location 120 + Department 440
-
Line item 6: Location 120 + Department 550
-
-
A commented out (#) row has been added to double check that the debits and credits are balanced.
-
The addition of line item 6 in this journal entry has made the debits and the credits not match. You can fix this in your file, or you can fix it in the import service review sheet. Regardless of where you fix the error, journal entries that don't balance will not be imported.
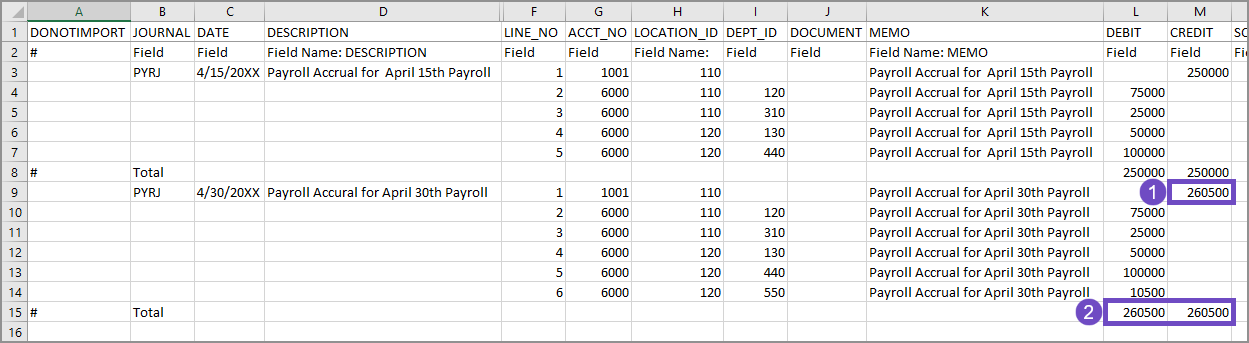
In the example above, line item 1 has been updated to reflect the addition of a new department at an existing location.
-
Line item 1 contains the credits against which the rest of the line items are balanced. It's been updated to reflect the addition of a new department at an existing location.
-
The Debits and Credits are balanced. The journal entry file can now have more journal entries added, or be imported into Intacct.
Tips, tricks, and troubleshooting
When importing data into a multi-currency environment:
-
Make sure all currencies and custom exchange rate types in the import file are present in Intacct before importing.
-
Enter a currency value in the import file, even if the transaction is in the base currency.
-
If a template has both a transaction currency and a location, the currency value is the transaction currency.
If the currency value is empty, Intacct will use the specified location's base currency.
Import scenarios
-
Current rate: Fill in the Currency and Exchange rate date fields. Intacct calculates the value based on these fields.
-
Custom exchange rate type: Fill in the Currency, Exchange rate type, and Exchange rate date fields. Intacct calculates the value based on these fields.
-
Rate from outside Intacct: Fill in the Currency, Exchange rate date (for reference), and Exchange rate fields. Intacct calculates the amount based on these values, if the values are in a non-base currency.
When importing General Ledger journal entries, the line item number defines the import order. To make reconciliation after import easier, here are a few tips when entering journal entries:
-
The line number in a file determines the order of line item imported for General Ledger journal entries.
-
Grouping debits and corresponding credits together in the file makes reconciliation easier after you import.
-
The LINE_NO column is important for maintaining the order of the line items, and determining how entries appear in a journal.
-
Enter the information in the file as you do in a regular journal entry for post-import clarity.