CSV import: Prepare General Ledger journal entry CSV files for import
Related information
Importing data is a fast way to get information into Sage Intacct. The way you prepare your CSV files directly affects the success or failure of your data import.

Start small: test your import first
To ensure a smooth import, Intacct recommends starting with a limited, representative set of General Ledger journal entry information.
This initial import serves as a valuable trial run, allowing you to verify data compatibility with the template format. You will be able to identify any potential formatting inconsistencies, and solidify your understanding of the import process.
By testing with a smaller sample, you mitigate risks associated with large-scale imports and gain valuable insights for a successful full-scale data import.
Download an up-to-date template
Use an up-to-date template to ensure your import completes successfully. Intacct customizes the templates that you download to fit your company's specific configuration, including dimensions.
Templates are available on the Company Setup Checklist.
| Subscription | Company |
|---|---|
| Regional availability |
All regions |
| User type | Business user with admin privileges |
| Permissions | Company Setup Checklist: Run |
To open the Company Setup Checklist, go to Company > Setup > and select Import data. Go to the Set up General Ledger transactions section and select the Template link for General Ledger journal entries.
Add your data
After you have the General Ledger journal entries template, it's time to add your data.
Leaving any required fields blank will cause your import to fail. Exceeding the character limit on any field will cause your import to fail.
Familiarize yourself with the different fields in the template before adding your data.
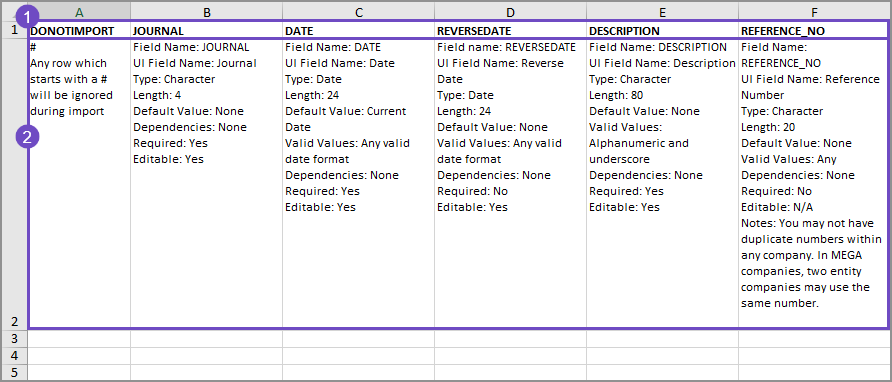
-
Column header.
-
Column header descriptions.
The following are the required fields for General Ledger journal entries.
The field definitions in your template explain what type of information is required for each field, and how to enter valid information. It's always a good idea to read the field definitions before making entries.
You can reorder the columns of your CSV file for ease of use. However, the column header must contain the field name exactly as it appears in the original template.
If you downloaded a template from the Company Setup Checklist or an object list page, your template contains the headers and dimensions that are specific to your company. The headers in a standard template might not contain field definitions specific to your company.
To import dimension values, enter information in the appropriate dimension column of the import spreadsheet. Otherwise, no information appears for that dimension.
If you relabeled any dimensions (see Terminology for more information), your dimension name does not appear in the CSV template, but the original Intacct dimension name does.
| Field Name: |
JOURNAL |
|---|---|
|
UI Field Name: |
Journal |
|
Type: |
Character |
|
Length: |
4 |
|
Default Value: |
None |
|
Dependencies: |
None |
|
Required: |
Yes |
|
Editable: |
Yes |
| Field Name: | DATE |
|
UI Field Name: |
Date |
|
Type: |
Date |
|
Length: |
24 |
|
Default Value: |
Current Date |
|
Valid Values: |
Any valid date format |
|
Dependencies: |
None |
|
Required: |
Yes |
|
Editable: |
Yes |
|
Note: |
Typically the next day after you close your old accounting system and start a new set of books in Intacct. If you do not enter a date, the default is today. Be careful when entering the beginning date. For example, if you want to print comparative financial statements, enter a date as of 2 fiscal years ago. Then, make journal entries for the ending GL balances for all the periods between your standing balance and the date you begin using Intacct.
If you are uploading historical transactions, be sure that your starting balances CONTAIN these uploaded transactions, and set the date to that date. If you set the wrong starting date for your GL balances, you can clear the transactions using the Company Setup Checklist and start again. |
| Field Name: | DESCRIPTION |
|
UI Field Name: |
Description |
|
Type: |
Character |
|
Length: |
30 |
|
Default Value: |
None |
|
Valid Values: |
Alphanumeric and underscore. |
|
Dependencies: |
None |
|
Required: |
Yes |
|
Editable: |
Yes |
| Field Name: | TAXSOLUTIONID - This field only applies to companies subscribed to the Taxes application. |
|
UI Field Name: |
Tax solution |
|
Type: |
Character |
|
Length: |
100 |
|
Default Value: |
None |
|
Valid Values: |
Alphanumeric and underscore. |
|
Dependencies: |
For VAT and GST tax solutions; refers to a valid VAT or GST tax solution. |
|
Required: |
Yes, only if your organization is configured for multiple tax jurisdictions and you are importing from the top level. |
|
Editable: |
No |
|
Note: |
Only applicable if Inbound or Outbound tax implications |
| Field Name: | LINE_NO |
|
UI Field Name: |
No field name as such. These fields are the line numbers on the left side of the transaction area. |
|
Type: |
Number |
|
Length: |
Any |
|
Default Value: |
None |
|
Valid Values: |
Positive integer |
|
Dependencies: |
Start with 1 for the first line of a transaction, and increment by one for each subsequent line. Also must be unique per journal entry and per journal. For example, Summary 1 might contain line numbers 1-20, Summary 2 might contain line numbers 1-44, and so on. |
|
Required: |
Yes |
|
Editable: |
No |
| Field Name: | ACCT_NO |
|
UI Field Name: |
Account |
|
Type: |
Character |
|
Length: |
24 |
|
Default Value: |
None |
|
Valid Values: |
Any; must conform to the primary/sub account specification in Company > Setup: Company Info |
|
Dependencies: |
None |
|
Required: |
Yes |
|
Editable: |
Yes |
| Field Name: | DEBIT |
|
UI Field Name: |
Debit |
|
Type: |
Number |
|
Length: |
38,2 |
|
Default Value: |
None |
|
Valid Values: |
Any number |
|
Dependencies: |
The uploaded file must contain a number in either the DEBIT or CREDIT field. For example, if you do not have a debit amount, you must have a credit. You can import negative numbers for either debit or credit. In this case, a negative debit amount will be treated as a credit, and a negative credit amount will be treated as a debit. |
|
Required: |
Yes, if the CREDIT amount is not present. |
|
Editable: |
Yes |
|
Notes: |
A negative number is treated as a credit. |
| Field Name: | CREDIT |
|
UI Field Name: |
Credit |
|
Type: |
Number |
|
Length: |
38,2 |
|
Default Value: |
None |
|
Valid Values: |
Any number |
|
Dependencies: |
None |
|
Required: |
Yes, if the DEBIT amount is not present. |
|
Editable: |
Yes |
|
Notes: |
A negative number is treated as a debit. |
| Field Name: | EXCH_RATE_DATE |
|
UI Field Name: |
Exchange Rate Date |
|
Type: |
Date |
|
Length: |
10 |
|
Default Value: |
Today |
|
Valid Values: |
Any valid date format |
|
Dependencies: |
None |
|
Required: |
Yes, unless you provide the EXCHANGE_RATE. |
|
Editable: |
Yes |
|
Notes: |
Use only in multi-currency companies. This field determines the exchange rate as of this date. |
| Field Name: | TAX_LINE_NO - This field only applies to companies subscribed to the Taxes application. |
|
UI Field Name: |
No field name as such. These fields are the incrementing numbers for the tax lines specific to line items. |
|
Type: |
Number |
|
Length: |
4 |
|
Default Value: |
None |
|
Valid Values: |
Positive integer |
|
Dependencies: |
For VAT and GST tax solutions. Start with 1 for the first tax line of a line item, and increment by one for each subsequent line. |
|
Required: |
Yes, only if there are Inbound or Outbound tax implications and there are multiple taxes for the line. |
|
Editable: |
No |
| Field Name: | TAX_DETAILID - This field only applies to companies subscribed to the Taxes application. |
|
UI Field Name: |
Tax detail |
|
Type: |
Character |
|
Length: |
100 |
|
Default Value: |
None |
|
Valid Values: |
Alphanumeric and underscore. |
|
Dependencies: |
For VAT or GST tax solutions; refers to a valid tax detail ID. |
|
Required: |
Yes, only if there are Inbound or Outbound tax implications. |
|
Editable: |
Yes |
|
Notes: |
Specify both a tax detail (TAX_DETAILID) and the amount of the tax (TAX_AMOUNT). |
| Field Name: | TAX_AMOUNT - This field only applies to companies subscribed to the Taxes application. |
|
UI Field Name: |
Transaction tax |
|
Type: |
Number |
|
Length: |
38,2 |
|
Default Value: |
None |
|
Valid Values: |
Any number |
|
Dependencies: |
For VAT or GST tax solutions |
|
Required: |
Yes, only if there are Inbound or Outbound tax implications. |
|
Editable: |
Yes |
|
Notes: |
Specify both a tax detail (TAX_DETAILID) and the amount of the tax (TAX_AMOUNT). |
Learn more about how to CSV import: General Ledger journal entries.
Data entry tips
-
Do not change the column headers.
-
Hide columns for easy data entry, as needed.
-
Use initial caps only.
-
Begin entering data on row 3 of the template, after the column header and description rows.
-
Make sure all dates use the same format.
When you import your CSV file into Intacct, you select a date format. The date format that you select must match the format in the import file. -
Format all the cells as text to avoid errors.
Applying other types of formats to the cells can be helpful when adding data to the template, but it can cause errors when importing. -
Remove or comment out (using the # sign) any extra rows.
Blank rows between records or transactions can cause errors.
Review the Common CSV import errors for things to keep in mind when entering data.
Save the file as CSV
Before saving your file, remove all commas from your file.
Save the file as <your-file-name>.csv after entering your data.
Make sure to save as a plain CSV and not any of the other CSV formats.
Review your data
Before importing your file, review your data.
- Make sure that all the required information is entered.
Check the description row for information about the required fields. If a required field is left blank, the import will fail. -
Make sure that the required information is correct.
Required fields must contain the ID of the related record, such as the account number for a General Ledger account. The title of the account is not the account number.
The data entered in the CSV file must match what's in Intacct exactly.
-
Check for any formatting errors.
Do not use commas in any text.
Review the Common CSV import errors for other things to review before importing your file.
Import your file
After entering data, saving your file as a CSV file, and reviewing your data, it's time to import.
Go to General Ledger > All > Journal entries and select Import transactions.
There are fields on the import dialogue box that Intacct recommends you always use for any import.
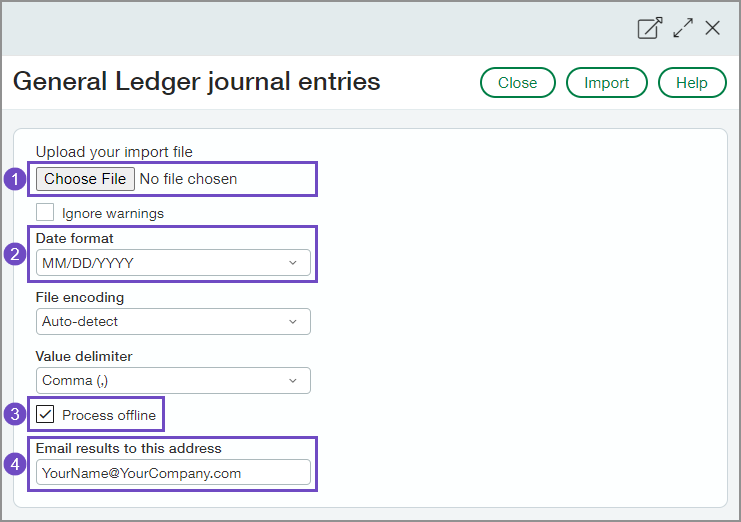
-
Choose File
Use this to select your file for import. Your file must be a CSV file.
-
Date format
When you import your file into Intacct, set this field to the date format you used in your file. The Date format field defaults to the date format set on your preferences page. See Regional formatting and general settings—User preferences for more information about selecting your preferred date format. -
Process offline
When checked, your import is processed offline. This means that:-
you can continue with other work while the import is processed.
-
any errors that are encountered during import are sent in a file to your email. The error file helps you troubleshoot any errors that happened during import.
-
-
Email results to this address
When you process your import offline, enter your email address here. This is the email that will be used to send you updates and information about your import, including the error file.
If you leave this blank, you will not receive information about your import, including the file that contains any errors that might have happened during import.
See Prepare your file for CSV import for more information about how to prepare CSV files for import.
Find and fix errors
Learn more about how to find and fix errors in an import file with this free video:
Learn more about Find and fix CSV import errors.