Supplier GL groups
Related information
About supplier GL groups
You can create supplier GL groups that are specific to your business. Then you assign a supplier GL group to each supplier record. Finally, you can map the supplier GL group to GL accounts on transaction definitions.
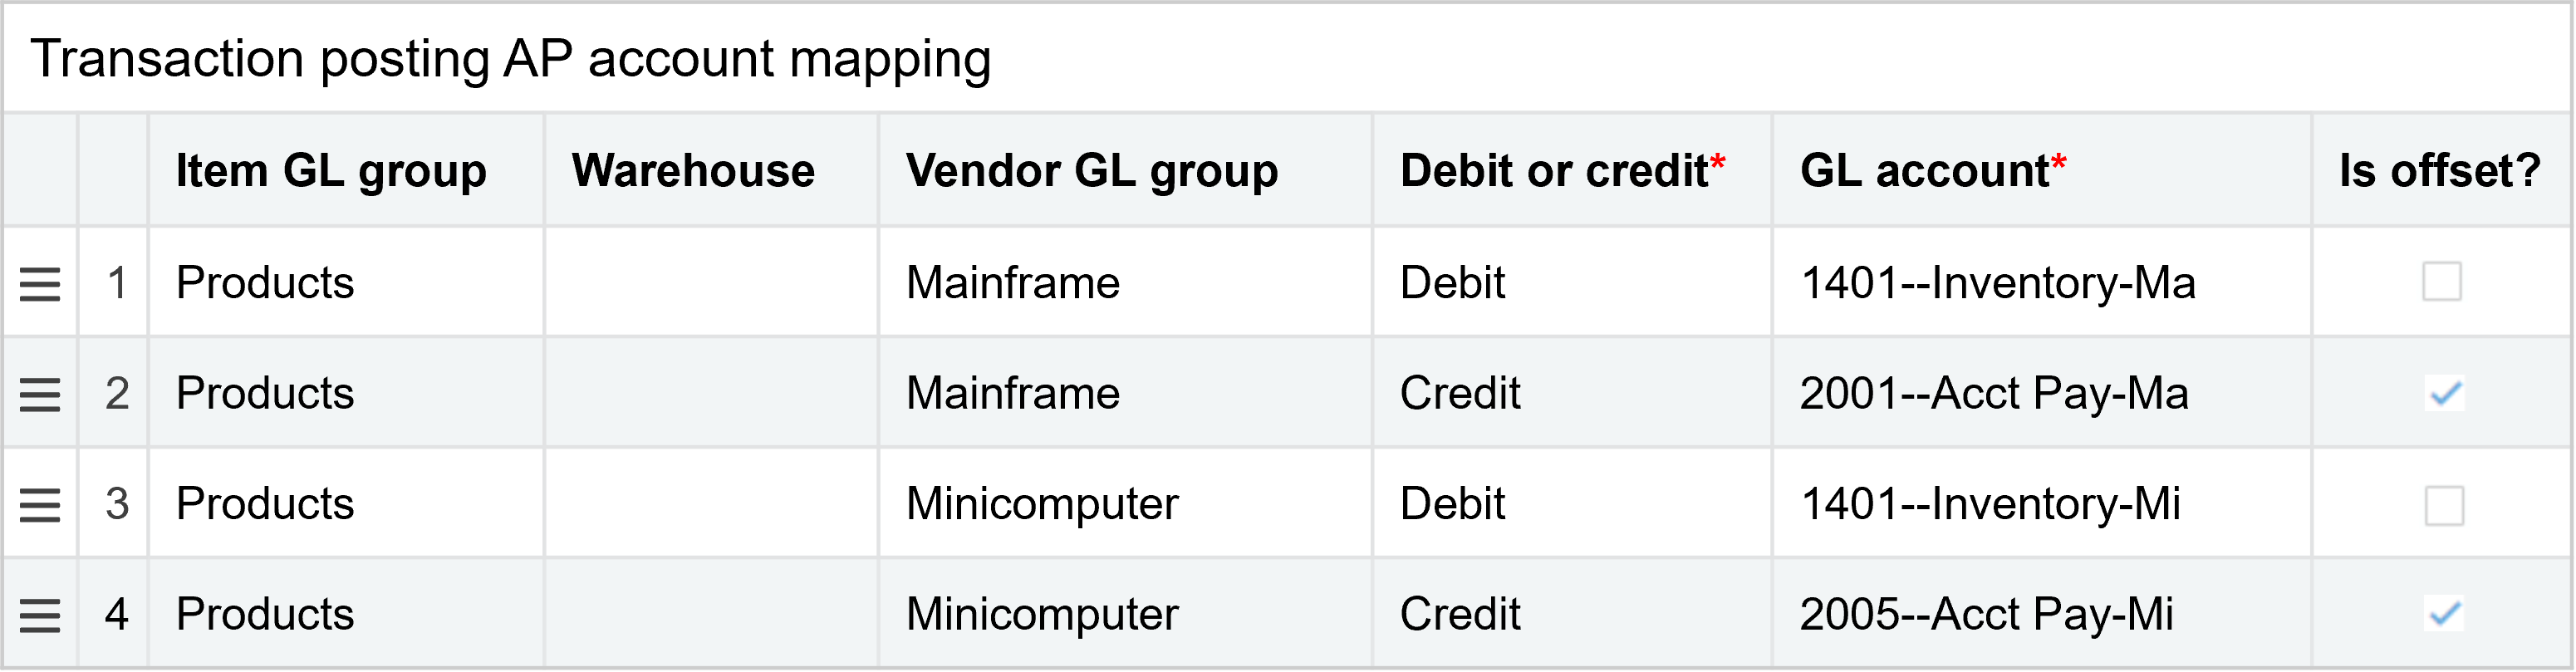
For example, say you have different suppliers who supply hardware. You could have one supplier GL group called Hardware. If you wanted to track data in more detail, you could create more supplier GL groups, such as Mainframe, Minicomputer, and so on. In this example, if you buy a part from a Mainframe supplier, the purchase transaction could post to a different GL account than the one for a Minicomputer supplier from whom you purchased the same part. You could also filter list views by these supplier GL groups.
| Subscription |
Purchasing |
|---|---|
| Regional availability |
All regions |
| User type |
|
| Permissions |
Supplier GL groups: List, View, Add, Delete, Edit |
| Restrictions |
Employee, Project Manager, and Warehouse users can only List and View supplier GL groups. |
View a supplier GL group
-
Go to Purchasing > Setup > Suppliers > GL groups.
-
Records designated as Inactive do not appear in the list by default. To view these records, select Filters at the top of the list and select Remove next to the Status filter to remove it.
-
When you access the list from the top level, you initially only see records created at the top level. To see records created within entities, select Filters and then select Include entity records. Select Apply to update the filter.
-
Select More actions > View at the end of the row to display a specific vendor GL group.
-
Go to Purchasing > Setup > Suppliers > GL groups.
- To view inactive GL groups, select the Include inactive checkbox.
- If you accessed this page from the top level of a multi-entity shared environment, select the Include private checkbox to view the GL groups that were created at the entity level.
-
Add a supplier GL group
-
Go to Purchasing > Setup > Suppliers and select Add (circle) next to GL groups.
- In the Name field, enter the name for the GL group.
- Use the Status dropdown list to indicate whether the GL group is active or inactive.
-
Select Save.
Deactivate a supplier GL group
You can deactivate a supplier GL group (change the status to Inactive), which prevents it from appearing in any supplier GL group selection lists but Sage Intacct retains the supplier GL group for historical purposes.
-
Go to Purchasing > Setup > Suppliers > GL groups.
-
Find the supplier GL group to deactivate.
-
Select Edit at the end of the row.
- Select Inactive in the Status field and then select Save.
-
Go to Purchasing > Setup > Suppliers > GL groups.
-
Select Edit next to the applicable supplier GL group.
- Select Inactive in the Status field and th select Save.
Delete a supplier GL group
You can delete a supplier GL group if it has not been used by any transactions or if it has not been assigned to any suppliers. This removes the supplier GL group from the system.
You can only delete a supplier GL group if you are in the level of the multi-entity structure where the supplier GL group was created. For example, if the supplier GL group was created at the top level, and you are in the entity level, the Delete link does not appear (the supplier GL group is listed as Not owned). In this scenario, go to the appropriate level to perform the deletion.
-
Go to Purchasing > Setup > Suppliers > GL groups.
-
Find the supplier GL group to delete.
-
Select More actions > Delete at the end of the row.
Depending on your user preferences, to confirm the delete select OK.
-
Go to Purchasing > Setup > Suppliers > GL groups.
-
Find the supplier GL group to delete, select the checkbox at the end of the row, and select Delete at the top of the page.
Depending on your user preferences, to confirm the delete select OK.
Assign a supplier GL group to a supplier
-
Go to Purchasing > All > Suppliers.
-
Find the supplier in the list.
The Supplier Information page appears.
-
Select Edit at the end of the row.
- Select the Additional information tab.
-
In the Supplier details section, use the GL group dropdown to select the applicable supplier GL group.
-
Select Save.
-
Go to Purchasing > All > Suppliers.
-
Find the supplier in the list and select Edit.
The Supplier Information page appears.
- Select the Additional information tab.
-
In the Supplier details section, use the GL group dropdown to select the applicable supplier GL group.
-
Select Save.
Map supplier GL groups to GL accounts on transaction definitions
You must have the appropriate permissions to edit transaction definitions. You can map supplier GL groups to GL accounts on transaction definitions that post to either AP or the GL, for example, a PO purchase invoice.
-
Go to Purchasing > Setup > More > Transaction definitions.
- Find the transaction definition.
- Select Edit at the end of the row.
- Select the Posting configuration tab.
-
-
Select Save.
-
Go to Purchasing > Setup > More > Transaction definitions.
- Find the transaction definition and select Edit next to it.
- Select the Posting configuration tab.
-
-
Select Save.
Field descriptions
| Field | Description |
|---|---|
|
Name |
|
|
Status |
The default status is Active. If you are no longer using this supplier GL group and do not want it to appear in dropdown lists, choose Inactive. You can still view inactive supplier GL groups by selecting the Include inactive checkbox in the Supplier GL Groups list. |
What does "Not owned" mean?
In a multi-entity company, shared records such as customers, suppliers, and other items can be edited only at the top level of a company. Some journal transactions, for example, recurring journal entries created at the top level, are also owned at the top and can't be edited from within an entity.
If you display the list of shared records (customer, supplier, or entry) within an entity, you can see the shared records in the list. However, these will be listed as Not owned by the entity and the Edit option won't appear. Move to the top level, which owns the record, to make any changes.