Dimension structures for financial reports
Related information
Dimension structures provide a flexible way for you to organize dimension data that you want to see on the rows or columns of a financial report. For example, instead of showing all locations on a report, you might want to select a Location structure that is named for a particular region and includes a subset of locations.
You can add any number of structures for the dimensions you track.
Find dimension structures
-
Go to General Ledger > All > Financial report structures > Dimension structures.
- View the report structure list for each dimension enabled in your company.
| Subscription |
Company |
|---|---|
| Regional availability |
All regions |
| User type |
Business, Admin, Project Manager, Employee (Viewing) |
| Permissions | Dimension groups: List, View, Add, Edit, Delete |
What are dimension structures?
Dimension structures are structures that represent dimensional data that you intend to use on the rows or columns of financial reports.
- Dimension structure on reports rows.
- Dimension structure on report columns.
For example, you might create dimension structures that show:
- Selected departments
- Customers by type
- Items by product line
You can create any number of dimension structures to represent the different ways you want to segment your data. For instance, you might create multiple Customer structures that enable you to analyze your "Customers by type," "Customers by sales territory," and so on. After they're created, the re-usable dimension structures can be used across the rows or columns of any number of financial reports.
When added to the rows of a report, each dimension structure gets a heading, rows for the individual members or substructures in the dimension structure, and a total row.
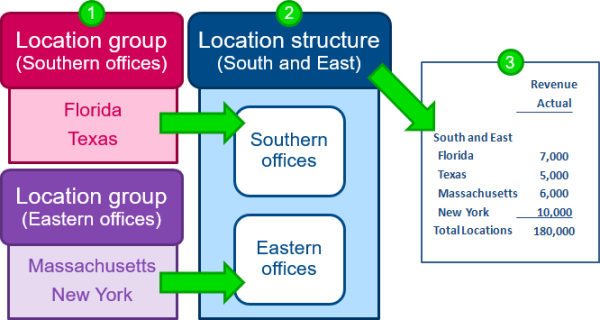
Dimension structures are built from dimension groups, which can contain particular members (such as 1 or more locations) or members that meet certain criteria (such as customers of a particular type). Learn more about dimension groups.
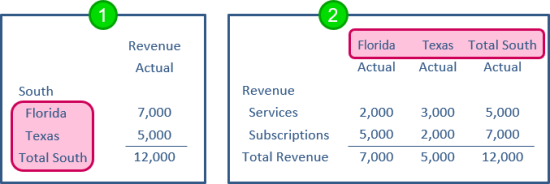
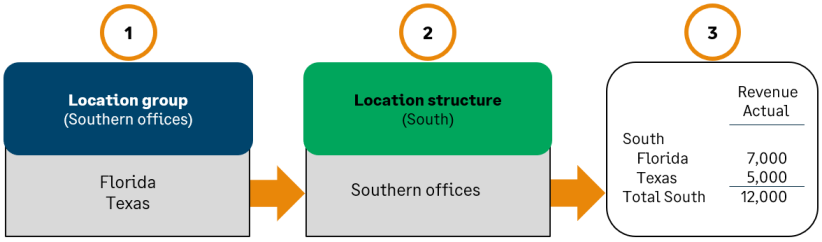
The following graphic shows a simple location structure named "South," which contains a location group that includes a company's southern offices as its members.
- Dimension groups are custom groupings that are meaningful to your company.
- Dimension report structures can contain 1 or more dimension groups.
- The dimension report structure is what lets you add the dimension to a report.
Dimension groups and dimension structures work together to provide power and flexibility in reporting.
- Dimension groups enable you to dynamically filter data at the time you run a report, and can be used for standard reports, such as an AR Ledger, as well as financial reports.
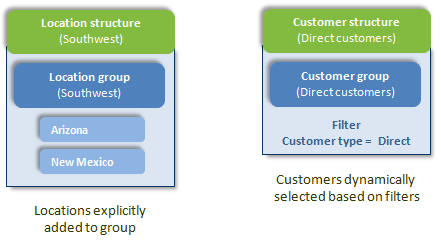
- In addition to creating groups that include particular members, one of the most powerful ways to use dimension groups is to select members based on filter criteria. For example, a dimension group can filter for customers of the same type, items from the same product line, or locations with the same parent location.
- Dimension groups are also used outside of financial reports. For example, you might have a dimension group that is used only to filter the AR Ledger for customers with an outstanding balance greater than R500.
- Dimension structures are created specifically for the purpose of adding dimensions to the rows or columns of financial reports.
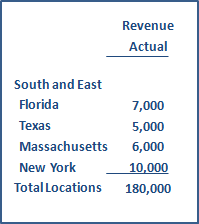
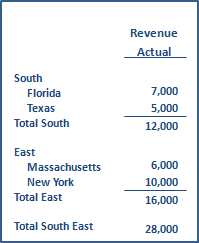
- Depending on how you assemble the groups in structures, you can achieve different results on reports. Groups can be assembled into structures that display dimension members (such as locations or customers) in a flat list, or can be used to create multi-level hierarchical structures.
- As with account groups, dimension structures enable you to choose what text you want to appear on heading and total lines, for example enabling you to display "Customers by Industry" in the heading row and "Total Customers" in the total row.
There are two types of dimension structures, which allow you to create different types of report output. When you create a new dimension structure, you'll be asked to choose the structure type.
| Structure type | Example |
|---|---|
|
Groups Enables you to show members of a dimension, such as a set of locations, in a flat list. |
|
|
Hierarchy of structures Contains other dimension structures, which enables you to show organization, groupings, and subtotals on reports. |
|
Create a dimension structure
Flat structure
You create a flat dimension structure by selecting 1 or more dimension groups that contain the members you want to include.
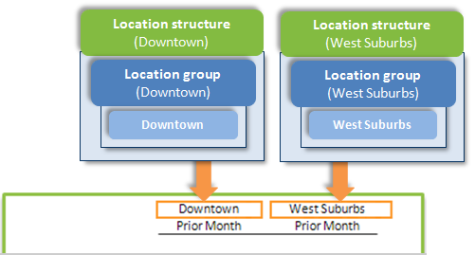
The following graphic provides an overview of how a flat dimension structure can be created and used. In this case, the dimension structure is shown being used on the rows of a report.
-
Create dimension groups that include the members you need.
Members can be selected individually or dynamically based on filters.
- Create your dimension structure and add the groups to it.
-
Use the dimension structure on reports.
Create a flat structure
- Review your dimension groups to determine which ones you plan to include.
You can include a single dimension group, if it contains all the members you want to include, or add multiple groups. If you don't already have the dimension groups you need, you can set up new dimension groups.
By default, members in a dimension group are sorted in ascending order by ID, but you can edit the group and change the sort order (for example to sort by Last Name).How do I review my existing dimension groups?- To review your existing groups, go to Reports > Setup > Dimensions groups, and then select the dimension group list. From the dimension group list, select Edit or View to see how a particular group is defined. Or, select Members to quickly see the existing members of the group.
- Create a new dimension structure: Go to General Ledger > All > Financial report structures > Dimension structures and select Add (circle) next to the structure you want to add.
- In the Name field, enter a name that will remind you of the function of the dimension structure.
- Review the "display as" text for reports, and make changes as needed.
- Based on the Name you entered, we'll suggest the name that will appear on reports (Display on report as) and the total line text (Display total line as).
- You can make changes as needed. For example, you might name a structure "Eastern locations" to help you remember its function, but on reports you display the structure as "East Coast" with a total line of "Total East Coast."
- For the structure type, select dimension groups. For example, if you're creating a location structure, select Location groups.
- In the Specify groups to include section, select and add dimension groups.
- Use the group dropdown menu to select a group.
- Select Add to include the group in your structure.
- Decide whether the report should Roll up child amounts for dimension members that have children.
- By default, amounts for dimension members don't include amounts from children. For example, amounts for departments don't include any child departments, locations don't include sublocations, and so on.
- In some cases, rolled up reporting might make sense. For example, suppose that your projects are typically organized into child projects. By selecting Roll up child amounts, you can ensure that when Project A is included on a report, the amounts reported all of the child projects.
- When you're done building the structure, select Save.
Hierarchical structure
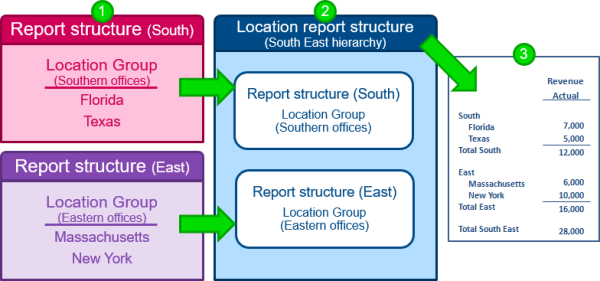
A hierarchical dimension structure contains other structures, which enables you to show organization, groupings, and subtotals on reports.
The following example provides an overview of how a hierarchical dimension structure can be created and used. In this case, the dimension structure is shown being used on the rows of a report.
- Create substructures that include the members you need.
- Create your hierarchical structure and add the substructures to it.
- Use the hierarchical dimension structure on reports.
Create a hierarchical structure
- Create any substructures that you need for your hierarchy.
In the example, you would first need to create a Location structure for South and another Location structure for East.
If you don't already have the substructures you need, you can create a dimension group and turn it into a hierarchy at the same time. - Create a new dimension structure for your hierarchy: Go to General Ledger > All > Financial report structures > Dimension structures and select Add (circle) next to the structure you want to add.
- In the Name field, enter a name that will remind you of the function of the report structure.
- Review the "display as" text for reports, and make changes as needed.
- Based on the Name you entered, we'll suggest the name that will appear on reports (Display on report as) and the total line text (Display total line as).
- You can make changes as needed. For example, you might name a structure "Customers by industry" to help you remember its function, but on reports you display the structure as "Customers" with a total line of "Total Customers".
- For the structure type, select Hierarchy of dimension structures. For example, if you're creating a location structure, select Hierarchy of location structures.
- In the Specify structures to include section, select and add dimension structures.
- Use the structure dropdown menu to select a structure
- Select Add to include the selected structure in your hierarchical structure.
- When you're done building the structure, select Save.
View or edit a dimension structure
When you edit a dimension structure, your changes will apply to all reports that use the structure. Before editing, it's a good idea to review which reports and graphs will be affected.
Even if you haven't yet created any dimension structures, you might find that you already have some in your lists. If you have existing dimension groups, such as location groups that represent different regions, we automatically create corresponding dimension structures so that you're ready to use your existing groupings on reports.
To view and edit your existing dimension structures:
- Go to General Ledger > All > Financial report structures > Dimension structures, and then select the dimension.
For example, to display your department structures, go to General Ledger > All > Financial report structures > Dimension structures > Department.
- From the dimension structure list, drill-down to get more information about a particular structure.
- View and Edit enable you to see how the structure is defined.
- To quickly see the members within a structure, select Members instead.
- To see which reports and graphs use the structure, select Reports or Graphs.
- Edit the dimension structure as needed.
The dimension structure defines how the structure should be listed on reports, and what it should contain.
- To change the title and total line, edit the fields for Display on report as and Display total line as.
- To change the dimension members that appear when the structure is used on reports, edit the dimension groups that make up the structure. If the dimension structure contains other structures, edit those structures to review the dimension groups.
Create a dimension group and dimension structure simultaneously
If you don't already have a dimension group that contains the members you need for a dimension structure, you can create the dimension group and structure at the same time.
- Create a new dimension group, such as a new Location group.
- For example, to create a new location group, go to Reports > Setup > Dimension groups > Location.
- Select Add (circle) next to Location, and for structure type, select Location group.
- Define the group, for instance by selecting individual dimension members or using filtering.
- Select the Dimension structure option, which automatically creates a dimension structure of the same name.
- Select Save.
Examples: how to create different dimension structures
This section provides step-by-step instructions for creating specific types of dimension structures that you might need for your financial reports.
Learn how to create structures that represent:
In some cases, you might want to display a single dimension member, such as a particular location or department, by itself in a column or row.
To create this type of structure, you create a dimension group that contains a single member and then select the option to create a dimension structure of the same name.
To create this type of structure:
- Create a new dimension group.
For example, create a new location group:
Go to General Ledger > All > Financial report structures > Dimension structures and select Add (circle) next to Location.
- In the Structure type field, select Location groups.
-
Enter an ID for the dimension group.
When you select tab, this ID is prefilled as the Name.
- For the Group type, select Specific members.
-
Select the Members section and add the member.
For example, you might add a Downtown location.
- Select the Dimension structure option to request that we automatically create a dimension structure with the same name.
When you save your new dimension group, the corresponding dimension structure is created at the same time. That way, the dimension group will be ready to be used on financial reports.
- Select Save.
- Verify the dimension structure and make any optional changes.
- Display the dimension structure list.
- Select Edit next to the structure you want to edit.
- Verify how the structure will appear on reports by reviewing the Display on report as and Display total line as fields.
You can create a dimension structure that represents a specific set of members, or members that meet certain criteria. To create this type of structure, you create a dimension group that defines the members you want and then select the option to create a dimension structure of the same name.
To create this type of structure:
- Create a new dimension group.
For example, create a new location group:
- Go to General Ledger > All > Financial report structures, select Dimension structures and then select Add (circle) next to Location
- In the Structure type field, select Location groups.
- Enter an ID for the group.
When you select tab, this ID will be prefilled as the Name.
- Define the group.
You can select specific members or members that meet some filter criteria, such as customers of the same type or employees with the same manager. Learn how to determine what members are included in the group.
- Select the Dimension structure option to request that we automatically create a dimension structure with the same name.
When you save your new dimension group, the corresponding dimension structure is created at the same time. That way, the dimension group will be ready to be used on financial reports.
- Select Save.
- Verify the dimension structure and make any optional changes.
- Display the dimension structure list. For example, to display your Location structures, go to General Ledger > All > Financial reporting > Dimension structures > Location.
- Select Edit next to the structure you want to edit.
- Verify how the structure will appear on reports by reviewing the Display on report as and Display total line as fields.
You can easily add all members of a dimension, such as all active customers, to the rows or columns of a report. This is particularly useful for reports that display dimensions in rows, such as a report that includes customers as the rows.

To create this type of structure, you create a dimension group that contains all active members of the dimension and then select the option to create a dimension structure of the same name.
To create this type of structure:
-
Create a new dimension group. For example, create a new customer group:
-
Go to General Ledger > All > Financial report structures > Dimension structures and select Add (circle) next to Customer.
- In the Structure type field, select Customer groups.
-
-
Enter an ID for the group.
When you select tab, this ID will be prefilled as the Name.
- For the Group type, select All members.
-
Select the Dimension structure option to request that we automatically create a dimension structure with the same name.
When you save your new dimension group, the corresponding dimension structure is created at the same time. That way, the dimension group will be ready to be used on financial reports.
-
In the Filters section, add a filter that selects only active customers by setting the following:
- Field: Status
- Operator: Equals
- Value: Active
-
Select Save.
- Verify the dimension structure and make any optional changes.
- Display the dimension structure list.
- Select Edit next to the structure you want to edit.
- Verify how the structure will appear on reports by reviewing the Display on report as and Display total line as fields.
To include a top or bottom match on a financial report, you must first create a dimension structure that contains the set of members from which you want to choose the top or bottom. Then, on the report, you'll set the detail level to show only the top or bottom matches based on a metric of your choice.
For example, you can create an Item report structure for a specific product line. When you use it on a report, you can then change the detail level for the structure to show the top 5 items by revenue.
Learn more about using top and bottom matches in financial reports.