Create, edit, and delete user-defined dimension groups
Related information
A dimension group is a name for a particular set of members in a dimension, or a set of members that meet certain criteria. For example, you can create customer groups for customers located in a particular state or customers with the greatest open balance.
Create a user-defined dimension group
You create user-defined dimension (UDD) groups differently than the way that you create groups for standard dimensions. User-defined dimensions are created as Platform Services objects. They do not appear in the usual dimension groups list.
After they're created, user-defined dimension groups are no different than standard dimension groups.
To create effective user-defined dimension groups, you create a view in Platform Services. That View is actually your group.
Your UDD must already exist. If not, create it before continuing.
| Subscription |
Platform Services |
|---|---|
| Regional availability |
All regions |
| User type | Business user with admin privileges |
| Permissions | Custom Applications with User-defined Dimensions: Authorize Installations |
- Go to Platform Services > Objects.
- On the Objects list, find the dimension for which you want to create the group, then select the user-defined dimension name.
- Select Views at the top of the page.
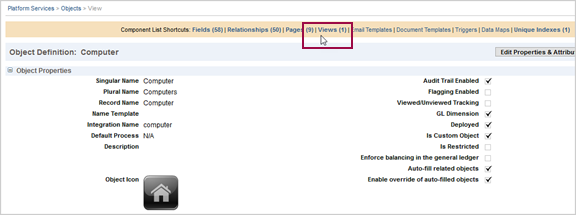
The Views that are listed are your existing groups. You'll see your UDD in the list. These then become available in Dimension Structures in the Reports menu and the General Ledger Financial report structure lists.
Example: edit a group
- Go to your user-defined dimensions men and select the dimension to which you want to add a group member.
If you're editing an existing group, select Edit to the left of the group.
- Enter an ID and Name for the dimension group.
When displayed elsewhere in Intacct, the dimension group will be listed with the ID and name together (ID--Name), as in NAOPS--North America Operations. IDs cannot be changed after you've saved the group, but you can edit the name later.
- Optionally, enter any description that will remind you of what this group includes or how it's used.
- From the Group type dropdown menu, select the type of group you want to create and then define the group.
- Select Specific members if you want to manually select the members, such as locations and departments, to include in the group.
- Select All members if you want to filter based on the criteria of your choice. For example, you can define a "Direct Customers" group that includes all members but then filters the results to only customers where the Customer Type field is equal to "Direct."
- Optionally, specify how dimension members will be sorted when displayed in reports.
How you define the group determines the display order for members.
Sort dimension members Group type How to sort members All members
By default, members are sorted in ascending order based on ID, but you can change the sort order. For example, you can want to sort a customer group in Ascending order based on the Last Name field.
To define the sort order, set the Sort order to Ascending or Descending and then choose the field to use for sorting.
Specific members
Members will be displayed in the order they appear in the Members list.
Learn how to select and order members.
-
Select the Dimension structure option to create a dimension structure that enables the group to be used on the rows or columns of financial reports.
You can later find your dimension structures by going to
If you do not create a dimension structure for the group, you'll be able to use the group only for filtering.
Dimension groups in reports and dashboards
Defining a dimension group gives you additional control over what appears in reports and dashboards. In general, any dimension groups that you create will appear as additional filter choices.
With a dimension group, you can do the following:
- Manually select a set of members, such as specific customers, suppliers, or locations
- Filter to include members that meet certain criteria, such as items of the same type or customers of the same type
- Control the order in which the members appear in report columns and rows
- Take advantage of dimension counts to post to statistical journal entries automatically
Where can dimension groups be used?
Dimension groups can be used to filter in the following areas of Intacct:
- Financial reports
- Financial graphs
- General Ledger reports
-
Dashboards
Dimension use in dashboards is limited to components for performance cards, financial reports and graphs, and standard General Ledger reports.
| Feature | Allows filtering by dimension group? | Description |
|---|---|---|
|
Financial reports and graphs |
Yes |
Applies to reports and graphs in these lists:
When you define a report or graph, you can specify the filters as part of the report definition, or you can prompt the user for the filter at report runtime. |
|
Standard General Ledger reports |
Yes |
Applies to reports listed on the General Ledger menu, such as the Journals report or Trial Balance report. When you run a General Ledger report, you can select the filters to use. Or, you can create a prefiltered report by memorizing the report with the filters that you want. |
|
Other reports |
No |
Currently, reports outside of General Ledger do not support dimension groups.
|
|
Dashboards |
Yes (limited) |
Dashboard components can be prefiltered for a dimension group, or you can allow the user to filter the entire dashboard. Filtering is limited to components for performance cards, financial reports and graphs, and standard General Ledger reports. Learn more about dashboard filtering. |
How are dimension groups used in financial reports?
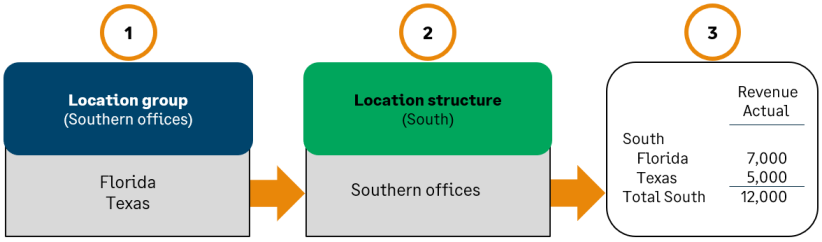
Dimension report structures enable dimensions to be used on the rows or columns of financial reports. The following example shows a simple location report structure named "South," which contains a location group entitled "Southern offices."
- Dimension groups are custom groupings that are meaningful to your company.
- Dimension report structures can contain 1 or more dimension groups.
- The dimension report structure is what lets you add the dimension to a report.
When you add a dimension group, you're given the option to create a dimension report structure automatically. Learn more about how dimension report structures are created from dimension groups.
Delete a dimension group
Dimension structures can be deleted as long as they are not being used for reporting.
- Go to Reports > Setup > Dimension structures.
- Select the dimension structure that you want to remove permanently.
- On the <UDD> report structures list, select Delete.
- Used to filter 1 or more reports, graphs, or dashboards
- Part of a dimension structure
For example, you have a location structure that you use to filter financial reports. Remove the filter from the financial reports, save your changes, and then try deleting the location group again.
Determine what's in the group
The group type and options that you select determine which members are included in report data when you filter on this dimension group.
If you're creating financial reports that show dimensions in rows or columns, your selection also determines the column and row headings, and the order in which they're listed.
| What do you want to do? | Steps |
|---|---|
|
Include all members (such as all locations) |
|
|
Include all members that meet your criteria |
Do not select any specific members. If you select specific members (such as particular locations or suppliers), the filters will apply only to the members you selected.
|
|
Include specific members |
|
|
Select specific members, and further narrow the selection based on other criteria |
|
|
Select only the top or bottom matches based on the value of a field
Non-numeric fields are matched alphabetically.
|
If you're planning to show top or bottom matches in a financial report, such as showing the top customers by revenue, do not use this option for the group. Learn more about how top and bottom matches work in a financial report.
|
Select specific dimension members and set their order
When you select "specific members" of a dimension, you manually select the individual group members that you want to include. For example, you can create an Employee group that contains certain employees.
- Set the Group type to Specific members.
-
Use the Members list to select the members to include. The sort order that you choose will be used in any reports that show dimensions in columns or rows.
If you're creating a dimension group at the top level, you cannot include members that belong to an entity. Try creating the dimension group from the entity itself.
Filter with field values
You can add filters that select dimension members based on the value of certain fields. For example, you can select customers of a certain type or suppliers that have a payment priority of urgent.
- Select the field to filter on.
- Choose the operation and value that you want to filter for.
The options you'll see depend on the field you choose.
By default, if you add more than 1 filter, members are included only if they match all criteria. However, you can change this behavior using the Filter conditions dropdown menu.
Frequently asked questions (FAQs)
You can easily create a dimension group that includes all active members of a dimension.
When creating the dimension group, select the following options:
- Select All members as the group type.
- Change the sort order as needed.
- In the Filters list, filter for all Active members.
- For the Field, select Status.
- For the Operator, select equals.
- For the Value, select Active.
Depending on the type of field you select, matching can work differently.
- For numerical fields, equals, greater than, and less than are often used to filter based on whether the amount is equal to, above, or below the number you enter.
- In general, non-number fields ask you to select a specific record from a list (for example, a specific department name or manager). For these types of fields, equals, not equal to, is empty, and is not empty are the most useful operators.
- If you want to match records that contain a certain word (for example, project names that contain the word "design"), use the contains operator. Instead of choosing a record from a list, enter the word in the Value field.
Some fields, such as amount due and item price, contain data that can change over time. For the purposes of filtering reports, amount-based filters are always applied using the most current data, even if the "as of" date for the report is in the past.
For example, suppose that you create a revenue report that filters for items with the highest price. When you run the report, the filter will be applied based on the current price of the items, even if the report is being run for a prior reporting period.
The filters operate differently depending on whether you select any specific members in the Members list.
- If you use the Members list to select specific dimension members, such as particular departments or customers, the filters will be applied only to those specific members.
- To apply filters to all members of a dimension (for example, selecting all your locations where the Status equals "Active") do not select any specific members in the Members list.
Example: Suppose that you have a location group that has three members such as California, New York, and Oregon (an inactive location), and you then add a filter for locations where the Status equals "Active." In this case, when you use the location group to filter reports, the report will include data only for California and New York and will not include the inactive location.
Dimensions are often hierarchical. For example, a department can have one or more child departments, up to several levels deep.
When a report filter includes a member of a dimension, data from any members that belong to it will also be included. This means that a department group that matches the Engineering department will automatically include data from any subdepartments (like Development, Quality Assurance, and Documentation.)
Create a dimension group that is filtered to include both inactive and active members. Then, use that dimension group to filter financial reports.
See the help for the specific dimension, for example, location or department, for details on making a dimension inactive.
If a user is restricted to the child of a dimension value and then a group is used in reporting that would include the child the option to view the report group is blocked for the restricted user.