General ledger
Manual lettrage for General Ledger transactions for France
Manually match the debit and credit transactions for your designated General Ledger accounts to ensure compliance with your internal processes.
Details
Use the new Lettrage page to manually match corresponding debit and credit transaction lines using an assigned lettering sequence. This matching feature is for transactions created directly in General Ledger that are not automatically matched like the ones created in Accounts Payable and Accounts Receivable. Lettrage must be enabled for individual accounts, so you can specify which ones use it.
Use the new Lettrage activity report in General Ledger to generate comprehensive reports with match results. Depending on how you filter the report, it shows the following information:
-
Transaction activity that has been matched
-
Transaction activity that's unmatched
-
Both matched and unmatched activity
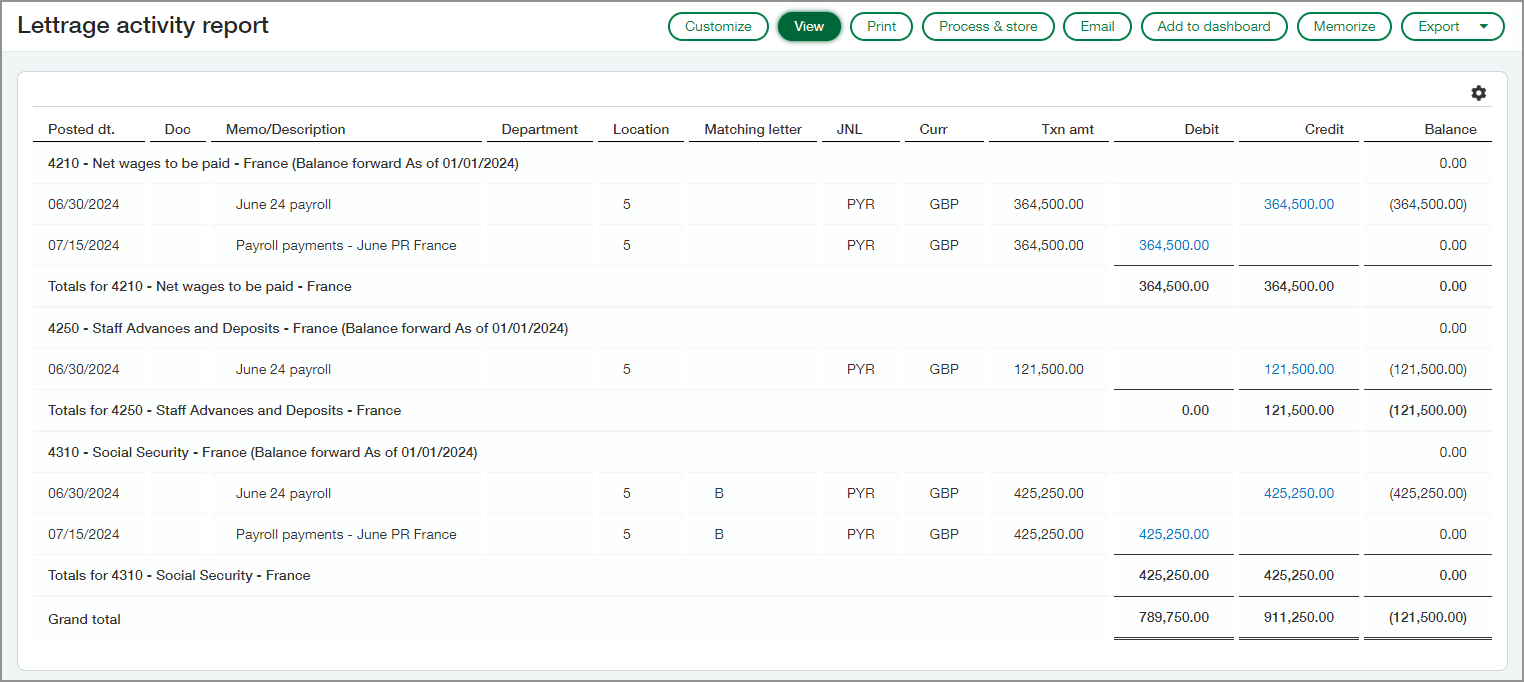
Run the report for matched transactions to review and validate the transactions that have been matched and to see the relationship between offsetting debits and credits. Run the report for unmatched transactions to see which transactions represent the remaining, unreconciled balance of the accounts.
How it works
To use manual lettrage for GL transactions, you first need to set up your document sequence in Company and then enable the lettrage feature in the General Ledger Configuration page and for individual accounts.
Setup
Create a document numbering sequence to use for the lettering codes. You can create 1 sequence to use for all accounts, or you can create multiple sequences and select one for each account.
Use a length that ensures the codes do not get reused within a fiscal year. For example, select the following options when you create the document sequence:
-
Sequence type: Alpha
-
Primary sequence maximum: zzz
-
Primary sequence: aaa
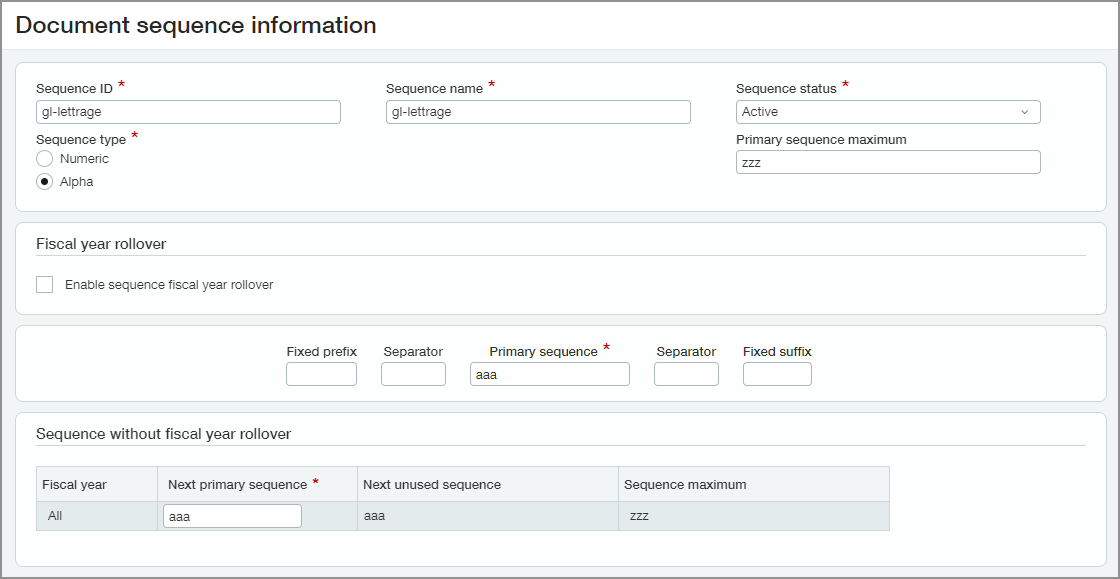
- Go to Company > Setup > Settings > and select the + beside Document sequence.
-
Enter a Sequence ID, which is used to identify the sequence in dropdown lists.
The sequence ID cannot be changed after you save the sequence.
-
Enter a Sequence name.
-
Select a Sequence type.
The sequence type cannot be changed after you save the sequence.
-
Enter the Primary sequence maximum.
The default maximum for numeric and alpha sequences is 16 numbers or letters, but you can change it.
When the end of the sequence is reached, you receive an error message and must start a new sequence.
-
Enter the Primary sequence.
The primary sequence cannot be changed after you save the sequence.
- The Next primary sequence is automatically entered, but you can change it.
- Add any other settings that you need.
- Select Save.
See the field descriptions for more information about what to enter in each field.
-
Go to General Ledger > Setup > Configuration.
-
In the Account settings section, select Enable lettrage.
-
In the Lettrage sequence field, select the document sequence that you created.
This is the default sequence for all accounts, but you can select a different one when you edit an account.
-
Select Save.
Determine which accounts require lettrage, and then enable it for those accounts.
-
Go to General Ledger > All > Accounts > General Ledger accounts.
-
Find the account that you're configuring for lettrage and select Edit.
-
Select Enable lettrage for this account.
-
Optionally, select a Lettrage sequence.
If you do not select a sequence here, the lettrage sequence selected in Configure General Ledger is used instead.
-
Select Save.
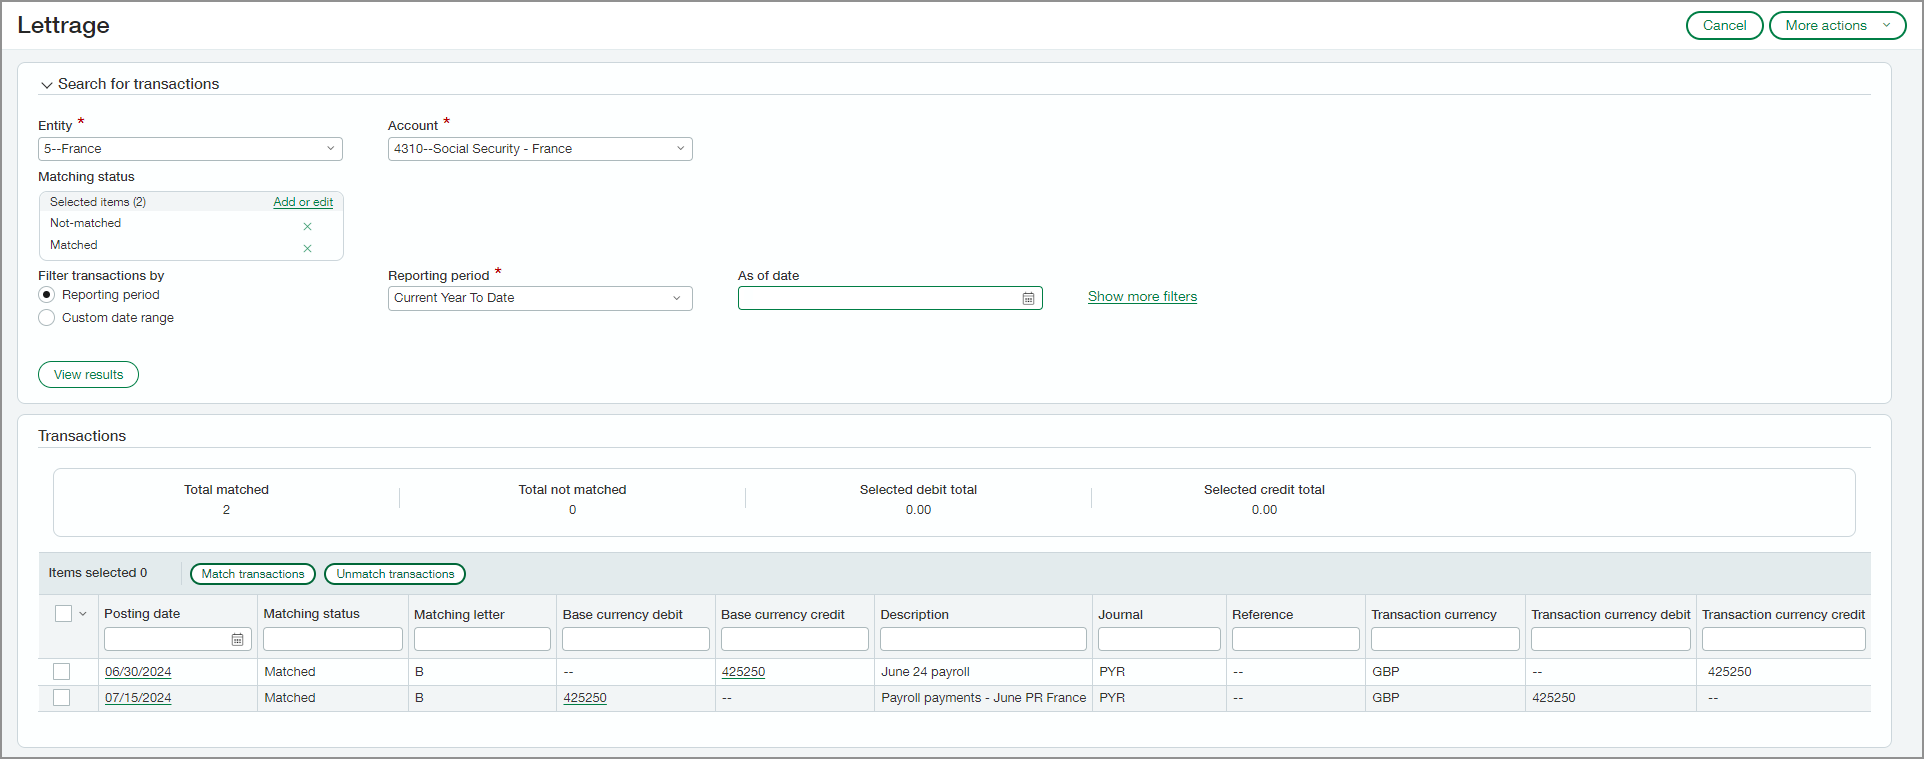
Select and match transactions
- Go to General Ledger > All > Lettrage.
- In the Search for transactions section, select an Entity.
-
Select an Account.
Only the accounts for which you've enabled lettrage appear in the dropdown list.
-
Under Matching status, choose which transactions you want to view.
-
You can accept the default selection, Not matched.
-
Or select Add or edit, and then select Matched to view those transactions as well.
-
In the Selected items list, you can select the x to remove an item.
-
Select Done when you're finished.
-
- Select a Filter transactions by option.
- If you select Reporting period, select the period and enter an As of date.
- If you select Custom date range, enter a Start Date and End date.
- Select Show more filters to see additional fields.
- Enter any additional filtering options.
- Select View results.
The transactions list appears at the bottom of the page.
-
Select 2 or more transactions to match.
The total debit and credit amounts of the selected transactions must be equal to match them.
For example, you can select 1 transaction with a debit amount of $800 and 2 transactions with credit amounts of $300 and $500.
The total debit and credit amounts of your selected transactions appear above the transaction list.
-
Select Match transactions.
The Matching letter is filled in based on the document sequence, and the Total matched field above the transaction list is updated.
You can select transactions that are matched, and then select Unmatch transactions. To unmatch transactions, you must select all the ones that were included in the original match.
For example, if you matched an $800 debit to credits of $300 and $500, you cannot unmatch only the $300 credit. You have to unmatch them both at the same time.
View the Lettrage activity report
-
Go to General Ledger > All > Reports > Lettrage activity.
-
Enter your filtering and formatting settings.
-
Select an option for generating the report.
You can view it now, print it to save it as a PDF file, or export it.
You can also process and store it to view later or add it to your dashboard or memorized reports list.
Permissions and other requirements
| Subscription |
General Ledger |
|---|---|
| Regional availability |
France |
| User type |
Business user with admin privileges to enable Business to match transactions |
| Permissions |
General Ledger
|
| Configuration |
Lettrage must be enabled in Configure General Ledger and for individual accounts. |
| Restrictions | Company or entity must have the operating country set to France. |