Bill basics—Accounts Payable
Basic workflow
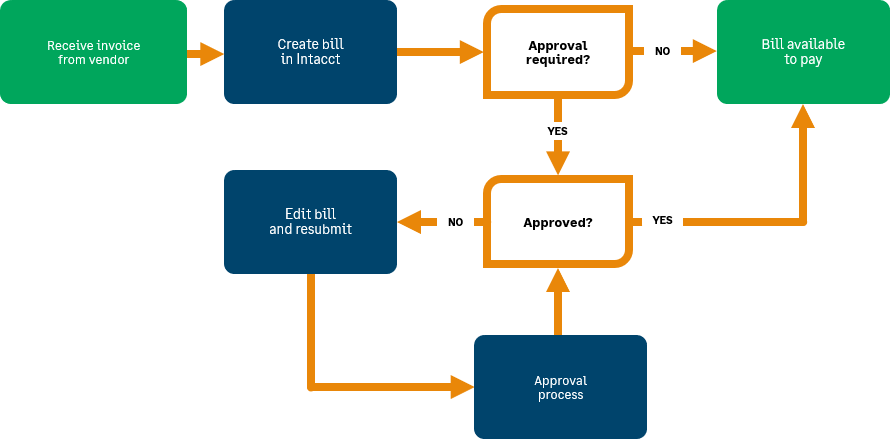
When you receive an invoice from a vendor for goods or services, you create a bill in Sage Intacct to record the expense.
After a bill is entered, many companies then require the bill to be approved prior to payment. Your approval process can have multiple levels of approvals.
Video: Add a bill
Training
Sage University provides training that you can take at your own pace. The courses are designed to help new users get started with Sage Intacct quickly.

Processing Accounts Payable
See how to add and manage vendors and bills. Learn how to pay bills and manage adjustments, advances, and credits. Find out how to fix mistakes.

See all on-demand training
Get up to speed quickly with short video tutorials and interactive training modules.
Understand the basics
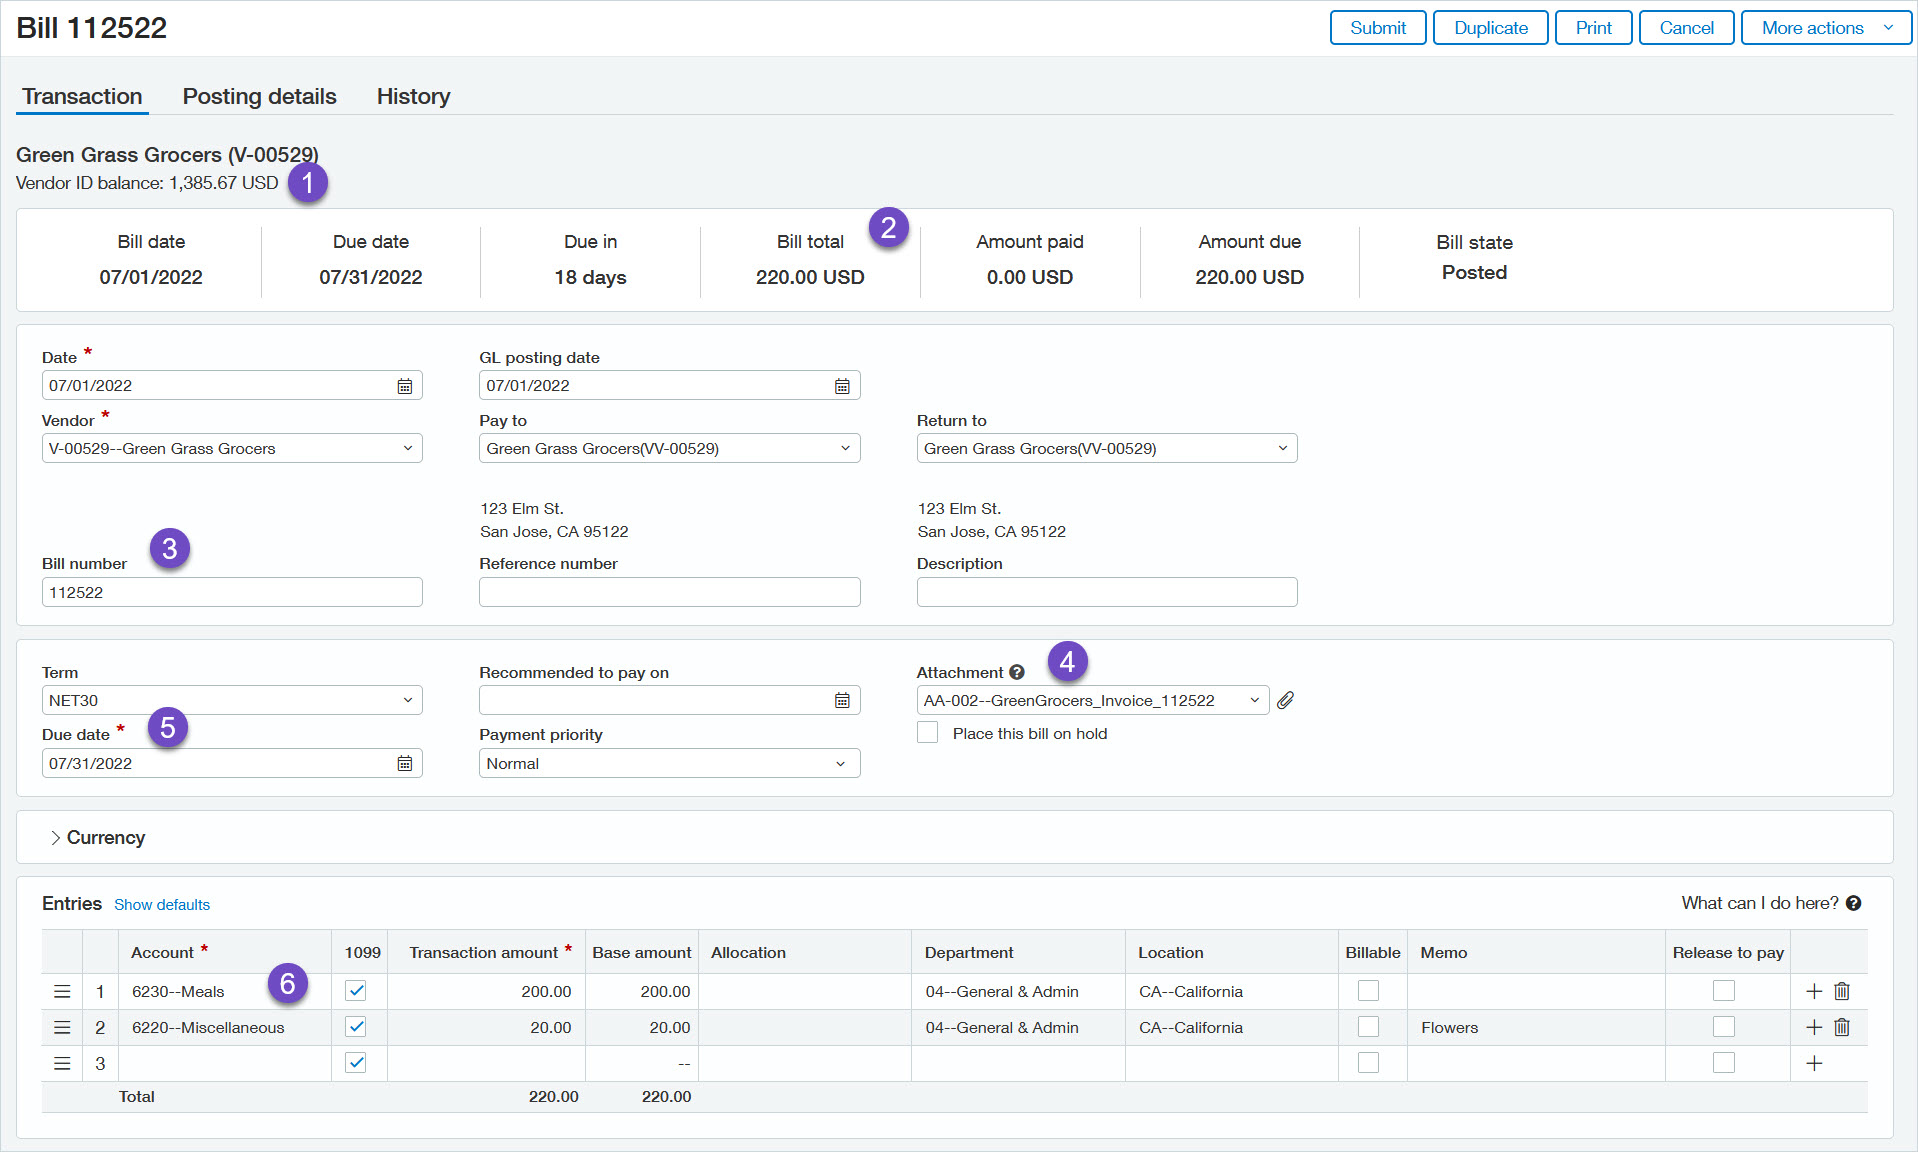
- The Vendor ID balance is the total amount you owe this vendor for all outstanding bills.
- The bill summary bar shows key information about the bill, including the total for just this bill.
- The Bill number is the identifying number from the vendor invoice. Always enter a bill number so that you can easily locate the bill later and avoid duplicate bill entry.
- You can add the vendor invoice and other supporting digital documents to an attachment and associate it with the bill.
- Intacct automatically determines the Due date based on the Bill date and the selected Term. This gives visibility to payment timing.
- Each row in the Entries table shows the account, amount, and any tagged dimensions for each line item. You can expand a row by selecting it and selecting Show details.
See the Bills field descriptions for detailed information on each field in the Bills page.
If you're adding a bill for a new vendor, you can add the vendor record directly from the Bill page. Follow your company's business process for adding vendors.
Learn more about adding vendors.
In Intacct, an attachment is a group of one or more digital files associated with a transaction or record such as a bill or a vendor.
Each bill can be associated with one attachment. You can add multiple vendor invoices or other supporting document files to a bill's attachment. You can also share an attachment with more than one bill. If you do this, any changes you make to the attachment are reflected in all associated bills.
Attachments are stored in folders that are organized in a hierarchical structure. This means the folders can be stored in other folders, called subfolders, which in turn can be stored in subfolders, and so on. See your Intacct administrator for information on how your company's attachment folders related to bills are organized.
| Subscription | Accounts Payable |
|---|---|
| User type | Business |
| Prerequisites | At least one attachment folder must exist. |
| Permissions |
Accounts Payable Bills: List, View, Add, Edit Company Attachments: List, View |
To add a vendor invoice to an attachment:
- If necessary, digitize the vendor invoice. For example, scan a hardcopy vendor invoice to create an electronic PDF file.
-
Go to Accounts Payable > All > Bills.
- Find the bill that you want to edit.
-
Select Edit at the end of the row.
-
In the Bill page, select the dropdown arrow in the Attachment field and then select Add.
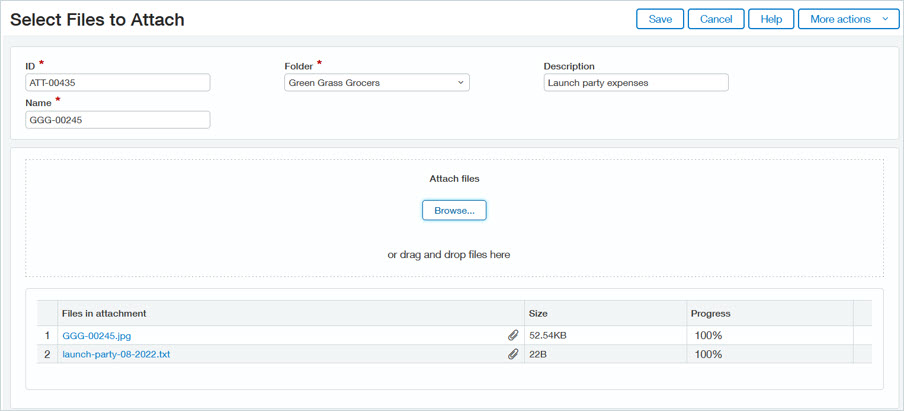
The Select Files to Attach window appears.
-
Enter a unique ID for the attachment.
If your company has set up attachment auto-numbering, the attachment ID is automatically populated.
-
Enter a Name to identify the attachment.
If you leave this field blank, Intacct automatically adds a name for the attachment based on the first file that you upload. You can change this name as needed.
- Select the Folder to store your attachment.
- Optionally, enter a Description of the attachment.
-
Do one of the following:
- Drag and drop one or more files from your desktop or file explorer into the Attach files section.
- Select Browse, then select one or more files to upload.
- When you have finished adding files, select Save.
- If necessary, digitize the vendor invoice. For example, scan a hardcopy vendor invoice to create an electronic PDF file.
-
Go to Accounts Payable > All > Bills.
- Select Edit next to the desired bill.
-
In the Bill page, select the dropdown arrow in the Attachment field and then select Add.
The Select Files to Attach window appears.
-
Enter a unique ID for the attachment.
If your company has set up attachment auto-numbering, the attachment ID is automatically populated.
-
Enter a Name to identify the attachment.
If you leave this field blank, Intacct automatically adds a name for the attachment based on the first file that you upload. You can change this name as needed.
- Select the Folder to store your attachment.
- Optionally, enter a Description of the attachment.
-
Do one of the following:
- Drag and drop one or more files from your desktop or file explorer into the Attach files section.
- Select Browse, then select one or more files to upload.
- When you have finished adding files, select Save.
Learn more about attachments.
Save time entering a new bill by copying the details of an existing bill for the same vendor.
| Subscription |
Accounts Payable |
|---|---|
| User type |
Business |
| Permissions |
Bills: List, View, Add, Edit |
-
Go to Accounts Payable > All > Bills.
- Find the submitted bill that you want to copy.
- Select the bill number to view bill detail.
-
Select Duplicate.
A copy of the bill opens in edit mode.
-
Edit the bill details as needed.
In most scenarios, you'll want to at least enter a unique bill number.
- Select Draft, Submit, or Post to save the transaction.
-
Go to Accounts Payable > All > Bills.
- Select Edit or View next to the bill you want to copy.
- Select Duplicate.
A copy of the bill opens in edit mode.
-
Edit the bill details as needed.
In most scenarios, you'll want to at least enter a unique bill number.
-
Select Draft, Submit, or Post to save the transaction.
You can load many bills at one time into Intacct via a CSV import template. You can use any software that can save the data as CSV. The most commonly used software is Microsoft Excel.
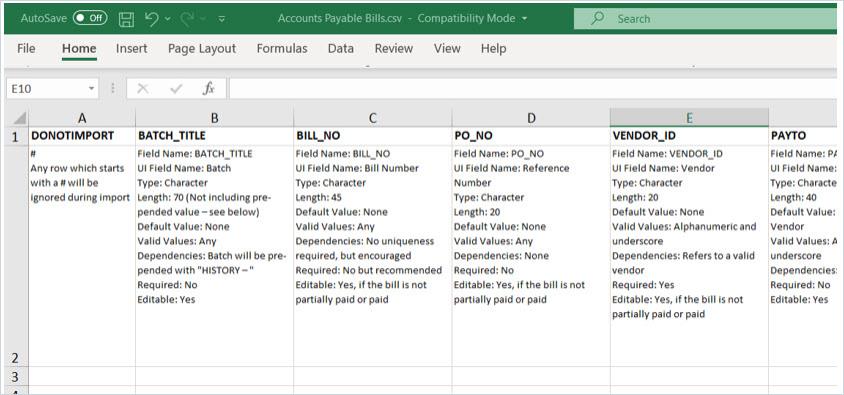
The basic steps to import bills are as follows:
- Download the import template from Intacct.
- Using your spreadsheet software program (for example, in Excel), add the bill data to the template in the correct format and save the template as a CSV file.
- Import the template into Intacct.
Additional resources
- For information on the bills import template, see Import bills.
- To see a demo of importing data and troubleshooting errors, watch the .
- If your company is subscribed to the Learning membership, see the Adding Data Using Imports On-demand training course.
If you pay the same bill on a regular basis, such as a monthly rent bill, you can save time by having Intacct create the bill automatically for you.
| Subscription |
Accounts Payable |
|---|---|
| User type |
Business |
| Permissions |
Recurring Bills: List, View, Add |
-
Go to Accounts Payable > All > Bills and select Add (circle) next to Recurring bills.
-
Enter the bill header and line item information. At a minimum, complete the required fields (indicated by a red asterisk). Additionally, the following fields can help you identify the recurring bill:
-
Bill sequence number.
If Accounts Payable is configured to require bill numbers, you must enter a Bill sequence number. Each recurrence of the bill automatically receives an incremented number from the defined sequence type. This number prints on the remittance stub, not on the check itself.
-
Reference number.
This is a number such as a purchase order or account number to use in searches or reports on this bill. This number shows on the GL Details report and prints on the check and vendor stubs.
See Field descriptions: Recurring bill page for information on each field.
-
-
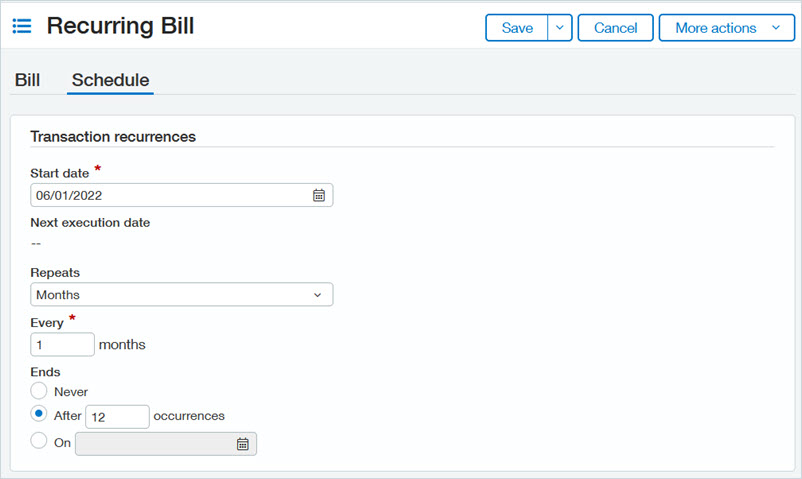
Select the Schedule tab and enter the following information:
-
Start date. This is the date the recurring bill should begin. For week, month, or year intervals, the start date drives both the start of the recurring schedule and when the schedule is repeated.
For example, if the start date is on the 15th day of a month and Repeats = Months, the schedule will repeat on the 15th day of each calendar month. If the recurring schedule is set to repeat every week, the schedule will repeat every 7 days, starting on the 15th day of the month.
- Repeats, Every: how often the recurring bill should be created.
- Ends: when to stop the schedule.
-
- Select Save. Intacct creates the first bill and sets the bill Date to the recurring schedule Start date.
Next steps
- Best practice: When you receive the vendor invoice for each bill occurrence, edit the applicable bill to set the Bill number to the vendor invoice number.
- Monitor the Recurring transaction status report to verify the status of recurring bill generation. If a bill failed to generate, you can find error information in this report to help you resolve any issues.
- Use the AP recurring report to track recurring bill information, including recurring payment details.
Learn more about creating a recurring bill.
| State | Description |
|---|---|
|
Draft |
The bill was saved as a draft (preliminary version of the transaction). A Draft bill has no effect on the General Ledger. You can edit a draft transaction as applicable. |
|
Posted |
The bill posted to the General Ledger. If you have approvals enabled, the bill state is set to Posted after the last level approver approves the bill. See When you can edit unpaid bills for exceptions to edits in Posted bills. |
|
Submitted |
The bill was submitted for approval. Only applicable if your company has bill approvals enabled. Approvers can edit some details for a Submitted bill. If you need to make changes to a Submitted bill, you can either delete the bill and create a new one or wait for it to be approved or declined and then edit and resubmit it. |
|
Partially approved |
The bill was approved by at least one approver but is awaiting at least one additional approver. Only applicable if your company has bill approvals enabled. You can view the approval history on the bill's History tab. |
|
Declined |
The bill was declined at some point in the bill approval process. Only applicable if your company has bill approvals enabled. If necessary and the bill meets the applicable conditions, you can either delete the Declined bill or edit it and submit it for approval again. |
|
Selected |
The bill has been selected for payment but the payment has not been processed. A payment request exists that includes the bill. Complete the applicable payment method process to pay the bill. See Edit a paid bill for information on how to make changes to a Selected bill. |
|
Paid |
The bill was paid in full. Most information in Paid bills is restricted from edits. See Edit a paid bill for information on what kind of changes you can make to a Paid bill. |
|
Partially paid |
A payment was applied to the bill, but the payment amount was less than the total bill amount. The remaining balance for the bill is available to pay via the Pay bills page. Most information in Partially paid bills is restricted from edits. See Edit a paid bill for information on what kind of changes you can make to a Partially paid bill. |
|
Reversed |
The bill was reversed. Only applicable if your company has reversals enabled. You can only edit non-posting fields for a Reversed bill. You cannot reverse a Reversed bill. After reversing a bill, you typically create a new bill that contains the correct information. Learn more about reversing bills. |
|
Reversal |
The bill was created when the source bill was reversed. It contains the reversal entry for the Reversed bill. The Reversed and Reversal bills are retained for audit purposes. Only applicable if your company has reversals enabled. For example, if the source Reversed bill had a line item for 100.00, the Reversal bill will have a line item for -100.00. The Reversal bill also has "Reversed -" inserted before the Bill number. |
|
No value |
The bill has positive and negative line items that net to 0.00. This bill will remain in this state and will not be available in Pay bills. You can reverse the bill if your company has reversals enabled. The best practice for documenting bills with zero total value is to create a bill that contains the positive line items and create an adjustment that contains the negative line items. |
- See the Pay bills basics page get started paying bills.
- Check out the Use Accounts Payable page for links to many popular topics.
- Search the Help Center to find information on particular subjects.