Upload a cheque signature on the Preferences page
Related information
Upload a signature that prints on cheques you print from your user account. This signature overrides any signature on the current account.
To print a cheque with a blank signature line instead of a signature, make sure no signature has been uploaded on either the current account or on the Preferences page of the person who is printing cheques. Learn how to remove check signatures.
Step 1: Create a digital cheque signature
A digital signature is a scanned, digital image of your signature that is used to print a signature at the bottom of cheques. Make sure the signature prints with a white background. Printing a signature with a transparent background is not supported.
- Sign your name in a 3.0" wide by 0.36" high frame.
-
Scan the signature.
Use 150 dpi resolution.
-
Save the file as a 16-bit color GIF, JPG or PNG file.
File size can't exceed 10KB.
- Open the file in a graphics program and verify that it appears correctly.
The most effective signature fills the box, leaving little white space.
If your signature doesn’t fill the box, it will appear distorted on your printed cheques.
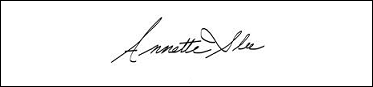
Good: The signature fills the box.

Too small: The signature leaves too much white space.
Unclear: The signature is too small and too far to the left.

Step 2: Upload the signature
| Subscription |
Accounts Payable |
|---|---|
| User type |
Business, Project Manager |
| Permissions |
If you upload your signature from your Preferences page, you need no permissions. |
-
Select your login name at the top of any page and select My preferences.
- Go to the Cheque preferences section.
- Select Upload signature.
- On the Upload signature image page, select Choose Files.
- Find the image file with your signature, and select Open.
- Select Upload, then Save your preferences.
Avoid changing the cheque printing offsets from 0.0" unless your bank rejects your cheques.
If the MICR portion of your cheques is not properly aligned (that is, your bank is rejecting your cheques), use these controls to re-position the PDF cheque image relative to the left and top edges of the sheet of paper. Learn more about MICR code alignment. To print a PDF test page that also contains detailed instructions on the adjustment process, select the link to the right of the offset adjustment boxes.