Troubleshoot printing cheques
Related information
Troubleshoot your way through printing a cheque. Depending on whether you are using blank or preprinted cheque stock, your issues can vary.
Did you purchase the correct cheque stock?
Make sure cheques print correctly and purchase cheque stock and envelopes from Sage Cheques and Forms through the Intacct Cheques & Supplies center. This is the only supplier with whom we guarantee compatibility. Order cheque stock that matches how you set up to print from your current account: preprinted (High security or Standard) or blank. You can contact Sage Cheques and Forms at 1-855-892-2010.
Make sure that your checks print correctly and purchase check stock and envelopes from one of our approved suppliers:
Use CAD cheque 2.0 as the Printing format when you set up to print cheques for a current account using cheque stock from these suppliers.
View and print cheques
The PDF to preview and print cheques might not appear based on browser settings. Which browser are you using to print cheques?
Allow pop-ups in Chrome:
- In the Chrome browser, select the three vertical dots in the upper right and select Settings.
- Go to the Privacy and security tab.
- Select Site settings.
- In the Content section, select Pop-ups and redirects.
- In the Default behavior section, select Sites can send pop-ups and use redirects.
If you download a PDF but the files are not saved or you see the error "Failed-Forbidden", deactivate the native Chrome PDF Viewer.
Download PDFs in Chrome:
- Open Google Chrome.
- In the address bar, enter chrome://settings/content/pdfDocuments
- In the Default behavior section, select Download PDFs.
or
- In the Chrome browser, select the three vertical dots in the upper right and select Settings.
- Go to the Privacy and security tab.
- Select Site settings.
- In the Content section, from the Additional content settings dropdown list select PDF documents.
- In the Default behavior section, select Download PDFs.
Allow pop-ups in Firefox:
- In the Firefox browser, go to the menu bar at the top of the pageand select Settings.
- Go to the Privacy & Security tab.
- In the Permission section, deselect Block pop-up windows.
Download PDFs in Firefox:
- Go to the menu bar at the top of the page and select Settings.
- Go to the General tab, enter PDF in the Find in Settings search bar.
- In the Applications table, from the Portable Document Format (PDF) dropdown list select Save File.
If Portable Document Format (PDF) is not listed, download your favorite PDF viewer.
Allow pop-ups in Safari:
- Launch Safari and select Safari > Preferences.
- Go to the Security tab.
- Find Web content and deselect Block pop-up windows.
Download PDFs in Safari:
- Launch Safari and select Safari > Preferences.
- Go to the Security tab.
- Find Internet plug-ins and select Website Settings.
- On the list of plug-ins, select Adobe Reader.
- Under When Visiting Other Websites, select Allow Always from the dropdown list.
- Select Done.
Allow pop-ups in Microsoft Edge:
- Open Microsoft Edge.
- In the address bar, enter
edge://settingsto see the browser settings. - Go to the Cookies and site permissions tab.
- In the All permissions subsection, select Pop-ups and redirects.
- Deselect Block (recommended).
Download PDFs in Microsoft Edge:
- Open Microsoft Edge.
- In the address bar, enter
edge://settingsto see the browser settings. - Go to the Cookies and site permissions tab.
- In the All permissions subsection, select PDF documents.
- Select Always download PDF files.
You might see a pop-up that the PDF reader has been disabled in Microsoft Edge. Select Download file to continue and download the PDF.
By default, the Print cheques page shows cheques that you created. To view and print cheques created by another user, select the Select cheque view dropdown and select All.
The location of the cheque depends on whether or not you confirmed it to the general ledger.
- If you printed the cheque but didn't confirm it, it still appears on the Print cheques page.
- If you printed and confirmed the cheque, find it in the Cheque register.
Are you trying to void the cheque?
If your current account is not appearing in the dropdown list for selection, it might be inactive. Learn how to view inactive accounts. To make payments using this account, the status needs to be Active.
You might need to approve the payment request before the cheque appears for printing.
You can print a test cheque or void cheque from the Current account information page.
When you select AP supplier invoices to pay, or expense reports to reimburse, the payments are sent to the Print cheques page for printing and confirmation. By default, cheques will print in the order they are listed on the Print cheques page, which might not be based on their payment date.
Learn how to print cheques in order by their payment date.
Incorrect information printing on cheques
Correct or update this information on the Current account information page.
-
Go to Cash Management > All or Setup > Accounts > Current.
- Find the account you want to correct.
- Select Edit at the end of the row.
- On the Cheque printing tab, find the section for Company address and logo.
-
Do one of the following:
-
Select Use address from Company information.
The company name and address listed on the Company information page will print on cheques for this current account.
- Select Use a different address and enter the information to print on cheques for this current account.
-
- Select Save.
-
Go to Cash Management > All or Setup > Accounts > Current.
- Find the account you want to correct and select Edit next to it.
- On the Cheque printing tab, find the section for Company address and logo.
-
Do one of the following:
-
Select Use address from Company information.
The company name and address listed on the Company information page will print on cheques for this current account.
- Select Use a different address and enter the information to print on cheques for this current account.
-
- Select Save.
You're previewing a cheque before you confirm it, and you notice the cheque has the incorrect name or mailing address for your supplier. Learn how to correct this information.
How you correct the payment date on a cheque depends on whether or not you have printed and confirmed the cheque to the general ledger.
If you have not printed the cheque
If you printed the cheque but have not yet confirmed it
Void the cheque on the Print cheques page and then edit the payment request.
If you printed and confirmed the cheque
Void the cheque in the Cheque register. Then, you can make your corrections when you go to pay the AP supplier invoice again.
First delete the payment request. Then, repay the AP supplier invoice on the Pay AP supplier invoices page.
Prevent the additional header from printing on cheques by following the instructions below.
-
Go to Cash Management > All or Setup > Accounts > Current.
- Find the account you want to correct.
-
Select Edit at the end of the row.
- On the Cheque printing tab, clear the Print company address checkbox.
- Select Save.
-
Go to Cash Management > All or Setup > Accounts > Current.
- Find the account you want to correct and select Edit next to it.
- On the Cheque printing tab, clear the Print company address checkbox.
- Select Save.
Cheque signatures
Upload a cheque signature with a white background. Signatures with transparent backgrounds will not print properly.
Learn about uploading cheque signatures.
If your current account is set up for USD currency, change the Printing format to High security.
Make sure that your checks print correctly and purchase check stock and envelopes from one of our approved suppliers:
Use CAD cheque 2.0 as the Printing format when you set up to print cheques for a current account using cheque stock from these suppliers.
To print a cheque with a blank signature line instead of a signature, make sure no signature has been uploaded on either the current account or on the Preferences page of the person who is printing cheques. Learn how to remove check signatures.
You can upload a signature in two places: on the current account record and on the My preferences page. The signature on the My preferences page always overrides any signature or signatures on the current account.
Remove the signature on the My preferences page to print signatures uploaded to the current account.
If you’re having trouble uploading a new signature, or the old signature keeps appearing, try one of the following solutions:
- Be sure to Save after you remove the old signature, then upload the new signature.
- Make sure that the new signature file is 3.0" wide by 0.36" high and at 150 dpi. Save the new signature file as a GIF, JPG or PNG file no larger than 10KB.
- Clear your browser's cache and cookies before uploading the new signature.
- If you're trying to edit the signature on the current account, check whether you have uploaded a signature on your Preferences page. Signatures uploaded on your Preferences page override any signature associated with the current account.
Cheque stock
Select and manage the cheque stock for a current account on the Current account information page. You can choose different print settings and cheque stock for different current accounts.
Stubs and memos
Learn how to print a memo on the:
If you're using preprinted cheque stock and the cheque stub information spans more than one page, first print the cheque. Then, go to the Print payment copies page to print the rest of the cheque stub pages.
Cheque numbers
How you change a cheque number depends on whether or not you're printing on blank or preprinted cheque stock, and whether or not you already printed the cheque.
MICR information
When printing using MICR ink, follow these guidelines to prevent issues.
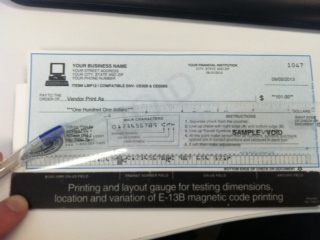
Do you have the Magnetic Ink (MICR) Printing Specifications from your bank? They spell out exactly how your bank needs you to set up the line of MICR coding that appears at the bottom of your cheques. Each bank has their own specification, and they sometimes refer to them as Cheque Printing Specifications or MICR Specifications.
Do you have a MICR gauge? Slide your sample cheque beneath this transparent grid to verify that your MICR coding is properly aligned. If the alignment is off, make adjustments in Sage Intacct. MICR gauges are available at most office supply stores and through our certified supplier: www.formsforintacct.com.
If you're using Firefox, or are using Safari on a Mac, your cheques might print with erroneous characters. To resolve, use an Adobe program as your default PDF viewer.
Firefox: Set Adobe as your default PDF viewer
- In your Firefox browser window, at the top of the page, select the menu bar.
- Select Options, then select the Applications tab.
-
For the Portable Document Format (PDF) option, select to Use Adobe Acrobat (in Firefox) or Use Adobe Reader (default).
If Portable Document Format (PDF) is not listed, download Adobe Acrobat Reader from the Adobe website.
- Close the window.
Safari (Mac): Set Adobe as your default PDF viewer
- In your Safari browser window, go to the Safari menu and select Preferences.
- In the Preferences window, select Security.
- For Internet plug-ins, select Website Settings.
- In the list of plug-ins, select Adobe Reader.
- For the option When visiting other websites, from the dropdown list select Allow Always.
- Select Done.
Make sure you're using the MICR E13B font. If you do not have it, free downloads are available. Search the Internet for: micr font E13B download.
If the MICR font prints unevenly, or if numbers are oddly shaped, adjust the weight of the font. If characters look incomplete, use a bolder version of the font. If characters look smudged or blotchy, use a lighter version of the font.
If the MICR font is printing too dark/light or wide/narrow, you might need to calibrate the MICR font to work with your printer. MICR font packages often come with a calibration tool to sync your fonts with your printer.
Fix alignment
-
Select your login name at the top of any page and select My preferences.
-
Go to the Cheque preferences section and select Verify your printer alignment for Intacct cheques.
A PDF appears with alignment instructions.
- Print the PDF.
- Follow the PDF instructions, using the printed crosshairs to adjust your Horizontal and Vertical printing offsets.
-
Select Save.
Change the payment method
Learn what to do if you need to change the payment method from a cheque to something else.
Cancel a cheque
If the cheque has not yet been printed, remove it from the Print cheques page by canceling the payment request.
If the cheque has been printed but was not confirmed, void the cheque on the Print cheques page.
Custom cheques
Sage Intacct no longer supports custom cheque formats.
To remove a custom cheque format, contact customer support.
If your problem is not listed
Select No under Was this topic helpful? Then enter details about the problem. We'll work to answer the most common problems in our next update.