Set up to print Canadian cheques
Related information
Set up to print cheques on the Cheque printing tab on the Current account information page.
For current accounts using USD or CAD only. You can also set up to print CAD cheques in French.
Make sure that your checks print correctly and purchase check stock and envelopes from one of our approved suppliers:
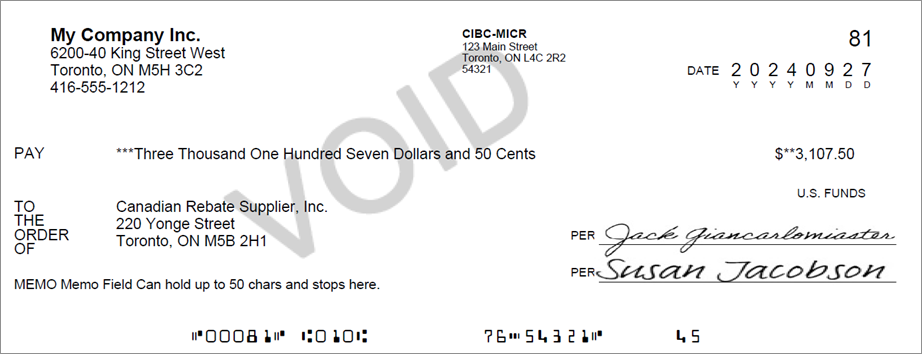
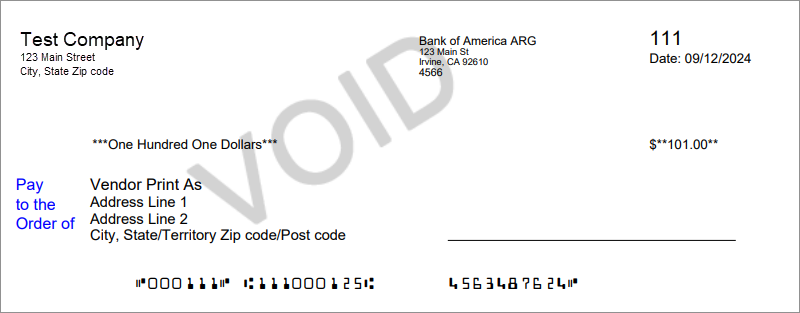
Use CAD cheque 2.0 as the Printing format when you set up to print cheques for a current account using cheque stock from these suppliers.
| Subscription |
Cash Management |
|---|---|
| User type |
Business |
| Permissions |
Current account: Add, Edit, View |
-
Go to Cash Management > All or Setup > Accounts > Current.
-
If you're editing an existing account:
-
Find the current account you want to edit.
-
Select Edit at the end of the row.
If you’re creating a new account:
- Select Create.
-
On the Details tab, select the GL account to which the current account will map.
How you assign GL accounts determines where and how the account can be used.
Make sure that the Currency for the account is set to CAD or USD.
-
-
Define whether to allow cheques to be printed from this account.
On the Cheque printing tab, do one of the following:
-
To allow cheque printing from this account, select Preprinted cheque stock or Blank cheque stock (MICR printer ink required)
If you select to print on blank cheque stock, see the guidelines for using MICR printer ink and adjusting printing alignment.
-
To prevent cheques from being printed, select Disable cheque printing from this account.
-
-
Define whether to print a company address on cheques.
- To print a company address on cheques, select Print company address.
- If you don't want to print an address, leave Print company address clear.
Print company address?-
To print the company address that's saved in the company information on cheques from this account:
-
In the Company address section, select Use address from Company information to use the address on the Company information tab when printing cheques.
Multi-entity shared companies: if no address is found, we use the address of the entity contact selected on the Entity Information page.
-
-
To print a different address on cheques from this account:
- In the Company address section, select Use a different address.
- Enter the address details in the fields that appear.
-
Define whether to print a logo on cheques.
- To print a logo on cheques, select Print logo.
- If you have preprinted cheque stock that already includes a logo, or you do not want to print a logo on blank cheque stock, leave Print logo clear.
Print logo?-
Select Print logo.
If a cheque logo has been uploaded, it is shown in the Company logo section.
-
To upload a logo to use on your cheques, or to replace a previously uploaded logo:
-
Select Upload logo.
-
Select Choose file, find the logo you want to use and then select Upload.
The image must be 50 x 50 pixels or smaller and there's a 10,000 byte limit. We do not scale or re-size logos. Learn more about guidelines for logos.
-
-
To remove a saved company logo, select Remove company logo.
-
Define whether to include up to 2 signatures on printed cheques.
- To include 1 or 2 signatures on printed cheques, there must be a signature uploaded in Intacct.
-
To print a cheque with a blank signature line instead of a signature, make sure no signature has been uploaded on either the current account or on the Preferences page of the person who is printing cheques. Learn how to remove check signatures.
Print a signature?If a signature for this current account has been uploaded, it's shown in the Signatures section.
If the person who is printing cheques has uploaded a signature to their Preferences page, that signature overrides the 1st signature uploaded on the Check printing tab.
-
To print cheques with a single signature:
-
Below 1st signature select Upload signature.
Cannot see the Upload signature option?If you're creating a new current account, this option only appears after you save the account for the first time.
-
Select Choose file, find the signature you want to use and then select Upload.
-
To remove an uploaded signature, select Remove signature and then save your changes.
-
To define a maximum amount for printing a digital signature, in the Print for amounts below box enter the maximum amount. To print your digital signature on all cheques, leave this field blank.
-
-
To print cheques with a 2nd signature:
- Select Use 2-signature cheques and select Save.
- Return to the Check printing tab and enter the amount requiring a 2nd signature.
- To print 2 signatures above a certain amount, enter that amount.
- To print 2 signatures on cheques regardless of the amount, enter the amount of 0.
- To only print 1 signature, leave this field blank.
-
Below 1st signature select Upload signature.
-
Select Choose file, find the signature you want to use and then select Upload.
-
To remove an uploaded signature, select Remove signature and then save your changes.
-
To define a maximum amount for printing a digital signature, in the Print for amounts below box enter the maximum amount. To print your digital signature on all cheques, leave this field blank.
-
If the company uses Supplier Payments powered by CSI Select Use one signature only with providers to only use the signature for cheques sent through a payment service. This allows you to print cheques and sign them manually when not using Vendor Payments.
-
Define the print settings.
In the Print settings section, specify the following:
-
The next cheque no. to print on.
You can set this number here, or from the Print checks page in Accounts Payable. Learn more about setting the next check number.
-
The Printing format.
Select CAD chequeor CAD cheque 2.0, or select CAD French preprinted cheque to print CAD cheques in French.
-
The Paper format.
Select whether to print cheques on the Top, Middle, or Bottom portion of the cheque stock.
-
Select whether to Print line item details on cheque stubs. Learn more about what details can be printed on cheque stubs.
-
Select what location details to print on the cheque.
You can select to print the location ID, the Name of the location, or Both.
- Add any additional text you want to appear on the printed cheques.
-
-
To preview how your print run will look, in the Print preview box select whether to preview 1 cheque per page or 3, and select Print.
-
If you are setting up to print on blank cheque stock, in the MICR (Magnetic Ink Character Recognition) section, specify how to align your account number and set the length of your cheque number.
Printing on blank check stock?- Specify whether to align the account number to the left or right.
- Adjust the account number positioning.
- Set the length of your cheque number.
- To include the On-Us symbol on United States cheques, select On-Us symbol and set the required position.
-
To include Code 45 or US funds on Canadian cheques, select the required checkboxes.
If you're in a single-entity, single-currency CAD company, leave both of these checkboxes clear.
Before you start issuing cheques printed on blank stock, to prevent your bank rejecting your cheques contact your bank for specifications and send a test cheque. Learn more about printing guidelines.
Learn more about MICR cheque alignment.
-
Select Save.
-
Go to Cash Management > All or Setup > Accounts > Current.
-
If you're editing an existing account:
-
Find the current account you want to edit.
-
Select Edit at the start of the row.
If you’re creating a new account:
- Select Add.
-
On the Details tab, select the GL account to which the current account will map.
How you assign GL accounts determines where and how the account can be used.
Make sure that the Currency for the account is set to CAD or USD.
-
-
Define whether to allow cheques to be printed from this account.
On the Cheque printing tab, do one of the following:
-
To allow cheque printing from this account, select Preprinted cheque stock or Blank cheque stock (MICR printer ink required)
If you select to print on blank cheque stock, see the guidelines for using MICR printer ink and adjusting printing alignment.
To prevent cheques from being printed, select Disable cheque printing from this account.
-
-
Define whether to print a company address on cheques.
- To print a company address on cheques, select Print company address.
- If you don't want to print an address, leave Print company address clear.
Print company address?-
To print the company address that's saved in the company information on cheques from this account:
-
In the Company address section, select Use address from Company information to use the address on the Company information tab when printing cheques.
Multi-entity shared companies: if no address is found, we use the address of the entity contact selected on the Entity Information page.
-
-
To print a different address on cheques from this account:
- In the Company address section, select Use a different address.
- Enter the address details in the fields that appear.
-
Define whether to print a logo on cheques.
- To print a logo on cheques, select Print logo.
- If you have preprinted cheque stock that already includes a logo, or you do not want to print a logo on blank cheque stock, leave Print logo clear.
Print logo?-
Select Print logo.
If a cheque logo has been uploaded, it is shown in the Company logo section.
-
To upload a logo to use on your cheques, or to replace a previously uploaded logo:
-
Select Upload logo.
-
Select Choose file, find the logo you want to use and then select Upload.
The image must be 50 x 50 pixels or smaller and there's a 10,000 byte limit. We do not scale or re-size logos. Learn more about guidelines for logos.
-
-
To remove a saved company logo, select Remove company logo.
-
Define whether to include up to 2 signatures on printed cheques.
- To include 1 or 2 signatures on printed cheques, there must be a signature uploaded in Intacct.
-
To print a cheque with a blank signature line instead of a signature, make sure no signature has been uploaded on either the current account or on the Preferences page of the person who is printing cheques. Learn how to remove check signatures.
Print a signature?If a signature for this current account has been uploaded, it's shown in the Signatures section.
If the person who is printing cheques has uploaded a signature to their Preferences page, that signature overrides the 1st signature uploaded on the Check printing tab.
-
To print cheques with a single signature:
-
Below 1st signature select Upload signature.
Cannot see the Upload signature option?If you're creating a new current account, this option only appears after you save the account for the first time.
-
Select Choose file, find the signature you want to use and then select Upload.
-
To remove an uploaded signature, select Remove signature and then save your changes.
-
To define a maximum amount for printing a digital signature, in the Print for amounts below box enter the maximum amount. To print your digital signature on all cheques, leave this field blank.
-
-
To print cheques with a 2nd signature:
- Select Use 2-signature cheques and select Save.
- Return to the Check printing tab and enter the amount requiring a 2nd signature.
- To print 2 signatures above a certain amount, enter that amount.
- To print 2 signatures on cheques regardless of the amount, enter the amount of 0.
- To only print 1 signature, leave this field blank.
-
Below 1st signature select Upload signature.
-
Select Choose file, find the signature you want to use and then select Upload.
-
To remove an uploaded signature, select Remove signature and then save your changes.
-
To define a maximum amount for printing a digital signature, in the Print for amounts below box enter the maximum amount. To print your digital signature on all cheques, leave this field blank.
-
If the company uses Supplier Payments powered by CSI Select Use one signature only with providers to only use the signature for cheques sent through a payment service. This allows you to print cheques and sign them manually when not using Vendor Payments.
-
Define the print settings.
In the Print settings section, specify the following:
-
The next cheque no. to print on.
You can set this number here, or from the Print checks page in Accounts Payable. Learn more about setting the next check number.
-
The Printing format.
Select CAD chequeor CAD cheque 2.0, or select CAD French preprinted cheque to print CAD cheques in French.
-
The Paper format.
Select whether to print cheques on the Top, Middle, or Bottom portion of the cheque stock.
-
Select whether to Print line item details on cheque stubs. Learn more about what details can be printed on cheque stubs.
-
Select what location details to print on the cheque.
You can select to print the location ID, the Name of the location, or Both.
- Add any additional text you want to appear on the printed cheques.
-
-
To preview how your print run will look, in the Print preview box select whether to preview 1 cheque per page or 3, and select Print.
-
If you are setting up to print on blank cheque stock, in the MICR (Magnetic Ink Character Recognition) section, specify how to align your account number and set the length of your cheque number.
Printing on blank check stock?- Specify whether to align the account number to the left or right.
- Adjust the account number positioning.
- Set the length of your cheque number.
- To include the On-Us symbol on United States cheques, select On-Us symbol and set the required position.
-
To include Code 45 or US funds on Canadian cheques, select the required checkboxes.
If you're in a single-entity, single-currency CAD company, leave both of these checkboxes clear.
Learn more about MICR cheque alignment.
-
Select Save.
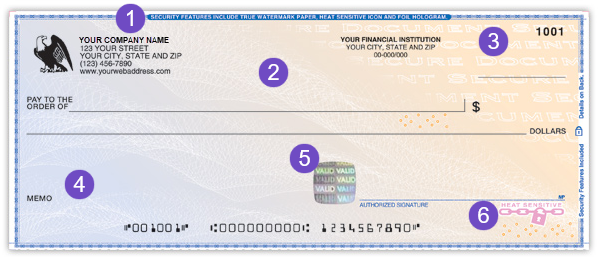
Field descriptions: Cheque printing tab (Current account information page)
| Field | Description |
|---|---|
|
Print on |
Select the cheque stock to use when you print cheques from this current account. Select one of the following:
|
Company address section
| Field | Description |
|---|---|
|
Print company address |
Select whether to print a company address on your cheques. If you have preprinted cheque stock that already includes your address, or have blank cheque stock and you do not want to show your address, leave this checkbox clear. Multi-entity shared companies: if no address is found, we use the address of the entity contact selected on the Entity Information page. |
|
Company address |
If Print company address is selected, select which address to print on cheques from this current account. Select one of the following:
|
Company logo section
| Field | Description |
|---|---|
|
Print logo |
Select whether to print a logo on the upper left of cheques, The logo aligns with the top of your company address, 10 pixels to the left. If you have preprinted cheque stock that already includes a logo, or have blank cheque stock and you do not want to include a company logo, leave this checkbox clear. Learn more about check logos and requirements. |
|
Company logo |
When Print logo is selected, select Upload logo to select a logo to use on printed cheques. |
|
Remove company logo |
If you uploaded a logo to print on cheques from this current account, select this checkbox then select Save to remove the logo. |
Signatures section
| Field | Description |
|---|---|
|
1st signature Upload signature |
By default, signatures are not included on blank or preprinted cheque stock. Upload a signature to print on cheques. Or, print a cheque with a blank signature line. If the person who is printing cheques has uploaded a signature to their Preferences page, that signature overrides the 1st signature uploaded on the Check printing tab. Cannot see the Upload signature option?
If you're creating a new current account, this option only appears after you save the account for the first time. |
|
Remove signature |
If a signature has been uploaded and you want to remove it, select Remove signature and then select Save. If you have removed a signature and it's still appearing on printed cheques, see Can't edit your signature? for tips. |
|
Print for amounts below |
Appears after you upload a signature. Enter the amount in the currency specified on the Details tab of the current account. A signature is printed on cheques with amounts less than the amount specified here. To print your digital signature on all cheques, leave this field blank. |
|
Use signature only with providers |
This option is only visible if the company uses Supplier Payments powered by CSI. Select to only use the uploaded signature for cheques sent through a payment service. This allows you to print cheques and sign them manually when not using Vendor Payments. |
|
Use 2-signature cheques |
Select this option to require cheques to have 2 signatures and select Save. Return to the Cheque printing tab of your current account to enter an Amount requiring 2nd signature and Upload signature. |
|
Amount requiring 2nd signature |
|
|
Use one signature only with providers |
This option is only visible if the company uses Supplier Payments powered by CSI. Select this checkbox to only use the signature for cheques sent through a payment service. This allows you to print cheques and sign them manually when not using Vendor Payments. |
|
2nd signature Upload signature |
By default, signatures are not included on blank or preprinted cheque stock. Select Upload signature to upload a 2nd signature to print on cheques. |
|
Remove signature |
If a signature has been uploaded and you want to remove it, select Remove signature and then select Save. If you have removed a signature and it's still appearing on printed cheques, see Can't edit your signature? for tips. |
|
Print for amounts below |
Enter an amount below which cheques are printed. |
Print settings section
| Field | Description |
|---|---|
|
Next cheque no. |
Enter a starting cheque number, such as 1001. For each succeeding cheque you print, the cheque number increments by 1, so the next cheque printed will be numbered 1002, 1003, etc. To override, type in a new next cheque number in this field. Succeeding cheque numbers will increment starting with whatever number you enter. You can override Intacct at any time on the Print Cheques page. |
|
Printing format |
The options change depending on the check stock that you select.
|
|
Paper format |
Select the appropriate position for your cheques. This determines where the cheque prints on the three-part form. More specifically, you can print the cheque on the top, middle, or bottom panel. |
|
Print line-item detail on cheque stubs |
Additional fields by default to the non-remittance panel of the cheque. These fields include columns for the account, department, and location of each line item. You can generate up to 18 line items per page in either summary or detail mode. Learn more about printing extra information on check stubs. |
|
Print these location details on the cheque stub |
|
|
Additional text |
Enter optional text to appear under the signature line of the cheque. For example, "Void After 60 Days." |
|
Print preview |
Select One or Three then select Print to see how the checks will look when printed. |

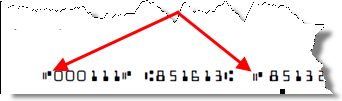
Magnetic Ink Character Recognition (MICR) section
MICR format is a widely adopted bank standard for blank cheque stock. MICR format standardizes the appearance of the routing, account, and other numbers at the bottom of every cheque. This section only appears if you select Blank cheque stock (MICR printer ink required) in the Print on section at the top of this tab.
If your bank requires a special horizontal alignment of the account number, you can change the alignment from right to left and, if necessary, nudge the account number left or right in increments of one space.
| Field | Description |
|---|---|
|
Account number alignment Account number positioning |
You do not need to change the default values for either of these settings unless your bank requests you do so. The entire PDF cheque image can be adjusted relative to the top-left corner of the sheet of cheque stock to correct for MICR misalignment due to your laser printer. Refer to MICR Code Alignment for step-by-step instructions on performing this adjustment. By default, the account number is right-aligned.
|
|
Cheque number length |
Use this box to pad the cheque number with zeros. For example, if your cheques are currently 6 digits and your current cheque number is 218 but you want the cheque number to be 7 digits, enter "7" . Your cheque number will be 0000218 in the MICR. The minimum number of digits is 6. For example, if your cheque number is 123456, and you enter "5" here, the MICR still prints as 123456. |
|
Regional settings for United States |
Some banks require the On-Us symbol to appear on the MICR line in front of the account number. The On-Us symbol looks like 2 short parallel lines and a solid rectangle.
If you’re uncertain which position to select, ask your bank for an MICR specification sheet, which specifies which position to use. |
|
Regional settings for Canada |
American and Canadian blank cheque stock formats differ slightly regarding their use of the MICR format. Canada requires that all US dollar cheque payments conform to the Canadian variation of the MICR format. Select:
Selecting either checkbox prints the associated transaction codes on the cheques. By default, both these checkboxes are clear. You can also apply this setting to any USD current account, regardless of the entity's base currency. Keep track of any MICR transaction codes that you configure. If you select multiple transaction codes that conflict with each other (for example, both use MICR line item #14), both codes print in that space. You do not receive any warning about possible conflicts. |