Attachment overview
Related information
Think of an attachment as a group of one more or more files. You can attach multiple files of any type to a record or a transaction as an attachment—including but not limited to scanned images, spreadsheets, and word-processor documents. For example, you might add ten scanned images to a single attachment for an AP supplier invoice.
Each transaction or record can only have one attachment assigned to it. After you add an attachment, you can continue to add or delete individual documents as needed to and from the attachment, to ensure your supporting documents are always up-to-date.
Why use attachments?
You can select or create attachments as supporting documentation on records and many transaction pages; including but not limited to item, AP supplier invoice, AR sales invoice, supplier, customer, and employee expense pages.
Here are a few examples of the value of using attachments:
- Accounting firms can upload large quantities of hard-copy documents that they receive from their clients.
- Employees can scan and attach receipts to their expense reports, eliminating the need for paper filings.
- CPAs can attach engagement letters that outline the objectives of a new project.
- Controllers can attach spreadsheets and worksheets from different departments to the overall company budget to provide easy access to details for global budget numbers.
- Auditors can inspect accounting transactions more efficiently if attachments are filed with the specific accounting transactions to which they relate.
- Warehouse team members can ship items according to specific item packing instructions or reference drawings.
Attachment folders and hierarchy
Attachments are stored in folders for easy grouping. Attachment folders show the same names in both the application's main list and the attachment selection dropdown. Make sure you have the appropriate permissions to create attachment folders.
Attachment folders can be top-level folders without subfolders, parent folders with many subfolders, or simply subfolders that might or might not have child folders of their own. Because of this, you can make your folder hierarchy as broad or deep as your business demands.
For example, if you’re working on several projects, create an attachment folder, Projects, and subfolders with the name of specific projects. Then store supporting documents for each project in each project’s attachment subfolder. You might also want to consider creating a folder specifically for your inventory item attachments, or for product line item attachments.
Image key:
Consider the following image. Folder 1 and Folder 2 are top-level folders that are listed in the Attachment folders list. To see the child subfolders of each parent folder, drill down into the parent folder.
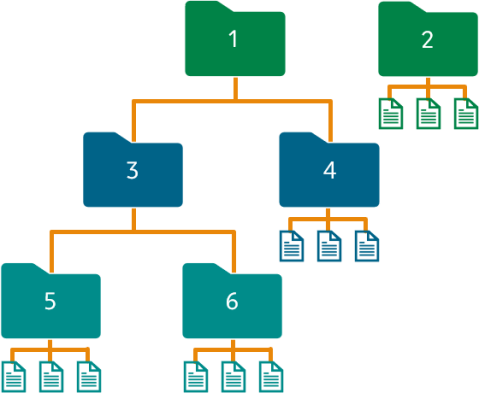
| Folder | Type |
|---|---|
| 1 | Parent folder with child subfolders |
| 2 | Folder with no subfolders. Each attachment represents one or more individual files. |
| 3 | Parent subfolder with child subfolders |
| 4 | Subfolder without subfolders |
| 5 | Child subfolder |
| 6 | Child subfolder |
Create auto-numbering for attachments
Use auto-numbering to quickly add attachments with a reference number. Auto-numbering lets you skip the manual process of numbering your attachments, so they are easier to identify within a folder. Set up attachment auto-numbering on the Document sequences for auto-numbering IDs and enable it in the Global settings section on the Company Information page. Then, every time you create an attachment, a new ID is automatically generated.
Step 1: Create the numbering system
-
Go to Company > Setup > Settings and select Add (circle) next to Document sequences.
-
Enter the required fields, and any other information you want included in your sequence.
The following fields are required:
-
Sequence ID
Enter a label for the name of the sequence, such as Attachments.
It’s important that you name the sequence using words that describe the documents for which you’ll use the sequence.This ID cannot be changed after save.
-
Sequence name
-
Sequence status
-
Sequence type
Cannot be changed after save.
-
Primary sequence
Cannot be changed after save.
-
Next primary sequence
Automatically generated, but can be edited.
-
-
Select Save.
-
Go to Company > Setup > Settings and select Add (circle) next to Document sequences.
-
Enter the required fields, and any other information you want included in your sequence.
The following fields are required:
-
Sequence ID
Enter a label for the name of the sequence, such as Attachments.
It’s important that you name the sequence using words that describe the documents for which you’ll use the sequence.This ID cannot be changed after save.
-
Sequence name
-
Sequence status
-
Sequence type
Cannot be changed after save.
-
Primary sequence
Cannot be changed after save.
-
Next primary sequence
Automatically generated, but can be edited.
-
-
Select Save.
See the field descriptions for more information about what to enter in each field.
Using leading zeros as part of an ID sequence is not recommended. IDs with leading zeros can cause errors when you import information into your company from Excel because Excel removes the leading zero. Use a character as a prefix to your ID; for example, A0001 for an attachment ID.
Step 2: Set the number to apply automatically
-
Go to Company > Setup > Configuration > Company.
- Select Edit.
- In the dropdown for Attachment sequence type under Global settings, select the name of the sequence you created, such as Attachments.
-
Select Save.
After you save, Intacct automatically generates a unique number for each new attachment you create.
Attachment sharing
Intacct uses shared attachments. When you attach a file to multiple transactions, you're not creating copies. Any changes to the referenced attachment, such as adding a new supporting document, are reflected in both transactions.
-
Sharing attachments in duplicate transactions: The same attachment link is copied to the duplicate transaction; no new attachment instance is created. If you change the attachment, such as removing a supporting document from the attachment, that change is reflected in both transactions.
If you do not want to use the same attachment when you duplicate a transaction, you can manually remove the attachment link and, if needed, add a different attachment link.
- Sharing attachments in recurring transactions: The same attachment link is copied into all instances of the recurring transaction. Attach updated document versions separately, instead of overwriting the original, to maintain both.
When you add an attachment to multiple journal entries simultaneously, the attachment shares the same ID across those entries. In this case, any changes to the attachment affect all journal entries using the same attachment ID.