Create a checking account
Related information
Enter financial details and set up your checking account to make payments.
-
As a best practice, set up an account at the top level. Then, restrict the account for use in specific entities.
-
Reconcile an account at the same level in which it was created. Make sure to assign it to a unique general ledger account and a location.
| Subscription |
Cash Management |
|---|---|
| Regional availability |
All regions |
| User type |
Business Project Manager |
| Permissions |
Checking accounts: Add |
-
Go to Cash Management > Setup > Accounts and select Add (circle) next to Checking.
-
Add the required information on the tabs for the account.
Details tab
Enter account and financial details.
-
Create a unique Account ID.
After you save, this field cannot be edited.
-
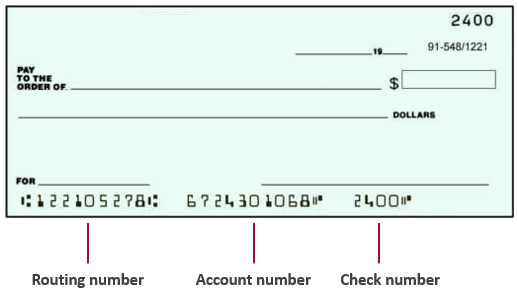
Enter the Account number and Routing number to issue payments from this account.
Find the account number and routing number on a checkYou can find the account number and routing number in the following ways:
- Contact your bank.
- Log in to your online banking site.
-
Look on the bottom of a check.
-
Enter the Name on the account.
This is the legal name attached to the account (usually the company name).
- Enter address information.
-
Set a reconciliation Match sequence.
Learn more about match sequences for reconciliation.
-
Select a unique GL account.
After you save, this field cannot be edited. How you assign GL accounts determines how and where an account can be used.
Use a unique GL account. You cannot save the account in the following situations:
- You select an account configured as the default Accounts Payable or default Accounts Receivable account. As a best practice, select a cash, cash equivalent, or credit card liability account.
- The GL account is assigned to another bank or credit card account.
- Select any other accounts, for example the Default payables GL account.
-
Select a Department ID and Location ID to default for the GL posting.
Depending on your company, a location might be required to enforce balancing of related journal entries. Learn more about dimension settings in the General Ledger.
After you save the Location ID, this field cannot be edited.
-
Select an Applied rule set. This defines how incoming transactions from an import file or bank feed match to existing Intacct transactions for reconciliation.
Learn more about rules and rule sets.
-
Set the Banking cloud time zone. This defines the time stamp for transactions generated from creation rules and for incoming bank feed transactions.
Learn more about the Banking cloud time zone.
-
Select Save.
Import Checking accounts
Checking accounts can now be imported using the Import service.
Learn more about importing checking account information with the import service.
To open the import service:
-
Go to Cash Management > Setup > Accounts and select Add (circle) next to Checking.
-
Ensure that the enhanced list is turned on.
-
Select Import.
The Import service opens.
Check printing tab
If you plan to issue checks from this account, enter information on the Check printing tab. Follow the links below for details.
- Set up to print checks.
- Set up to print CAD checks.
- Add a check logo.
- Upload a check signature.
- Set the next check number to print.
Bank file tab
Enable the account to issue standard ACH payments or bank file payments.
Banking cloud tab
If your company is subscribed to Sage Cloud Services and enabled for bank feeds, you can connect your account to your online bank to receive a bank feed. After you connect, match bank transactions to Intacct transactions for reconciliation.
From the Banking cloud tab, you can view bank transactions and even match transactions for reconciliation if you have the proper permissions. You can also create transactions from bank transactions.
Learn how to connect to your online bank and receive a bank feed
-
Have you saved this account?
You can only see this tab after you save the account.
-
Is your company subscribed to Sage Cloud Services and enabled for bank feeds?
In order to view or edit the Banking cloud tab, your company must be subscribed to Sage Cloud Services and enabled for bank feeds.
After you save, from the account list find the account and select Edit at the end of the row. Then, go to the Banking cloud tab.
After you save, from the account list, select Edit next to the account. Then, go to the Banking cloud tab.
Payment providers tab
If your company is subscribed to any payment provider services, you can enable the account for a payment provider service. Learn more about Vendor Payments powered by CSI.
- This tab is only for companies subscribed to a payment provider service like Vendor Payments powered by CSI.
- This tab only appears after you save your checking account for the first time.
Restrictions tab
Restrict a checking account so that it only appears for use at the top level or for specific locations and departments. This tab appears if your company is configured for restrictions.
Location groups and department groups that contain dynamic filtering do not appear on the Restrictions tab for selection.
When setting up location groups or department groups, restrictions can be based on groups that contain specific locations or departments. Restrictions cannot be based on groups that filter dynamically based on the value of certain fields (such as locations where the status is Active).