Print expense reimbursement checks
Related information
Learn how to print checks. On this page you can preview checks before you print to make sure there are no errors, confirm check payments to the General Ledger, and void unconfirmed checks if necessary.
Preview and print the checks
| Subscription |
Time and Expenses |
|---|---|
| Regional availability |
All regions |
| User type |
Business |
| Permissions |
Expenses
|
-
Go to Expenses > All > More > Print checks.
-
Filter the list.
-
Select a Check style.
-
Scroll to the Checks to be printed and confirmed section.
-
Below Print, select the checks that you wan to print.
-
Select the Check stub details checkbox or Employee stub details checkbox.
Unless you’re printing three checks per page, check stubs are automatically included. There are two check stubs, one for your own records and one for
The checkboxes for Check Stub Details and Employee Stub Details refer to additional coding details (account, department, and location) that can be included with line items on either stub.
Set up checking accounts to automatically print line item details on check stubs.On the Check printing tab of the checking account, select Print line-item detail on check stubs.
Maximum number of check stub lines for preprinted checksFor preprinted checks, check stubs include space for a maximum of 18 bills or expenses. To avoid overwriting the next preprinted check, additional remittance lines cannot be included. If a particular check covers additional bills or expenses, you can print a payment copy for the check, which will include all remittance lines, and include the payment copy with the check. -
Enter a Memo.
-
Select Print.
Select the reimbursements to pay
| Subscription |
Time and Expenses |
|---|---|
| Regional availability |
All regions |
| User type |
Business |
| Permissions |
Expenses
|
-
Go to Expenses > All > Reimbursements > Select expenses to reimburse.
-
For the Payment method, select Checks.
-
Select a Bank.
-
For Payment method, select Merge requests into one per employee.
This creates a single check per employee.
-
Select a Set payment date to.
-
Select a Currency.
-
Select expense reports and enter payment amounts.
-
Select Save.
Confirm the checks
To record the expense reports as reimbursed, confirm that the checks printed correctly on the Print Checks page.
| Subscription |
Time and Expenses |
|---|---|
| Regional availability |
All regions |
| User type |
Business |
| Permissions |
Expenses
|
-
Go to Expenses > All > More > Print checks.
-
Filter the list.
-
Set your print options.
-
Select Checks to be printed and confirmed.
-
Select Confirm.
Fix check alignment
-
Select your login name at the top of any page and select My preferences.
-
Go to the Check preferences section and select Verify your printer alignment for Intacct checks.
A PDF appears with alignment instructions.
- Print the PDF.
- Follow the PDF instructions, using the printed crosshairs to adjust your Horizontal and Vertical printing offsets.
-
Select Save.
Field descriptions
Filters
Filtering your list of checks enables you to simplify your workflow processes. By setting specific filters that limit your list of checks to only the checks you want to print right now, you can simply select all by selecting the top-most Print checkbox.
When you have the filters set how you want them, select Apply filters.
Time Period
| Field | Description |
|---|---|
|
Check period |
Choose a standard accounting period such as Current Month, Prior Quarter, and so on. Then enter an As of date from which Intacct calculates the corresponding time period. The default As of date is the current date. |
|
As of date |
The date from which the reporting period is calculated. The default is the current date. |
|
Start date/End date |
Choose a date range by entering a start and end date in Start date and End date respectively. |
| Check Range/Sorting |
Control sort order and the number of checks you see listed. |
|
Employee from/Employee to |
Select a beginning and ending range in order by ID #. |
|
Sort by |
By default, Intacct sorts your list of checks by date. To add fields by which to sort, in Sort by, select a field in the left-hand box, then select the right-pointing arrow to add it to the right-hand box. Remove an item by selecting the item in the right-hand box, then selecting the left-pointing arrow to move it back to the left-hand box. Intacct sorts checks according to the order of the items in the right-hand Sort by box. To arrange these items, select an item, then select the up and down arrow icons to move the item up or down the list. |
Print options
| Field | Description |
|---|---|
|
Check style |
Learn more about check stock. |
|
Checks per page |
Select theChecks per page dropdown to choose how many checks to print per page. Select One to print your check with a vendor stub and a check stub. Or, select Three to use the entire paper space to print three checks per page and exclude printed stubs. |
|
Checking account |
Choose the account for which you want a list of checks. We automatically list all checking accounts that you've set up for preprinted checks. Print checks from a single account, to keep preprinted check stock in order. |
|
Next check number |
Appears if you select Preprinted checksfor Check style. Enter the next check number from your preprinted checks. Learn more about check numbers. |
Checks to be printed and confirmed section
To print checks, you must have one or more approved reimbursement requests against which you can print checks.
| Field | Description |
|---|---|
|
|
Prints the check to a PDF when you select Print at the top of the page. Select each check to be printed. |
|
Check stub details and Employee stub details |
Add stub details. Unless you’re printing three checks per page, check stubs are automatically included. There are two check stubs, one for your own records and one for The checkboxes for Check Stub Details and Employee Stub Details refer to additional coding details (account, department, and location) that can be included with line items on either stub. Set up checking accounts to automatically print line item details on check stubs.
On the Check printing tab of the checking account, select Print line-item detail on check stubs. Maximum number of check stub lines for preprinted checks
For preprinted checks, check stubs include space for a maximum of 18 bills or expenses. To avoid overwriting the next preprinted check, additional remittance lines cannot be included. If a particular check covers additional bills or expenses, you can print a payment copy for the check, which will include all remittance lines, and include the payment copy with the check.
|
|
Employee ID |
Intacct automatically enters this information based on what you enter here. |
|
Employee name |
Intacct automatically enters this information based on what you enter here. |
|
Bank account |
The account out of which you’ll pay. |
|
Payment currency |
The currency in which the payment is being made. |
|
Amount selected |
The amount being paid on the check. |
|
Check no. |
The Check no. column is blank until you print and confirm the check. |
|
Payment date |
The payment date which appears on the check. |
|
Check memo |
Prints your note on the check memo line. |
|
Confirm or void |
Confirms or voids the check when you select either Confirm or Void at the top of the page, respectively. |
Foreign check formats
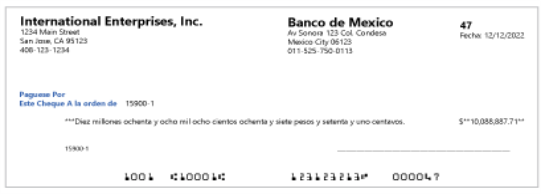
If your company uses foreign transaction currencies, Canadian and Mexican check formats are available in addition to the standard US format. Intacct makes this choice based on the bank. If the bank is Mexican, so is the check format. The following illustration shows the Mexican format.
Single-currency companies might also use Canadian and Mexican check formats. To do so, you define your company as Canadian or Mexican in Company Information, and Intacct displays Canadian and Mexican check-format choices on the Cash Management Preferences page. More specifically, you select Canadian or Mexican base currency in Company Info (Company > Setup > Configuration > Company and select the Accounting tab on the Company information page), and select the check format in Configure Cash Management (Company > Admin > Subscriptions > Cash Management > Configure).
In Configure Cash Management (Company > Admin > Subscriptions > Cash Management > Configure), you have a choice between the currency of the bank account issuing the check, or the location of the user. The default is to use the Bank account currency.
However, say you have a company based in the US and the currency is USD. You also have an office in Canada. Users there want to print checks in Canadian format. In that case, select to use the Country currency. Intacct uses the user's contact country code to determine the check format. You select the optional country code feature with the Use ISO Country List checkbox on the Company Information page ( Company > Setup > Configuration > Company). You select the user's contact country code by associating a contract with the user on the User Information page ( Company > Admin > Users). However, you specify the contact's country with the Country Code dropdown on the Mailing Info tab of the Contact Information page.
If you have not enabled the country code feature, Intacct checks the user's contact information to see if the manually entered country name is either Mexico or Canada to determine. If so, Intacct uses either the Mexican or Canadian check format. If not, Intacct uses the standard US version.