Field descriptions: Current accounts
Related information
The following table describes each option on each tab on the Current account information page.
Details tab
Current account section
| Field | Description |
|---|---|
|
ID |
Enter a unique identifier that quickly reminds you of this account's purpose and differentiates it from other current accounts. After you save, this field cannot be edited. Learn best practices for Name and ID creation. This field is required for bank file payments. About bank files. |
|
Account number |
Enter the account number for this bank account. This is the account number that's found at the bottom of the cheque. Avoid changing the account number because you’ll need to retain bank account information for auditing purposes. Instead, create a different current account and change the status of the original current account to Inactive. If you use this account to pay for your Sage Intacct services, you can't change the Account number. This field is required for bank file payments. About bank files. |
|
Bank name |
If you have more than one account at this bank, include something descriptive in the name, such as "Wells Fargo-Payroll Checking". Learn best practices for Name and ID creation. This field is required for bank file payments. About bank files. |
|
Name on the account |
The official name that the bank has on file for the current account (not the Account ID). For example, Acme Inc. might be the name on file at your bank for an account. This field is required for bank file payments. About bank files. |
|
Routing number |
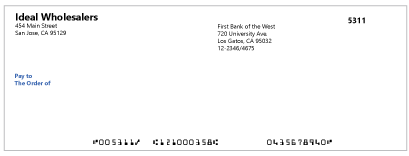
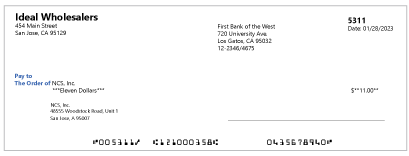
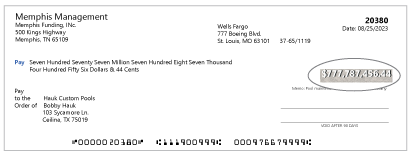
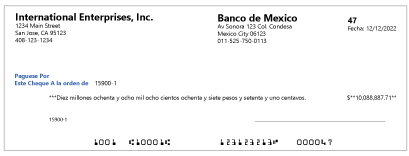
An account number and routing number are needed for issuing payments from this account, regardless of the payment method. If you’re printing on blank cheque stock, the routing number is a 9-digit number printed at the bottom of the cheque. If you're uncertain what your routing number is, contact your bank. |
|
Find this number at the top of your cheque, above the area where you write the date. This is where you can enter a transit fractional number to print on blank cheque stock. |
|
|
Country |
Enter the country where the bank is located. This field is required for bank file payments. About bank files. |
|
Address line 1 |
Enter your bank's address. |
|
Address line 2 |
Enter your bank's address. |
|
Address line 3 |
Enter your bank's address. |
|
City |
Enter the city where the bank is located. |
|
State or territory |
Enter the state or territory where the bank is located. This field is populated with a list of states, provinces, or territories based on the country selected above. |
|
Postal code |
Enter the postal code of the bank. |
|
Phone number |
Enter the phone number of your bank branch. |
|
Status |
To hide an account that you're no longer using from menus and dropdown lists, select Inactive. If you use this account to pay for your Intacct services, you can't select Inactive. Records designated as Inactive do not appear in the list by default. To view these records, select Filters at the top of the list and select Remove next to the Status filter to remove it. To view inactive bank accounts in lists, select Include inactive. |
|
Currency |
This field is required for multi-currency companies and cannot be edited. The default is the base currency under the assumption that most bank accounts are relatively local. However, if you deal with foreign banks, choose their currency instead. For information about adding a transaction currency, see Customize or edit a currency. When using bank files to make payments, make sure that the Currency field matches the Country field. For example, if you select United Kingdom, you would select GBP as the currency for the current account. |
Reconciliation match sequence section
| Field | Description |
|---|---|
|
Match sequence |
Select a match sequence for reconciliation. This is a document sequence that tracks matches in reconciliation. For example, if you match one bank transaction and two Intacct transactions, all three transactions are assigned to the same sequence. Sequences are alphabetic. Learn more about reconciliation match sequences. |
|
Require match sequence for |
Choose whether to assign a match sequence to automatically matched transactions, manually matched transactions, or both. Automatically matched transactions: Require a match sequence only for transactions that were matched automatically with a rule set. Manually matched transactions: Require a match sequence only for transactions that were manually matched. |
Accounting information section
| Field | Description |
|---|---|
|
GL account |
After you save, this field cannot be edited. How you assign GL accounts determines how and where an account can be used. Use a unique GL account. You cannot save the account in the following situations:
|
|
Default payables GL journal Default receivables GL journal |
To record payments (and transfers) you make out of the account and deposits (and transfers) into the account, select a journal. The default is the same journal used for Accounts Payable payments, which you can change on the Configure Accounts Payable page. If you selected dual-method reporting, choose a journal that's both cash and accrual. Whether you’re disbursing or depositing funds, the transaction must be entered in both journals. |
|
Service charge GL account Interest earned GL account |
These fields are used only for reconciliation. During reconciliation you can enter service charges (and other fees), and interest. Typically, you post these items to the same account. You can choose a default account for them so that you can track them separately, and not have to specify their account manually during reconciliation. However, this is not a required field, and you can enter the account manually during reconciliation. You can also override a default account that you do set here later when you enter these transactions in the reconciliation process. |
|
Department ID Location ID |
If your company uses them, you can select a department and location combination to default for GL posting. Depending on your company, a location might be required to enforce balancing of associated journal entries. Learn more about dimension settings in the General Ledger. After you save, this field cannot be edited. |
|
Last reconciled balance Last reconciled date |
These read-only fields show the results of your last reconciliation for the account. If you've never reconciled the account, these fields are blank. |
|
Cut-off date |
Enter the date after which reconciliation can begin. This field appears for accounts that have never been previously reconciled in Intacct and is removed after the first reconciliation. |
|
Applied rule set |
The rule set this account uses to match incoming transactions for reconciliation from a bank feed or import file. You can't reconcile an account with a bank feed or import file without a rule set. Learn more about rule sets. |
|
Banking cloud time zone |
Determine the time stamp for transactions generated from creation rules and incoming bank feed transactions. If you do not set a banking cloud time zone, the time zone on your My preferences page is used. If there's no time zone specified on the My preferences page, the time zone on the Company information page is used. |
|
Disable inter-entity transfers |
For multi-entity shared companies when inter-entity transfers (IET) are enabled. Prevents inter-entity transactions from being created in the General Ledger for subledger transactions. Transactions for this account that are entered directly in the General Ledger still create inter-entity transactions. |
|
Reconcile |
This link takes you to the Reconciliation page for this account, if it has not been reconciled. |
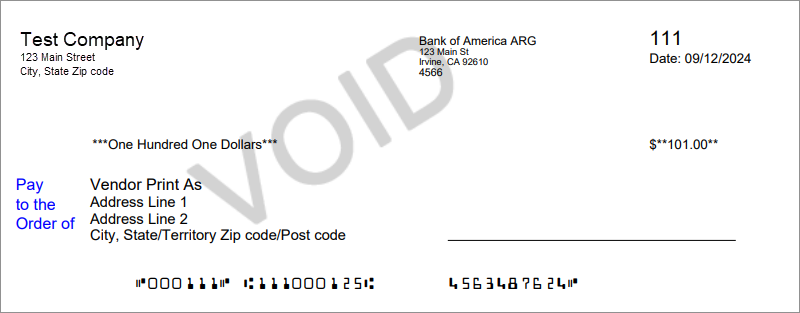
Cheque printing tab
Learn how to set up to print cheques.
| Field | Description |
|---|---|
|
Print on |
Select the cheque stock to use when you print cheques from this current account. Select one of the following:
|
Company address section
| Field | Description |
|---|---|
|
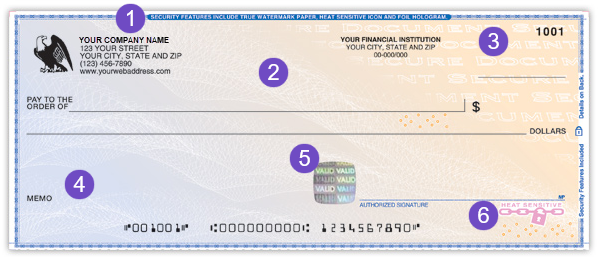
Print company address |
Select whether to print a company address on your cheques. If you have preprinted cheque stock that already includes your address, or have blank cheque stock and you do not want to show your address, leave this checkbox clear. Multi-entity shared companies: if no address is found, we use the address of the entity contact selected on the Entity Information page. |
|
Company address |
If Print company address is selected, select which address to print on cheques from this current account. Select one of the following:
|
Company logo section
| Field | Description |
|---|---|
|
Print logo |
Select whether to print a logo on the upper left of cheques, The logo aligns with the top of your company address, 10 pixels to the left. If you have preprinted cheque stock that already includes a logo, or have blank cheque stock and you do not want to include a company logo, leave this checkbox clear. Learn more about check logos and requirements. |
|
Company logo |
When Print logo is selected, select Upload logo to select a logo to use on printed cheques. |
|
Remove company logo |
If you uploaded a logo to print on cheques from this current account, select this checkbox then select Save to remove the logo. |
Signatures section
| Field | Description |
|---|---|
|
1st signature Upload signature |
By default, signatures are not included on blank or preprinted cheque stock. Upload a signature to print on cheques. Or, print a cheque with a blank signature line. If the person who is printing cheques has uploaded a signature to their Preferences page, that signature overrides the 1st signature uploaded on the Check printing tab. Cannot see the Upload signature option?
If you're creating a new current account, this option only appears after you save the account for the first time. |
|
Remove signature |
If a signature has been uploaded and you want to remove it, select Remove signature and then select Save. If you have removed a signature and it's still appearing on printed cheques, see Can't edit your signature? for tips. |
|
Print for amounts below |
Appears after you upload a signature. Enter the amount in the currency specified on the Details tab of the current account. A signature is printed on cheques with amounts less than the amount specified here. To print your digital signature on all cheques, leave this field blank. |
|
Use signature only with providers |
This option is only visible if the company uses Supplier Payments powered by CSI. Select to only use the uploaded signature for cheques sent through a payment service. This allows you to print cheques and sign them manually when not using Vendor Payments. |
|
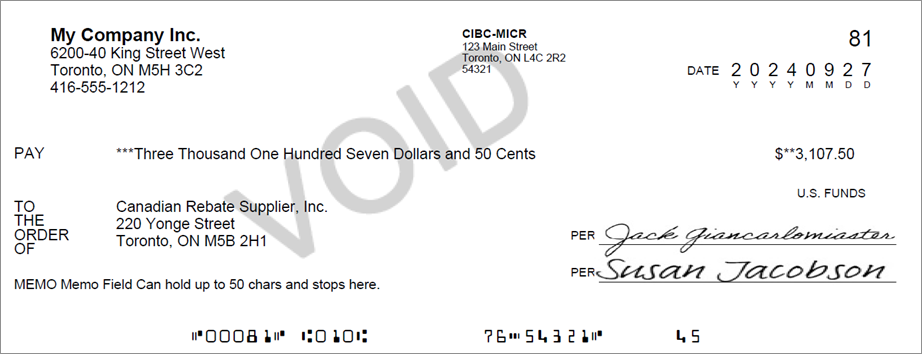
Use 2-signature cheques |
Select this option to require cheques to have 2 signatures and select Save. Return to the Cheque printing tab of your current account to enter an Amount requiring 2nd signature and Upload signature. |
|
Amount requiring 2nd signature |
|
|
Use one signature only with providers |
This option is only visible if the company uses Supplier Payments powered by CSI. Select this checkbox to only use the signature for cheques sent through a payment service. This allows you to print cheques and sign them manually when not using Vendor Payments. |
|
2nd signature Upload signature |
By default, signatures are not included on blank or preprinted cheque stock. Select Upload signature to upload a 2nd signature to print on cheques. |
|
Remove signature |
If a signature has been uploaded and you want to remove it, select Remove signature and then select Save. If you have removed a signature and it's still appearing on printed cheques, see Can't edit your signature? for tips. |
|
Print for amounts below |
Enter an amount below which cheques are printed. |
Print settings section
| Field | Description |
|---|---|
|
Next cheque no. |
Enter a starting cheque number, such as 1001. For each succeeding cheque you print, the cheque number increments by 1, so the next cheque printed will be numbered 1002, 1003, etc. To override, type in a new next cheque number in this field. Succeeding cheque numbers will increment starting with whatever number you enter. You can override Intacct at any time on the Print Cheques page. |
|
Printing format |
The options change depending on the check stock that you select.
|
|
Paper format |
Select the appropriate position for your cheques. This determines where the cheque prints on the three-part form. More specifically, you can print the cheque on the top, middle, or bottom panel. |
|
Print line-item detail on cheque stubs |
Additional fields by default to the non-remittance panel of the cheque. These fields include columns for the account, department, and location of each line item. You can generate up to 18 line items per page in either summary or detail mode. Learn more about printing extra information on check stubs. |
|
Print these location details on the cheque stub |
|
|
Additional text |
Enter optional text to appear under the signature line of the cheque. For example, "Void After 60 Days." |
|
Print preview |
Select One or Three then select Print to see how the checks will look when printed. |

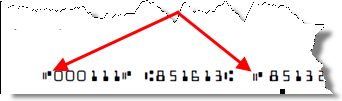
Magnetic Ink Character Recognition (MICR) section
MICR format is a widely adopted bank standard for blank cheque stock. MICR format standardizes the appearance of the routing, account, and other numbers at the bottom of every cheque. This section only appears if you select Blank cheque stock (MICR printer ink required) in the Print on section at the top of this tab.
If your bank requires a special horizontal alignment of the account number, you can change the alignment from right to left and, if necessary, nudge the account number left or right in increments of one space.
| Field | Description |
|---|---|
|
Account number alignment Account number positioning |
You do not need to change the default values for either of these settings unless your bank requests you do so. The entire PDF cheque image can be adjusted relative to the top-left corner of the sheet of cheque stock to correct for MICR misalignment due to your laser printer. Refer to MICR Code Alignment for step-by-step instructions on performing this adjustment. By default, the account number is right-aligned.
|
|
Cheque number length |
Use this box to pad the cheque number with zeros. For example, if your cheques are currently 6 digits and your current cheque number is 218 but you want the cheque number to be 7 digits, enter "7" . Your cheque number will be 0000218 in the MICR. The minimum number of digits is 6. For example, if your cheque number is 123456, and you enter "5" here, the MICR still prints as 123456. |
|
Regional settings for United States |
Some banks require the On-Us symbol to appear on the MICR line in front of the account number. The On-Us symbol looks like 2 short parallel lines and a solid rectangle.
If you’re uncertain which position to select, ask your bank for an MICR specification sheet, which specifies which position to use. |
|
Regional settings for Canada |
American and Canadian blank cheque stock formats differ slightly regarding their use of the MICR format. Canada requires that all US dollar cheque payments conform to the Canadian variation of the MICR format. Select:
Selecting either checkbox prints the associated transaction codes on the cheques. By default, both these checkboxes are clear. You can also apply this setting to any USD current account, regardless of the entity's base currency. Keep track of any MICR transaction codes that you configure. If you select multiple transaction codes that conflict with each other (for example, both use MICR line item #14), both codes print in that space. You do not receive any warning about possible conflicts. |
Bank file tab
Learn how to set up for standard ACH payments or how to set up bank file payments.
Enable setup section
| Field | Description |
|---|---|
|
Enable ACH payments |
Select this option to enable your bank account to make standard ACH payments. After you select this option, the ACH setup section appears where you can provide a routing number, account number, and specify an account type. |
|
Enable bank file payments |
Enables international bank accounts for use with bank file payments. |
|
None |
This is the default option. No ACH or bank file payments are enabled. |
ACH setup section
| Field | Description |
|---|---|
|
ACH bank ID |
The ID of the bank record associated with this bank account. Learn more about ACH bank configuration. |
|
Company name |
Prefilled with your company name, as specified on the ACH Bank record. If you’ve more than one current account with the bank, the bank might request that you enter a different company name for each account. This is the name that appears on the recipient's bank statement. |
|
Company identification |
Prefilled with your 10-digit company ID (including hyphens), as specified in the ACH Bank record. If you’ve more than one current account with the bank, the bank might request that you enter a different ID for each account. |
|
Originating financial institution |
Prefilled with the first 8 digits of your bank's routing number, as specified in the ACH Bank record. You do not need to change this number. |
|
Company entry description |
Optional text (up to 10 characters) that can be included with payments. Some banks might require that this field be left blank. |
|
Company discretionary data |
Type in up to 20 characters of additional information. Typically this will consist of codes that describe any special handling of entries in this summary payment. These codes will be unique to your bank. |
|
Payment numbering setup |
Select Use recommended setup to enable Intacct to generate the most common type of ACH payment file (service class code 220) and automatically set up numbering sequences for standard ACH payments. To override the default numbering sequences, clear the Use recommended setup checkbox, then make your changes in the fields that appear. Bank uses service class code 200 for ACH payments
Most banks expect to receive files that use service class code 220, which is a type of ACH payment file that contains only payments (credits). If your bank requires service class code 200, a format that allows both credits and debits, clear the Use recommended setup checkbox. From the Service class code dropdown list, select 200 (credits only). Service class 200 will be used for compatibility with your bank, but the payment file will continue to contain only credits. |
|
Batch number |
Required if the Use recommended setup checkbox is cleared. Unique numbering sequence used to automatically number payment batches. Numbers must be 7 digits with no prefixes or suffixes. When creating the Sequence ID, incorporate the bank name (such as "MyBank_ACH_Batch") to distinguish this batch from other batches. |
|
Trace number sequence |
Required if the Use recommended setup checkbox is cleared. Created by concatenating the bank's routing number with a unique numbering sequence. Numbers must be 7 digits with no prefixes or suffixes. You can use the same pattern as for summary numbers, but be sure to create a unique sequence with a different Sequence ID, such as "MyBank_ACH_Payment". |
|
Payment number sequence |
Required if the Use recommended setup checkbox is cleared, but you can re-use the trace number. You can create a unique payment number sequence to post confirmed payments to AP. Or, you can choose to use the same number sequence that you selected for the trace number. |
Bank file setup section
For companies subscribed to Sage Cloud Services and enabled for bank file payments. The fields in this section vary depending on the country selected on the Details tab.
Learn how to set up for bank file payments.
Australia
| Field | Description |
|---|---|
|
Bank file format |
Choose the bank file format of the bank that is associated with this current account. Sage Intacct supports bank file payments for 92 Australian banks. Generic bank file formats:
Specific bank file formats:
Sage Intacct supports the use of both current and future multiple payment dates for payment requests sent to Australian banks, and generates a separate bank file for each payment date. Learn more about About bank files. |
|
Bank code |
|
|
APCA number |
Enter the unique six-digit number that identifies the company or individual. The APCA number is used by Australian banks to make direct payments. |
|
BSB number |
Enter the six-digit number used to identify the particular branch of the Australian bank, three digits, followed by a hyphen, and three more digits. |
South Africa
| Field | Description |
|---|---|
|
Bank file format |
Choose the bank file format of the bank that is associated with this current account. Sage Intacct currently supports the following banks in South Africa:
Learn more about About bank files. |
|
User nominated branch |
Enter the six-digit Standard Bank branch code for the account from which payments are made. |
|
Branch code |
Enter the six-digit Standard Bank branch code for the account from which payments are made. |
|
Debit account branch code |
Enter the six-digit FNB bank account branch code from which payments are made. |
|
NedBank seed value |
Enter the 32 character NedBank seed value for the account from which payments are made. |
|
From branch code |
Enter the six-digit ABSA branch code for the account from which payments are made. |
|
User reference |
Enter the reference that's used on bank statements. This is a 10 character value that's supplied by Standard Bank. The format of this code is SBXXSHRTNA, composed of the following:
|
|
Client user code |
Enter the user code that identifies the client to Standard Bank. This field can either contain the ACB code provided by Bankserv or a user defined code that is mapped to the ACB code by Standard Bank. The value provided in this field must match the user code linked to your profile on Business Online. |
|
Type of service |
Select the type of Standard Bank BEFT service to use. |
United Kingdom
| Field | Description |
|---|---|
|
Bank file format |
Choose the bank file format of the bank that is associated with this current account. Sage Intacct supports the following banks in the United Kingdom:
Learn more About bank files. Important notes regarding UK payment dates:
|
|
Debit sort code |
A six-digit number identifying the bank and branch where the current account is held. This field is only displayed for those banks that require it. |
|
Service user number |
Optional. A unique identifier for organizations that collect payment with bank files. The service user number, together with the bank file, creates a record of the transaction. This optional field is displayed only when selecting the HSBC file format. For HSBC customers only. |
Banking cloud tab
Learn how to connect an account to a bank feed.
| Field | Description |
|---|---|
|
Connect |
Start the process of connecting your account in Sage Intacct to your online banking system. Learn about bank feeds. |
|
Intacct |
The bank account record information that exists in Sage Intacct. |
|
Banking cloud |
The name of the online bank account to which the account in Sage Intacct is connected. Bank feed transactions are downloaded from this online account. |
|
Last bank feed |
The date of the most recent bank feed refresh for this account. |
|
Last transaction date |
The date of the last transaction received from the most recent bank feed. Are you missing bank feed transactions? |
|
Last reconciliation type |
How you reconciled previously. For example, you used an import file or bank feed to bring in bank transactions and match them for reconciliation. |
|
Status |
The status of the account's connection to a bank feed. Create a custom view on the account list page to view the status of each account's bank feed connection. When creating the custom view, include the Bank feed status column. |
|
Refresh |
Refresh bank feed data for this account. |
|
Confirm |
This option appears after you select an online bank account to connect to. Check to make sure that you selected the correct account before you select Confirm. To select a different account, select Cancel. For some connections, this cancellation process can take some time. |
|
Cancel |
Appears before your bank account connects to Sage Intacct. Select to cancel the attempted connection. For some connections, this cancellation process can take some time. |
|
Edit login information |
If your login information has changed at your bank, edit that information here to maintain your bank feed connection. |
|
Reauthorize |
The bank might require you to reauthorize your account. You'll know if you need to reauthorize if you have a status of Auth required. |
|
Disconnect |
Only disconnect a bank feed in the following scenarios:
If you disconnect and change your mind, the reconnection process can take weeks to complete. If you're having trouble refreshing a bank feed, do not disconnect the bank feed. Instead, wait until you see a bank feed status of Partial success or Failed and refresh the bank feed. If you do decide to disconnect an account, Sage Intacct removes any unreconciled and unmatched bank feed transactions for that account. Any matched transactions become unmatched and the bank transactions are removed from Sage Intacct. After you select Disconnect, your bank is alerted that you want to stop receiving a bank feed. The rest of the disconnection process depends on actions by the bank. Depending on the type of connection, if yours is an AUS or UK bank, this process can take some time. For security reasons, we wait up to 5 days after the bank disconnects until we update the bank feed status. The entire disconnection process can take up to a few weeks. Learn how to troubleshoot bank feeds. |
Bank transactions section
This section is only visible if your account is connected to a bank feed, and you selected View from the account list. This section does not appear in Edit mode.
If you have the proper permissions, you can create Sage Intacct transactions and manually match transactions for reconciliation from this tab.
Filters section
| Field | Description |
|---|---|
|
State |
Transaction states include:
Make sure to select Apply filters to view transactions. |
|
Transaction type |
Select to view Checks and debits or Deposits and credits. |
|
Bank amount |
This filter appears on the Bank tab on the Reconcile credit card account page. |
|
Cheque or doc no. range |
To set a range by which to display transactions, in Chequeor doc no. range select >=, =, or >, then enter a bottom-of-range amount in the second field. In the next field select <= or <, then enter a top-of-range amount in the last field. |
|
Cheque or doc no. |
The cheque number, reference number, or document number of the transaction. |
|
Date range |
To set a range of transaction dates by which to display transactions, in the first Date range field, select the calendar icon and select a start date. Then, select the second calendar icon and select an end date in the second field. |
|
Payee |
Filter for the supplier or customer related to a transaction. |
|
Description |
|
|
Bank amount range |
Display a range of AP supplier invoices by amount. Select >=, =, or >, then enter a bottom-of-range amount in the second field. In the next field select <= or <, then enter a top-of-range amount in the last field. |
|
Amount |
Enter a specific amount to find the associated transaction. |
Bank transactions list
| Field | Description |
|---|---|
|
Date |
The date the transaction posted to the bank. |
|
Match sequence |
The match sequence of the transaction. |
|
Last reconcile |
|
|
Cheque no. or doc no. |
The cheque number, reference number, or document number of the transaction. |
|
Bank amount |
The total amount of the transaction. |
|
Amount to match |
The amount remaining to match for this transaction in reconciliation. |
|
Payee |
The supplier or customer associated with the transaction. |
|
Description |
Filter by a description entered on the bank transaction. |
|
Txn type |
For bank accounts, the transaction types can be: Deposits/Credits and Cheques/Debits. For credit card accounts, the transaction types can be: Charges and Payments. |
|
Currency |
The currency of the transaction. |
|
Payee |
The supplier or customer related to the transaction. |
|
Txn curr. |
The currency in which the transaction was created. |
|
Txn amount |
The amount of the transaction. |
|
Match |
Manually match the transaction to a transaction that already exists in Sage Intacct. |
|
Action |
Create Intacct transactions to match to a bank feed transaction for reconciliation. |
Restrictions tab
Learn how to set up account restrictions.
| Field | Description |
|---|---|
|
Unrestricted |
Make this account available to the top-level company and all entity-level locations. This is the default. |
|
Restricted to top level only |
Make this account available to only the top-level company. |
|
Restricted |
Only locations or location groups that you specify can access this account. After you select this option you can add or remove locations that can access this bank account using the Locations or location groups option. You can't remove a location restriction if the location is set as the owner location for the account, or if this bank account is configured as the default bank account. |
Payment providers tab
Supplier Payments powered by CSI section
| Field | Description |
|---|---|
|
Enable account for Supplier Payments powered by CSI |
Enable the bank account for use by CSI. |
|
Rebate account |
Set this current account as the account that you want CSI to deposit your earned rebates into. You can only have one current account as your rebate account at a time. |
|
Cheque start no. |
Enter a starting cheque number for cheques sent by CSI. |
|
Email address for remittances |
The email address for your company that should be included in the supplier remittances sent by CSI. |
Supplier Payments powered by MineralTree section
| Field | Description |
|---|---|
|
Enable account for Supplier Payments powered by MineralTree |
Enable the bank account for use by MineralTree. |
|
Rebate account |
Set this current account as the account that you want MineralTree to deposit your earned rebates into. You can only have one current account as your rebate account at a time. |
|
Cheque start no. |
Enter a starting cheque number for cheques sent by MineralTree. |
|
Email address for remittances |
The email address for your company that should be included in the supplier remittances sent by MineralTree. |
Current accounts list
| Field | Description |
|---|---|
|
ID |
The unique identifier that quickly reminds you of this account's purpose and differentiates it from other current accounts. After you save, this field cannot be edited. |
|
Account number |
The account number for this bank account. The account number is a 10-digit number found at the bottom of the cheque. Avoid changing the account number because you’ll need to retain bank account information for auditing purposes. Instead, create a different current account and change the status of the original current account to Inactive. If you use this account to pay for your Sage Intacct services, you can't change the Account number. |
|
Bank name |
The name of the bank. If you have more than one account at a bank, include something descriptive in the name, such as "Wells Fargo-Payroll Current". |
|
Currency |
The currency at the bank. This field cannot be edited. The default is the base currency of your company under the assumption that most bank accounts are relatively local. However, if you deal with foreign banks, choose their currency instead. For information about adding a transaction currency, see Customize or edit a currency. When using bank files to make payments, make sure that the Currency field matches the Country field. For example, if you select United Kingdom, you would select GBP as the currency for the current account. |
|
Bank transactions |
Select to view transactions received from a bank feed for this account. |
|
Pending reconciliation |
Select to view the Pending reconciliation report for this account. |
|
Reconcile |
Brings you to the Reconcile bank account page where you can begin a reconciliation or continue matching transactions and finalize the reconciliation. |
|
Reconciliation history |
Select to view the Reconciliation histories page where you can view a Reconciliation report, an Outstanding items report, and, with the proper permissions, reopen a reconciliation. |