Journal and journal entry mapping
Related information
Here you define the rules for journal entries created in Salesforce before they’re synced to Intacct. You can define both standard journal entries and statistical journal entries.
Create a journal entry mapping
You use journal entry mapping to create journal entries from Opportunities.
To create journal entry mappings:
- Log in to Salesforce as an administrator.
- Go to the Intacct Configuration tab in the Intacct Advanced CRM Integration application.
- Select the Intacct Synchronization tab.
- Select Journal Entry.
This section is only available if you enabled Intacct General Ledger sync. - In the Journal and Journal Entry Mapping section, select New.
- Enter Mapping Details, Grouping Details, Journal Entry, and Journal Entry Line mappings and Save your changes.
Mapping details
The following fields are in the Mapping Details section of the Journal Entry Mapping dialogue. Based on the selections you make, other areas of the journal mapping controls become available for use.
| Field | Description |
|---|---|
| Mapping Name | Unique name to identify the mapping. |
| Journal Entry Source Object | Salesforce object that will be the source for generating the journal entry. |
| Dimensions | The default Dimension Group used for this mapping. |
| Opportunity Record Type | Use the dropdown menu to filter Opportunities by record type. Only the selected record type is used with this mapping. |
| Journal Entry Line Source Object | The Salesforce object that will be the source for generating the journal entry lines. This field is not required. |
| Look up field to parent object | Based on the Journal Entry Line Source Object you choose, the look up fields are the reference fields on selected object records. |
| Child Object Field Reference (debit) | The field used to store references to the Journal Entry Line’s debit value. This line is automatically created when you select the Journal Entry Source Object. |
| Child Object Field Reference (credit) | The field used to store reference to the Journal Entry Line’s credit value. This line is automatically created when you select the Journal Entry Source Object. |
| Use this mapping in scheduled jobs | When selected, the journal entry mapping is included in scheduled jobs. |
| Enable grouping for this mapping | When selected, you can add Grouping Details to this journal entry mapping. |
| Is Statistical | Select this checkbox when mapping Statistical Journals, Statistical Journal Entries, and Statistical Journal Entry lines. |
| Do not apply defaults... | When selected, defaults are not applied for mapped fields if the Source Object value is blank. |
Grouping details
The Grouping Details section offers useful methods for consolidating Salesforce source objects into journal entries and journal entry lines.
In Journal Entry Grouping, choose the fields that you intend to use with the Salesforce job scheduler or mass synchronization tool. The selected fields help to consolidate transactions into a single journal entry. For example, you could consolidate all Opportunities generated on the same day to a single journal entry.
In Journal Entry Line Grouping Credit, choose the fields to consolidate source journal line transactions, even if they’re related to a single source transaction.
In Journal Entry Line Grouping Debit, choose fields to consolidate source journal line transactions, even if they’re related to a single source transaction.
Consolidating Salesforce objects into journal entries and lines is useful when the dimensions you need to track vary at the Payment but not the Opportunity.

Journal entry and journal entry line mappings
The Journal Entry and Journal Entry Line sections allow you to:
- Apply filters to source transactions to include in the journal entry creation process.
For example, you can filter journal entries by the Stage field, with a value equal to Closed Won. Only those journal entries that fit this criteria are included in the journal entry mapping outcomes. - Define custom field-mappings for additional data that you want to include on the journal entry.
For example, you can map the transaction amounts to the Journal Entry line debits and credits fields using the mapping tools here.
- Description fields (TextArea) in Intacct are limited to 999 characters. Salesforce accepts 32,000 characters. If the Salesforce field contains more than 999 characters, the field content is truncated when synced with Intacct.
- Debit and credit amount fields (Currency) in Intacct support 10 digits and 8 decimal places. Salesforce supports a 16 digit and 2 decimal places format.
Example of a journal entry mapping
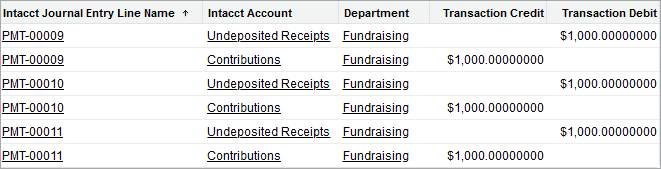
You have an Opportunity with 3 related payment records, and you want to use the related payment records as the source for a journal entry. There are several ways that you can use journal entry mapping to create journal entries for this Opportunity.
A single journal entry can be created using the Opportunity as the journal entry header, and the 3 payment records as the journal entry lines. Each payment has its own line, and you can use grouping to consolidate payments with similar dimensions.
Journal Entry Source Object: Opportunity
Journal Entry Line Source Object: Payment records
The resulting journal entry could look like this:
Use just the source transaction object (an Opportunity in this case) with a rollup summary field totaling payment amounts to create a simpler journal entry.
Journal Entry Source Object: Opportunity
Journal Entry Line Source Object: None (left blank)
The resulting journal entry could look like this:

Multiple journal entry mappings can be grouped together to create multiple journal entry transactions and different account postings. For example, to record the Opportunity amount as a Receivable in Intacct, and then over time receive payments as individual transactions.
To group mappings together, your first journal entry mapping uses the Opportunity record and a Default Dimension Group to post to your Receivables account.
Journal Entry Source Object: Opportunity
Journal Entry Line Source Object: None (left blank)
The resulting journal entry could look like this:

When a payment is received, use a Process Builder flow to create a journal entry automatically. Use a different journal entry mapping that moves Receivables to a Cash account.
Journal Entry Source Object: Payment
Journal Entry Line Source Object: None (left blank)
The resulting journal entry could look like this:

Create and schedule journal entry jobs
Intacct recommends you use the scheduler tool to automate the task of syncing journal entries. You can design a schedule that's right for your company.
Create a journal entry job
To create a journal entry job:
- Log in to Salesforce as an administrator.
- Go to the Intacct Configuration > Intacct Synchronization tab and select the Journal Entry sub-tab.
- In the Create Journal Entries Job section, select Schedule.
- Enter the following and select Schedule Job.
| Field | Description |
|---|---|
| Job Name | The name of the journal entry creation job. The name must be unique. |
| Frequency | Use the dropdown menu to select the frequency with which to create journal entries. |
| Recurs every week on | Select the days of the week that you want journal entry creation to repeat. |
| Preferred start time | Select the time at which you would like the scheduled job to start. |
When scheduled, new journal entries are created and synced to Intacct.
Schedule journal entry syncs
Intacct also recommends you schedule journal entry synchronization with the scheduler tools. You can use the filter options to select which journal entries to sync.
For example, you can filter for Sync with Intacct equals False to sync journal entries that have not yet been synced to Intacct.
To schedule journal entry syncs:
- Log in to Salesforce as an administrator.
- Go to the Intacct Configuration > Intacct Synchronization tab and select the Journal Entry sub-tab.
- In the Sync Journal Entries Job section, select Schedule.
- Enter the following and select Schedule Job.
| Field | Description |
|---|---|
| Job Name | The name of the journal entry sync job. The name must be unique. |
| Frequency | Use the dropdown menu to select the frequency with which to sync journal entries. |
| Recurs every week on | Select one or more days of the week that you want the journal entry sync to repeat. |
| Preferred start time | Select the time at which you would like the scheduled job to start. |
| Add Filter |
Select Add Filter to apply a filter to your journal entry sync job.
Select Add Filter again to add more filters. |
Other methods for creation and sync of journal entries
There are 3 alternative ways to create or sync journal entries in Salesforce.
Buttons on page layouts
Included in the Advanced CRM package in Salesforce is the Create Journal Entry button that can be placed in your page layout for the opportunity record. This button is used to create a journal entry from the Opportunity.
For example, to create Create Journal Entry buttons on other objects you could use this button configuration:
- Display Type: Detail Page Button
- Behavior: Display in existing window with sidebar
- Button or Link URL:
/apex/ia_crm__CreateJournalEntry?id={!Opportunity.Id}&recordTypeId={!Opportunity.RecordTypeId}
Go to Page layouts for more information.
Process Builder
The Salesforce Process Builder can be used to create or sync Intacct journal entries.
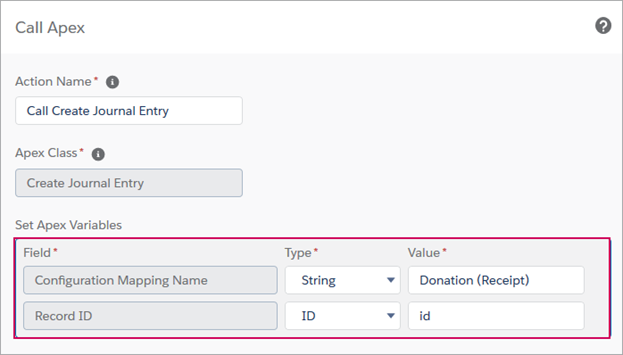
For example, to create a journal entry, add an action to your Process Builder workflow and set the following:
- Apex Class: Create Journal Entry
- Fields:
- Use a Configuration Mapping Name as the Journal Entry Mapping.
- Use a Record ID as the record ID to create the journal entry.
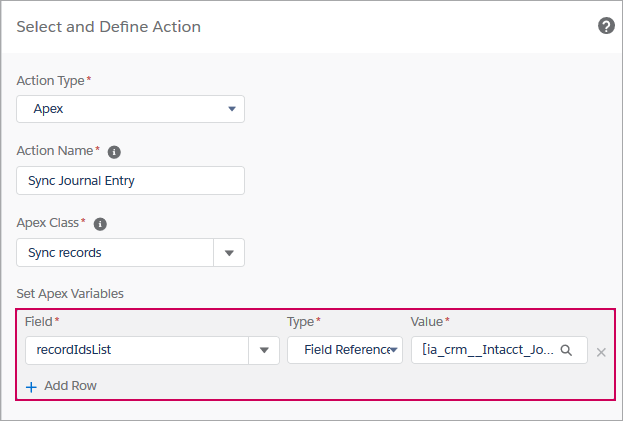
You can also sync journal entries using the Process builder. For example, to sync a journal entry to Intacct, add an action to your Process Builder workflow and set the following:
- Apex Class: Sync records
- Fields: Use recordIdsList as the record IDs of the Intacct journal entries to sync.
See Salesforce Process Builder for more information.
Intacct mass synchronization
The Intacct mass synchronization tool allows you to sync records and transactions to Intacct in bulk. The tool can be used to both create Intacct journal entries in Salesforce and sync journal entries to Intacct.
You can use filter options to select a subset of the transactions to sync.
For example, you could sync journal entries to Intacct that have previously encountered sync errors. When the cause of the sync error is corrected, you initiate a re-sync of all transactions that failed with the Intacct mass sync tool.
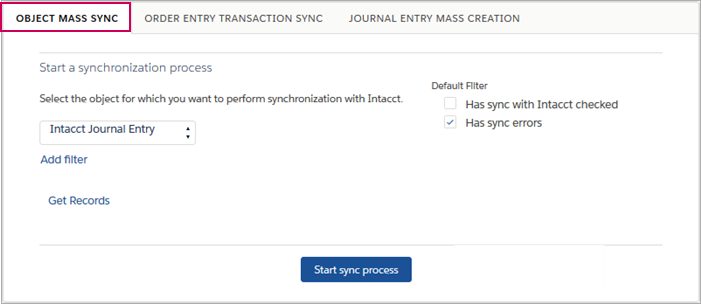
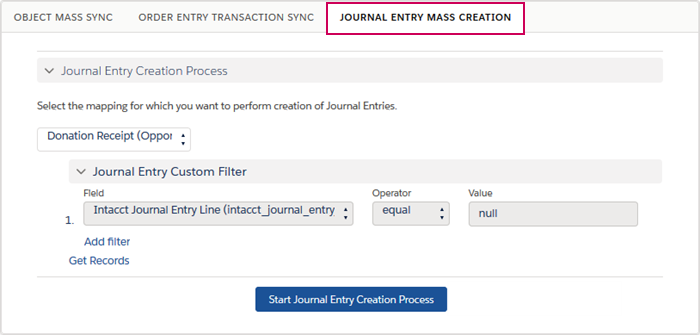
To create Intacct journal entries using the Intacct mass sync tool, use the Journal Entry mass creation tab. Filter the source reference field for Intacct journal entry line records. A blank value in this field indicates that the record hasn't been used to create a journal entry before.
In this topic